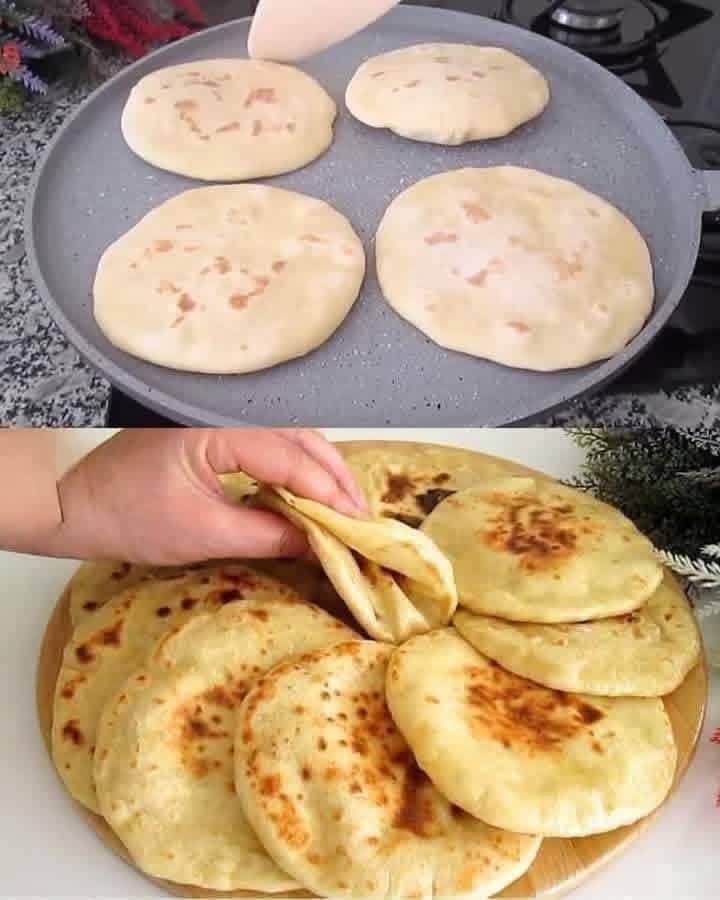
Authentic Moroccan Batbout Recipe Ultra Soft Stovetop Flatbread
There is nothing quite like the irresistible aroma of freshly baked bread filling the kitchen, especially when that bread is homemade Moroccan Batbout. Also known as Mkhamer or Meloui in various regions of North Africa, Batbout is a beloved stovetop flatbread celebrated for its pillowy softness, airy interior, and incredible versatility. Unlike traditional baked loaves that require a conventional oven, Batbout is cooked entirely on a hot dry skillet, griddle, or heavy-bottomed pan. This traditional technique produces a soft, slightly chewy bread with golden brown spots that naturally puffs up as it cooks, creating a hollow center ideal for stuffing with sweet or savory fillings.
Whether you are exploring North African cuisine for the first time or searching for an easy, foolproof bread recipe to complement your daily meals, Batbout is the perfect addition to your culinary repertoire. Made with simple pantry staples like fine semolina, flour, yeast, and warm water, this pocket bread comes together with minimal effort and yields rewarding results every time. In this ultimate guide, we will break down everything you need to know about crafting perfect, fluffy Batbout from scratch, including ingredient ratios, step-by-step techniques, stuffing ideas, and expert tips to ensure your bread puffs up effortlessly on the stovetop.
What is Moroccan Batbout?
Batbout is a staple of Moroccan culinary heritage, served across households daily and featured prominently during special occasions, family gatherings, and Ramadan break-fast meals (Iftar). It belongs to a broader family of pan-cooked flatbreads found throughout the Mediterranean and Middle East, but its distinct combination of fine wheat flour and fine semolina gives it a unique texture and rich golden hue that sets it apart from standard pita bread.
Cultural Significance and Heritage
In Morocco, bread is treated with immense respect and forms an integral part of almost every meal. Batbout holds a special place because of its speed and practicality; historically, when home ovens were rare and community bakery runs were saved for large sourdough loaves, quick stovetop flatbreads allowed families to make fresh, warm bread in a matter of minutes. Small, bite-sized versions (known as mini-Batbout) are frequently hollowed out and filled with spiced meats, tuna salad, or grilled vegetables, while larger disks are served alongside tagines, soups, or dipped in honey and melted butter.
Unique Characteristics of Batbout
What makes Batbout truly special is its dual texture: a slightly golden, toasted exterior wrapped around a cloud-soft, tender crumb. Because it is cooked directly on a hot griddle, steam builds up rapidly inside the dough disk during cooking. This sudden surge of heat causes the dough to balloon up, separating the top and bottom layers to create a natural pocket without the need for pockets to be manually carved out.
Key Ingredients for Perfect Homemade Batbout
Creating bakery-quality Batbout at home requires only a handful of basic ingredients. Understanding the role each component plays ensures your dough achieves the ideal elasticity and tenderness:
- Fine Semolina (Smida Rqiga): Semolina gives Batbout its signature golden color, pleasant subtle crunch, and hearty flavor. Be sure to use fine semolina rather than coarse semolina or semolina flour, as coarse grains can make the dough heavy and prevent proper puffing.
- All-Purpose Flour or Unbleached White Flour: Combining all-purpose flour with semolina softens the dough matrix and provides the necessary gluten structure for elasticity and steam retention.
- Active Dry Yeast or Instant Yeast: Yeast is the fermenting driver that creates carbon dioxide bubbles in the dough, allowing the bread to rise gently during proofing and expand rapidly when hit with stovetop heat.
- Warm Water: Water acts as the liquid binder that hydrates the flour proteins and activates the yeast. It is critical that the water is lukewarm (around 100°F–110°F or 38°C–43°C) so it stimulates fermentation without killing the yeast.
- Salt: Enhances flavor and tightens the gluten network for better dough handling.
- Sugar or Honey (Optional): A small pinch feeds the yeast and promotes beautiful browned spots on the crust during cooking.
- Olive Oil or Vegetable Oil (Optional): A splash of oil added to the dough increases crumb moisture and keeps the cooked bread soft for days.
Step-by-Step Instructions: How to Make Soft Batbout
Step 1: Activate the Yeast and Mix the Dough
In a large mixing bowl or the bowl of a stand mixer fitted with a dough hook, combine 1 cup of fine semolina, 2 cups of all-purpose flour, 1 tablespoon of active dry yeast, 1 teaspoon of sugar, and 1 teaspoon of salt (keeping salt slightly separated from the yeast initially). Pour in approximately 1 to 1.25 cups of warm water gradually while mixing on low speed or working with your hands.
Step 2: Knead for Elasticity
Knead the mixture continuously for 8 to 10 minutes by hand (or 5 to 7 minutes in a stand mixer). The dough should transform from sticky to supple, smooth, and slightly elastic. If the dough feels too stiff, add a tablespoon of warm water at a time; if it feels excessively sticky, dust in a sprinkle of flour. The final dough should be soft to the touch without sticking heavily to your fingers.
Step 3: First Proofing
Form the dough into a smooth ball and place it in a lightly oiled bowl. Cover the bowl with a clean kitchen towel or plastic wrap and set it in a warm, draft-free spot for 30 to 45 minutes, or until it doubles in size.
Step 4: Portion and Shape
Punch down the risen dough to release trapped gas bubbles. Divide the dough into equal portions depending on your preferred size: 8 to 10 equal balls for medium sandwiches, or 16 to 20 small balls for mini stuffed appetizers. Roll each portion into a smooth, tight sphere on a work surface lightly dusted with fine semolina.
Step 5: Roll Out the Flatbreads
Take each dough ball and flatten it with a rolling pin or the palm of your hand into a flat circle roughly 1/4-inch (0.5 cm) thick. Dust lightly with fine semolina to prevent sticking. Avoid rolling the dough too thin, as overly thin dough will dry out on the pan instead of trapping steam to puff up.
Step 6: Second Proofing
Transfer the shaped dough rounds onto a baking sheet or clean kitchen towel lightly dusted with semolina. Cover them gently with a light cloth and allow them to rest for 15 to 20 minutes. This second rest relaxes the gluten and allows the yeast to generate fresh steam pockets before cooking.
Step 7: Cook on the Stovetop
Heat a heavy cast-iron skillet, non-stick pan, or traditional Moroccan Farah griddle over medium-high heat until hot. Do not add oil to the pan—Batbout is cooked on a completely dry surface. Place a dough circle gently onto the hot skillet. Cook for 30 to 45 seconds until small bubbles begin to form on the surface, then flip immediately using a spatula. Cook the second side for another 45 seconds to 1 minute. Flip a third time; you will see the flatbread begin to inflate like a balloon! Continue turning every 20 seconds until both sides are lightly golden brown and fully cooked through. Transfer cooked breads to a cloth-lined basket and cover tightly to trap steam and keep them moist.
Secrets to Getting the Perfect Batbout Pocket
While making Batbout is simple, achieving that signature high-rise balloon effect requires mastering a few key parameters:
1. Consistent Heat Control
Pan temperature is everything when making skillet flatbreads. If the skillet is too cool, the dough cooks slowly and dries out before steam can expand the center. If the skillet is smoking hot, the outside burns before the heat penetrates the center. Medium-high heat provides the rapid thermal shock needed to vaporize internal water into steam instantly.
2. Frequent Flipping Technique
The secret to an even puff lies in flipping early and often. Flipping the dough after the first 30 seconds seals both the top and bottom crusts. Once both outer surfaces are lightly set, the trapped internal moisture has nowhere to go except outward, forcing the bread to inflate into a hollow ball.
3. Dusting with Fine Semolina
Dusting your work surface with fine semolina rather than standard flour serves two purposes: it prevents dough from sticking to the rolling pin without toughening the dough, and it creates those characteristic crisp, golden speckles visible on traditional artisanal flatbreads.
Delicious Filling Ideas & Serving Options
One of Batbout’s best qualities is its suitability for both savory meals and sweet morning treats:
Savory Stuffed Batbout (Mini or Sandwich Style)
- Spiced Kefta (Ground Meat): Sauté ground beef or lamb with Moroccan spices (cumin, paprika, coriander, fresh parsley, and diced onions) and stuff inside warm Batbout pockets with garlic sauce and shredded lettuce.
- Tuna and Vegetable Salad: Mix canned tuna with sweet corn, diced boiled eggs, grated carrots, olives, and a touch of mayonnaise for a classic Moroccan street-food sandwich.
- Grilled Chicken & Garlic Sauce: Layer sliced marinated chicken breast with pickled cucumbers, tomato slices, and creamy garlic or harissa aioli.
Sweet Breakfast Pairings
- Warm Honey Butter Dip: Split warm Batbout open and drizzle generously with a traditional warm blend of equal parts melted butter and honey (Msemmen & Batbout syrup).
- Nut Butter & Preserves: Spread creamy almond butter, peanut butter, or fig jam inside for a comforting breakfast option.
Nutrition Information (Per Serving)
Here is an estimated nutritional breakdown for one medium homemade Batbout (recipe yields 8 servings):
| Nutrient | Estimated Amount |
|---|---|
| Calories | 165 kcal |
| Protein | 5 g |
| Total Carbohydrates | 33 g |
| Dietary Fiber | 2 g |
| Total Fat | 1 g |
| Saturated Fat | 0.2 g |
| Sodium | 290 mg |
Storage, Freezing, and Reheating Instructions
Batbout stores remarkably well, making it a great option for meal prep or batch baking:
Room Temperature Storage
Store cooled Batbout flatbreads in an airtight zip-top plastic bag or airtight container at room temperature for up to 3 days. Keep the container sealed tightly to prevent the bread from losing moisture.
Freezing Batbout
Allow the flatbreads to cool completely after cooking. Stack them with small pieces of parchment paper between each loaf to prevent sticking, then slide the stack into a heavy-duty freezer bag. Freeze for up to 3 months.
Reheating Methods
- Skillet Reheating (Best): Place frozen or room-temperature Batbout onto a warm dry skillet over medium heat for 1 to 2 minutes per side until heated through and pillowy soft again.
- Oven or Toaster Oven: Bake at 350°F (175°C) for 3–5 minutes.
- Microwave: Wrap a flatbread in a damp paper towel and microwave on high for 15 to 20 seconds for instant softness.
Frequently Asked Questions (FAQs)
Why didn’t my Batbout puff up on the skillet?
If your flatbread fails to inflate, the issue usually stems from three main causes: rolling the dough too thin (which damages the internal structure), over-proofing during the second rest (which weakens yeast pressure), or a skillet that isn’t hot enough. Make sure your pan is thoroughly preheated and flip the bread within the first 30–40 seconds of cooking.
Can I make Batbout using only all-purpose flour?
Yes! While traditional Batbout relies on fine semolina for authentic flavor and golden texture, you can replace the semolina with an equal weight or volume of all-purpose flour or bread flour. The resulting bread will be slightly lighter in color but equally soft and delicious.
Is Batbout the same as Pita bread?
While both are stovetop or oven pocket flatbreads, Batbout incorporates fine semolina into the dough and is cooked exclusively on a dry skillet, whereas middle-eastern pita is traditionally made with wheat flour alone and baked at extremely high temperatures inside a specialized oven.
Conclusion
Moroccan Batbout is a versatile, soft flatbread that brings warmth and comfort to any meal. With simple ingredients and a basic skillet, you can master this stovetop favorite at home in under an hour. Serve it fresh off the pan alongside your favorite soups, tagines, or savory fillings, and enjoy the delicious taste of homemade North African bread!