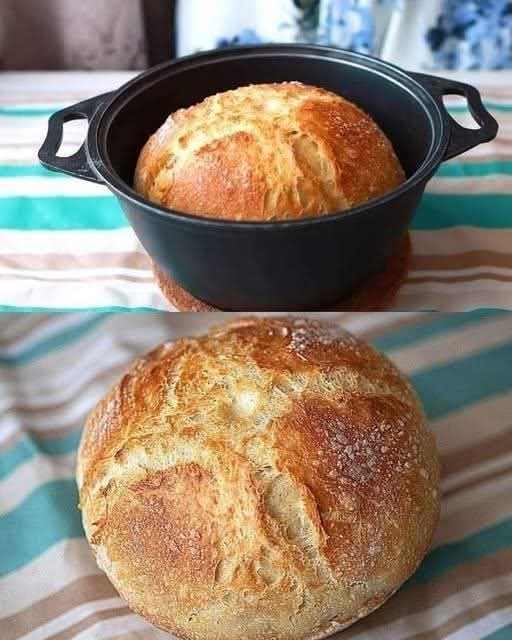
Easy Dutch Oven No Knead Artisan Bread
There is nothing quite like the irresistible aroma of freshly baked bread filling your home. For centuries, baking rustic artisan bread required hours of intense physical kneading, specialized bakery equipment, and precise culinary skills. Thanks to the magic of the Dutch oven no-knead technique, anyone can achieve a bakery-quality loaf with a crackly, golden-brown crust and a light, airy crumb right in a standard home kitchen. In this detailed guide, we will walk you through the foolproof science of no-knead breadmaking, essential tools, step-by-step instructions, and expert tips to ensure your homemade artisan loaf turns out perfectly crisp and chewy every single time.
Why You Will Love Dutch Oven Artisan Bread
Baking your own rustic bread at home is incredibly rewarding, and this specific method is widely considered the best starting point for beginner bakers. Here is why this recipe stands out:
- No Kneading Required: High hydration and a long, gentle fermentation process allow gluten strands to develop naturally without tiring your hands or arms.
- Only 4 Simple Ingredients: Made with standard pantry staples—flour, water, yeast, and salt.
- Bakery-Style Crispy Crust: Baking inside a preheated, covered Dutch oven traps natural steam released by the wet dough, creating an insanely crackly, blistered crust just like professional deck ovens.
- Minimal Hands-On Effort: While the dough needs time to rest and ferment, active hands-on preparation takes less than 10 minutes total.
Ingredients You Will Need
To make a classic Dutch oven artisan boules, gather these four basic ingredients. Quality matters when working with minimal components, so measure accurately!
Core Ingredients
- All-Purpose Flour or Bread Flour: 3 cups (approx. 390g–400g). Bread flour yields a slightly chewier structure due to higher protein content, while all-purpose flour creates a tender, light crumb.
- Instant or Active Dry Yeast: 1/2 teaspoon. A small amount of yeast is used because the dough ferments slowly over many hours.
- Fine Sea Salt or Kosher Salt: 1.5 teaspoons. Salt adds essential flavor and controls yeast activity.
- Warm Water: 1.5 cups (approx. 355ml), lukewarm around 100°F–105°F (38°C–40°C). Water that is too hot will kill the yeast.
Step-by-Step Instructions
Step 1: Mix the Shaggy Dough
In a large glass or ceramic mixing bowl, whisk together the flour, yeast, and salt until evenly combined. Pour in the lukewarm water. Use a wooden spoon, rubber spatula, or a Danish dough whisk to stir the ingredients together until a sticky, shaggy dough forms and no dry patches of flour remain. Do not knead or overmix the dough!
Step 2: Long Fermentation (First Rise)
Cover the mixing bowl tightly with plastic wrap or a damp kitchen towel. Place the bowl in a warm, draft-free spot in your kitchen. Allow the dough to ferment and rise undisturbed for 12 to 18 hours (overnight is ideal). During this slow rise, the dough will double in size, become light and bubbly, and develop a delicious, subtle sourdough-like aroma.
Step 3: Shape the Loaf and Second Rise
Generously dust a sheet of parchment paper with flour. Scrape the wet, bubbly dough out of the bowl onto the prepared parchment paper. Using floured hands, gently fold the edges of the dough under itself to form a round, smooth ball (a boule). Cover the shaped dough loosely with a clean kitchen towel and let it rest for 30 minutes while preheating your oven.
Step 4: Preheat the Oven and Dutch Oven
While the dough undergoes its final rest, place a 4-quart to 6-quart Dutch oven (with its lid on) into the center of your cold oven. Preheat the oven to 450°F (230°C). Allowing the Dutch oven to preheat inside the oven for 30 minutes is critical for creating an instant burst of heat that gives the bread its dramatic oven spring.
Step 5: Score and Bake Covered
Carefully remove the blazing hot Dutch oven from the main oven using heavy-duty oven mitts and set it on a heat-safe surface. Remove the lid. Using a razor blade or sharp knife, make a quick 1/2-inch deep slash across the top of your rested dough ball. Lift the bread by holding the corners of the parchment paper and lower both the parchment and dough carefully into the hot pot. Place the heavy lid back on top. Bake covered at 450°F (230°C) for 30 minutes. The trapped steam inside the pot will keep the outer surface of the dough moist, allowing it to expand fully while forming a thin, crispy crust.
Step 6: Uncover for Golden Crust
After 30 minutes, remove the lid from the Dutch oven. You will see a pale, well-risen loaf. Return the uncovered pot to the oven and bake for an additional 12 to 15 minutes, or until the outer crust turns a deep, golden mahogany color and sounds hollow when tapped on the bottom.
Step 7: Cool Completely
Carefully lift the finished loaf out of the Dutch oven using the parchment paper handles and transfer it onto a wire cooling rack. Allow the bread to cool completely for at least 30 to 45 minutes before slicing!
Essential Baker’s Tips for Success
1. Resist Slicing Warm Bread
While cutting into warm, steaming bread is tempting, slicing too early ruins the texture! As the loaf cools, internal moisture redistributes and finishes cooking the center. Cutting it hot traps steam, resulting in a gummy, wet crumb.
2. The Power of Steam
The secret behind professional artisan bakeries is high-pressure steam. Your heavy Dutch oven replicates this environment perfectly by trapping evaporating moisture from the high-hydration dough. Always keep the lid tightly sealed during the first phase of baking.
3. Flour Options
For an extra-rustic touch, sprinkle coarse cornmeal, wheat bran, or extra flour onto the parchment paper before placing your shaped dough on top. This prevents sticking and adds an authentic bakery look to the bottom crust.
Flavor Variations and Mix-Ins
Once you master the basic white artisan loaf, customize your bread by folding delicious mix-ins into the dry flour before adding water:
- Garlic and Rosemary: Add 2 tablespoons chopped fresh rosemary and 3 minced garlic cloves.
- Cheddar Jalapeño: Fold in 1 cup sharp white cheddar cheese cubes and 1/4 cup diced fresh or pickled jalapeños.
- Everything Bagel: Sprinkle 2 tablespoons of everything bagel seasoning over the top before scoring.
- Cinnamon Raisin: Mix in 1 teaspoon cinnamon, 2 tablespoons brown sugar, and 3/4 cup raisins or dried cranberries.
Storage and Freezing Guidelines
Room Temperature Storage
Store the uncut cooled bread at room temperature on a cutting board, cut-side down, or inside a breathable paper bag for up to 3 days. Avoid storing fresh artisan bread in sealed plastic bags or refrigerators, as plastic softens the crispy crust and refrigeration dries out the crumb prematurely.
Freezing
To freeze, slice the cooled loaf completely. Place parchment paper strips between slices, wrap the entire loaf tightly in plastic wrap followed by aluminum foil, and freeze for up to 3 months. Toast individual frozen slices directly in a toaster for fresh, warm bread anytime!
Frequently Asked Questions
Can I make this if I don’t own a Dutch oven?
Yes! While a Dutch oven gives the best crust, you can bake the bread on a heavy baking sheet or cast-iron skillet. To recreate steam, place a metal baking pan filled with 1 cup of boiling water on the bottom rack of your oven while baking.
Why didn’t my bread rise properly?
An improper rise usually traces back to expired yeast or water that was too hot when mixed into the dough (water above 120°F/49°C will kill yeast cells). Ensure your yeast is fresh and your water is comfortably lukewarm to the touch.
Can I shorten the 12-hour rise time?
If you are pressed for time, use 1.5 teaspoons of instant yeast instead of 1/2 teaspoon and increase the water temperature slightly. Let the dough rise in a warm spot for 2 to 3 hours until doubled in size, then proceed with shaping and baking.
Conclusion
Baking rustic, golden-brown artisan bread at home is a simple pleasure that anyone can master. With just four humble ingredients, a long gentle rise, and a trusty Dutch oven, you can craft a delicious loaf featuring a crackly outer crust and a chewy, airy center. Bake this easy no-knead bread today, serve it warm with salted butter or hearty soups, and enjoy the satisfaction of homemade artisan baking!