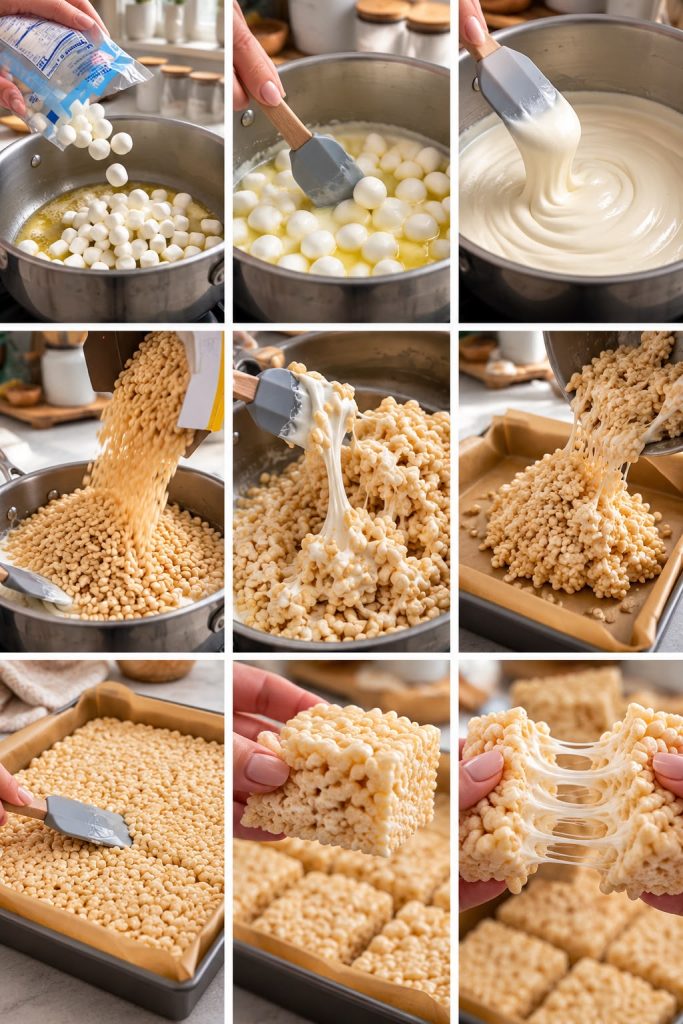
If you’re looking for the best homemade Rice Krispies treats recipe, this easy, no-bake dessert is exactly what you need! Made with crispy rice cereal, melted butter, and fluffy marshmallows, these classic treats are wonderfully chewy, buttery, and packed with sweet marshmallow flavor.
The secret to perfectly soft Rice Krispies treats is using fresh marshmallows, melting them gently, and avoiding pressing the mixture too firmly into the pan.
Whether you’re preparing an after-school snack, a birthday party dessert, a holiday treat, or something sweet for the weekend, these homemade cereal bars are always a crowd-pleaser.
⏱️ Recipe Information
- Prep Time: 10 minutes
- Cook Time: 5 minutes
- Cooling Time: 30 minutes
- Total Time: 45 minutes
- Servings: 16 squares
- Difficulty: Easy
- Cooking Method: Stovetop, no baking required
🛒 INGREDIENTS
You only need a few simple ingredients to make these delicious homemade marshmallow cereal treats.
- 6 cups Rice Krispies cereal (about 180 g)
- 10 oz mini marshmallows (about 283 g)
- 5 tablespoons unsalted butter (70 g)
- 1 teaspoon pure vanilla extract
- ¼ teaspoon salt
- 1 cup additional mini marshmallows (optional, for extra gooey pockets)
Optional Add-Ins
- ½ cup white chocolate chips
- ¼ cup colorful sprinkles
- ½ cup mini chocolate chips
- A drizzle of melted chocolate for decoration
Ingredient Tip: Fresh mini marshmallows melt more evenly than older, dried-out marshmallows. Use plain crispy rice cereal for the traditional flavor and texture.
👩🍳 HOW TO MAKE CLASSIC RICE KRISPIES TREATS
Step 1: Prepare Your Baking Pan
Line a 9 × 9-inch baking pan with parchment paper, leaving some overhang on the sides.
Lightly grease the parchment paper with butter or nonstick cooking spray to prevent sticking.
Step 2: Measure the Ingredients
Measure the crispy rice cereal and marshmallows before beginning.
Keep everything close to the stove because the melted marshmallow mixture starts thickening as it cools.
Step 3: Melt the Butter
Place a large, heavy-bottomed saucepan over low heat.
Add the unsalted butter and allow it to melt slowly, stirring occasionally.
Avoid browning the butter if you want the traditional light, buttery flavor.
Step 4: Add the Mini Marshmallows
Pour the 10 ounces of mini marshmallows into the melted butter.
Use a silicone spatula to stir gently, coating the marshmallows with butter.
Step 5: Melt Until Smooth
Continue stirring over low heat until the marshmallows melt into a smooth, glossy mixture.
This usually takes about 3–5 minutes.
Important: Do not increase the heat to speed up the process. Excessive heat can produce firmer, tougher treats once cooled.
Step 6: Add Vanilla and Salt
Remove the saucepan from the heat.
Stir in the vanilla extract and salt until evenly incorporated.
The vanilla adds a warm, sweet aroma, while the salt balances the sweetness.
Step 7: Add the Rice Krispies Cereal
Immediately pour the Rice Krispies cereal into the melted marshmallow mixture.
Use a large silicone spatula to fold the cereal gently into the marshmallow coating.
Step 8: Mix Until Evenly Coated
Continue folding until every piece of cereal is coated with the sticky marshmallow mixture.
The mixture should look glossy, thick, and stretchy.
Avoid crushing the cereal while mixing.
Step 9: Add Extra Marshmallows
For an extra-gooey texture, fold in the additional cup of mini marshmallows while the mixture is warm but no longer extremely hot.
These marshmallows will soften slightly, creating delicious pockets of marshmallow throughout the bars.
Step 10: Transfer to the Baking Pan
Spoon the warm cereal mixture into your prepared baking pan.
Use a lightly buttered spatula to spread the mixture toward the corners.
Work gently because the mixture becomes firmer as it cools.
Step 11: Press Lightly
Smooth the surface using parchment paper or a lightly greased spatula.
Press only enough to create an even layer.
Do not pack the mixture tightly. Light pressure keeps the finished bars soft and chewy.
Step 12: Allow to Cool
Let the treats rest at room temperature for approximately 30 minutes, or until they hold their shape.
Avoid refrigerating them unnecessarily, as chilling can make the texture firmer.
Step 13: Cut Into Squares
Lift the cooled cereal slab out of the pan using the parchment paper.
Place it on a cutting board and use a sharp knife to cut into 16 even squares.
Lightly butter the knife if the mixture sticks.
Step 14: Serve and Enjoy
Serve the homemade Rice Krispies treats immediately or store them in an airtight container.
For an especially tempting presentation, gently pull apart a freshly set square to reveal its soft, stretchy marshmallow center.
⭐ COOKING TIPS FOR PERFECT RICE KRISPIES TREATS
- Always use low heat. High heat can overcook the marshmallow mixture and make the finished treats hard.
- Choose fresh marshmallows. Fresh marshmallows melt smoothly and help create a softer texture.
- Measure the cereal correctly. Too much cereal can make the treats dry and crumbly.
- Don’t overmix. Fold gently to preserve the cereal’s light, crispy texture.
- Add extra marshmallows. Folding in a few additional marshmallows gives the bars soft, sweet pockets.
- Avoid pressing too firmly. A tightly packed pan creates dense treats instead of soft, chewy ones.
- Use parchment paper. It makes removing and cutting the bars much easier.
- Let the mixture cool naturally. Room-temperature cooling helps maintain a pleasant chewy texture.
🍫 DELICIOUS RECIPE VARIATIONS
Chocolate Rice Krispies Treats
Drizzle cooled treats with melted milk or dark chocolate. Allow the chocolate to set before serving.
Peanut Butter Rice Krispies Treats
Stir ⅓ cup creamy peanut butter into the melted marshmallow mixture before adding the cereal.
Birthday Cake Rice Krispies Treats
Add colorful sprinkles just before transferring the mixture to the baking pan for a festive dessert.
Cookies and Cream Rice Krispies Treats
Fold in ¾ cup roughly crushed chocolate sandwich cookies after mixing in the cereal.
Extra Marshmallow Rice Krispies Treats
Add another handful of mini marshmallows near the end of mixing to create visible marshmallow pockets.
📦 HOW TO STORE RICE KRISPIES TREATS
Room Temperature
Store the treats in an airtight container at room temperature for up to 2–3 days for the best texture.
Place parchment paper between layers to prevent sticking.
Refrigerator
Refrigeration is not recommended for everyday storage because the treats can become harder and less chewy.
Freezer
For longer storage, wrap individual squares tightly and place them in a freezer-safe container.
Freeze for up to 6 weeks for best quality.
Thaw at room temperature before serving.
Make-Ahead Tip
These treats are ideal for making the day before a party or family gathering. Keep them tightly covered to preserve their softness.
📊 NUTRITIONAL INFORMATION
Estimated nutrition per serving (1 square, based on 16 servings and the main ingredients without optional add-ins):
- Calories: Approximately 145 kcal
- Carbohydrates: 26 g
- Protein: 1 g
- Total Fat: 4 g
- Saturated Fat: 2.5 g
- Sugar: 15 g
- Fiber: Less than 1 g
- Sodium: Approximately 105 mg
Nutrition values are estimates and may vary depending on ingredient brands, portion sizes, and optional additions.
❓ FREQUENTLY ASKED QUESTIONS
Why are my Rice Krispies treats hard?
The most common causes are overheating the marshmallows or pressing the mixture too firmly into the baking pan. Use low heat and gently spread the cereal mixture.
Can I make Rice Krispies treats without an oven?
Absolutely! This is a completely no-bake recipe. You only need a stovetop to melt the butter and marshmallows.
Can I use large marshmallows instead of mini marshmallows?
Yes. Use the same weight of large marshmallows. They may take slightly longer to melt, so keep stirring over low heat.
How do I keep homemade Rice Krispies treats soft?
Use fresh marshmallows, avoid excessive heat, measure the cereal accurately, and store the finished treats in an airtight container.
Can I make these treats ahead of time?
Yes! Prepare them up to one day before serving and store them tightly covered at room temperature.
Why is my cereal mixture too sticky?
The mixture naturally becomes sticky while warm. Lightly grease your spatula and allow the bars to cool completely before cutting.
❤️ FINAL THOUGHTS
These Classic Homemade Rice Krispies Treats prove that you don’t need complicated ingredients or hours in the kitchen to make an irresistible dessert.
With their crispy cereal, buttery marshmallow coating, and soft, chewy center, these easy no-bake bars are perfect for family gatherings, school snacks, bake sales, birthday parties, and holiday celebrations.
The best part? You can prepare the entire recipe with just a handful of pantry ingredients and very little effort.
If you love quick and easy homemade desserts, this is one recipe you’ll want to make again and again.
📌 Save this Classic Rice Krispies Treats recipe for later, share it with your family and friends, and enjoy a delicious homemade treat whenever you’re craving something sweet!