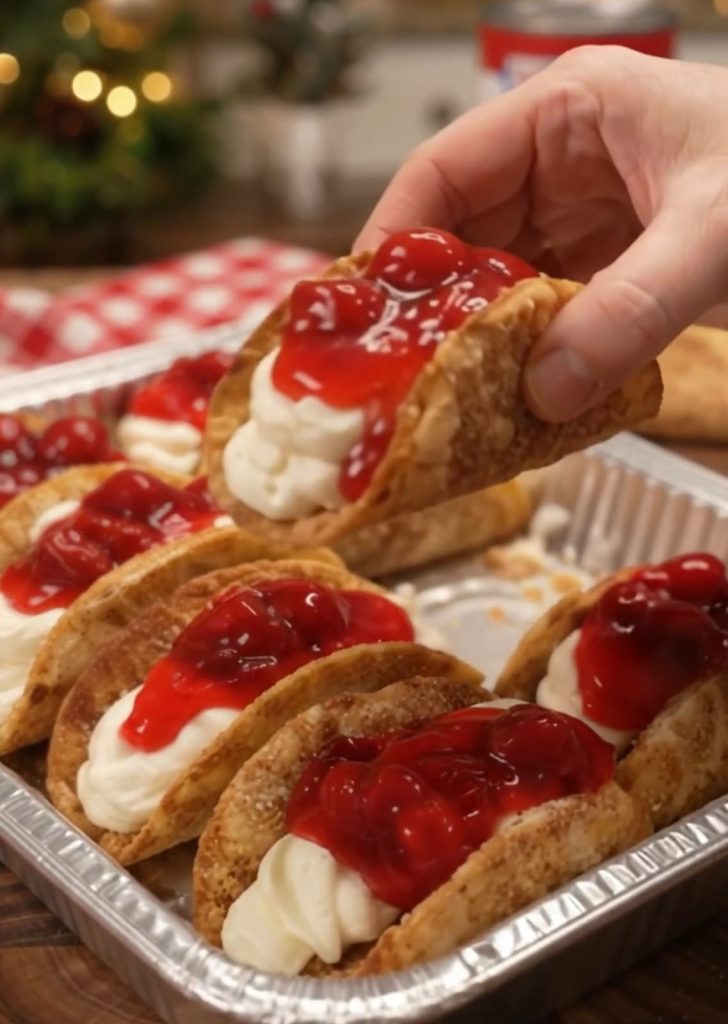
Crispy, creamy, sweet, and absolutely irresistible! These homemade Cherry Cheesecake Tacos combine golden cinnamon-sugar tortilla shells, fluffy vanilla cheesecake filling, and a generous spoonful of glossy cherry pie topping.
If you love cheesecake and quick homemade desserts, this easy recipe is perfect for you. Every bite delivers a delicious contrast between the lightly crunchy shell, smooth cream cheese filling, and sweet, juicy cherries.
They’re ideal for family gatherings, holiday dessert trays, birthday parties, or whenever you’re craving something special without spending hours in the kitchen.
⏱️ RECIPE DETAILS
- Prep Time: 20 minutes
- Cook Time: 10–12 minutes
- Chilling Time: 20 minutes
- Total Time: Approximately 50 minutes
- Servings: 12 mini cheesecake tacos
- Difficulty: Easy
- Cooking Method: Oven-baked
⸻
🛒 INGREDIENTS
For the Cinnamon Sugar Taco Shells
- 6 small flour tortillas (6-inch size)
- 3 tablespoons unsalted butter, melted
- ½ cup granulated sugar
- 1 tablespoon ground cinnamon
For the Creamy Cheesecake Filling
- 8 oz (226 g) cream cheese, softened
- ½ cup powdered sugar
- 1 teaspoon pure vanilla extract
- 1 cup cold heavy whipping cream
- 1 tablespoon fresh lemon juice (optional)
For the Cherry Topping
- 1 can (21 oz) cherry pie filling
- 1 teaspoon fresh lemon juice (optional)
Optional Garnishes
- Powdered sugar
- Crushed graham crackers
- White chocolate shavings
- Extra cinnamon sugar
⸻
👩🍳 HOW TO MAKE CHERRY CHEESECAKE TACOS
Step 1: Preheat the Oven
Preheat your oven to 375°F (190°C).
Prepare a large baking sheet and lightly grease the underside of a muffin pan if you plan to use it to shape the taco shells.
Step 2: Cut the Tortillas
Place the flour tortillas on a clean cutting board.
Using a round cookie cutter or a small bowl approximately 4 inches wide, cut 12 circles from the tortillas.
You can usually get two circles from each 6-inch tortilla, depending on the cutter size.
Step 3: Prepare the Cinnamon Sugar
In a shallow bowl, combine the granulated sugar and ground cinnamon.
Mix thoroughly until the cinnamon is evenly distributed throughout the sugar.
Step 4: Brush with Melted Butter
Use a pastry brush to coat both sides of each tortilla circle with a thin layer of melted butter.
Make sure the edges are lightly coated so they become golden and crisp during baking.
Step 5: Coat the Tortillas
Dip each buttered tortilla circle into the cinnamon-sugar mixture.
Turn gently to coat both sides.
Shake off any excess sugar.
Step 6: Shape the Taco Shells
Carefully fold each tortilla circle into a taco shape.
Position the folded tortillas between the raised cups of an upside-down muffin pan.
This helps the shells maintain their curved shape while baking.
Step 7: Bake Until Golden
Bake for approximately 8–12 minutes, or until the tortilla shells are golden brown and crisp.
Watch closely during the final minutes because the cinnamon sugar can brown quickly.
Step 8: Cool the Shells
Remove the muffin pan from the oven.
Allow the taco shells to cool completely before filling.
The shells will become firmer as they cool.
Important: Never add the cheesecake filling while the shells are still warm, or the filling may soften and melt.
⸻
🍰 PREPARE THE CHEESECAKE FILLING
Step 9: Beat the Cream Cheese
Place the softened cream cheese into a large mixing bowl.
Using an electric hand mixer, beat for approximately 2 minutes until completely smooth.
Scrape down the sides of the bowl to remove any lumps.
Step 10: Add Powdered Sugar
Gradually add the powdered sugar to the cream cheese.
Continue beating until the mixture becomes creamy and fluffy.
Step 11: Add Vanilla
Pour in the vanilla extract and optional lemon juice.
Mix until fully incorporated.
The lemon juice adds a subtle tang that balances the sweetness of the cherry topping.
Step 12: Whip the Heavy Cream
In a separate chilled mixing bowl, beat the cold heavy whipping cream until stiff peaks form.
Avoid overbeating.
Step 13: Combine the Filling
Gently fold the whipped cream into the cream cheese mixture using a spatula.
Continue folding until the filling is light, smooth, and uniform.
Do not mix aggressively because you want to preserve the fluffy texture.
Step 14: Chill the Filling
Refrigerate the cheesecake filling for approximately 20 minutes.
This helps it become slightly firmer and easier to pipe into the taco shells.
⸻
🍒 ASSEMBLE THE CHERRY CHEESECAKE TACOS
Step 15: Fill a Piping Bag
Transfer the chilled cheesecake filling into a piping bag fitted with a large star tip.
If you don’t have a piping bag, use a resealable plastic bag and snip off one corner.
Step 16: Pipe the Cheesecake Filling
Hold one cooled cinnamon-sugar taco shell upright.
Pipe a generous swirl of cheesecake filling into the center, filling from one end to the other.
Repeat with the remaining shells.
Step 17: Add Cherry Pie Filling
Spoon approximately 1–2 tablespoons of cherry pie filling over each cheesecake taco.
Allow some of the glossy cherry sauce to flow naturally over the creamy filling.
For the best presentation, make sure each taco receives a few whole cherries.
Step 18: Garnish and Serve
Arrange the finished cheesecake tacos in a serving tray.
For an extra-special presentation, add a light dusting of powdered sugar or a sprinkle of crushed graham crackers.
Serve immediately for the crispiest texture.
Your homemade Cherry Cheesecake Tacos are ready to enjoy!
⸻
⭐ COOKING TIPS FOR PERFECT RESULTS
- Use softened cream cheese. Room-temperature cream cheese blends more easily and prevents lumps.
- Keep the whipping cream cold. Cold heavy cream whips faster and helps create a stable, fluffy filling.
- Don’t overbake the shells. Remove them once they turn golden brown. Overbaking can make them too brittle.
- Cool the shells completely. Warm taco shells can cause the cheesecake filling to lose its shape.
- Fill just before serving. This is the best way to maintain the crispy cinnamon-sugar coating.
- Use a piping bag. Piping makes the tacos look beautiful and gives them the bakery-style appearance shown in the photo.
- Try different toppings. Strawberry, blueberry, raspberry, or caramel toppings also work beautifully.
⸻
❄️ HOW TO STORE CHERRY CHEESECAKE TACOS
Refrigerator
Store leftover assembled cheesecake tacos in an airtight container in the refrigerator for up to 2 days.
The shells will gradually soften after filling.
Store Components Separately
For the best results, prepare the components in advance:
- Baked taco shells: Store in an airtight container at room temperature for up to 2 days, provided they remain completely dry.
- Cheesecake filling: Refrigerate in an airtight container for up to 3 days.
- Cherry topping: Refrigerate according to the package directions after opening.
Assemble just before serving.
Freezing
The cheesecake filling can be frozen separately for up to 1 month, although its texture may change after thawing.
Freezing fully assembled tacos is not recommended because the shells can become soggy.
⸻
🍽️ SERVING SUGGESTIONS
These delicious dessert tacos pair wonderfully with:
- Fresh strawberries or raspberries
- Hot coffee or cappuccino
- Vanilla ice cream
- Melted white chocolate
- A drizzle of chocolate sauce
For holidays and celebrations, arrange them upright in a serving tray for an eye-catching dessert display.
⸻
📊 NUTRITIONAL INFORMATION
Servings: 12 mini tacos
Estimated nutrition per serving:
- Calories: 300 kcal
- Protein: 3 g
- Carbohydrates: 34 g
- Total Fat: 17 g
- Saturated Fat: 10 g
- Sugar: 23 g
- Fiber: 1 g
- Sodium: 170 mg
Nutrition values are approximate and depend on tortilla size, ingredient brands, and topping quantities.
⸻
❓ FREQUENTLY ASKED QUESTIONS
Can I make Cherry Cheesecake Tacos ahead of time?
Yes! Prepare the taco shells and cheesecake filling separately. Store them properly and assemble shortly before serving to preserve their crunchy texture.
Can I use store-bought whipped topping?
Absolutely. You can substitute approximately 2 cups of thawed whipped topping for the freshly whipped heavy cream. Fold it gently into the cream cheese mixture.
Can I use fresh cherries instead of canned filling?
Yes. Cook pitted fresh cherries with sugar, a little lemon juice, and a cornstarch slurry until thickened. Cool completely before using.
How do I keep the taco shells crispy?
Bake them until golden, cool completely, and avoid adding the cheesecake filling until you’re ready to serve.
Can I make these without an electric mixer?
Yes, but the cream cheese must be very soft. You can mix it by hand until smooth and use prepared whipped topping instead of whipping cream yourself.
⸻
❤️ FINAL THOUGHTS
These Easy Cherry Cheesecake Tacos are the perfect combination of crispy cinnamon-sugar shells, rich vanilla cheesecake filling, and sweet cherry topping.
They look impressive, taste incredible, and are surprisingly simple to prepare using everyday ingredients.
Whether you’re making dessert for a holiday party, family dinner, or weekend treat, these little cheesecake tacos are sure to disappear quickly!
🍒 Save this recipe for later, share it with someone who loves cheesecake, and enjoy every delicious bite!