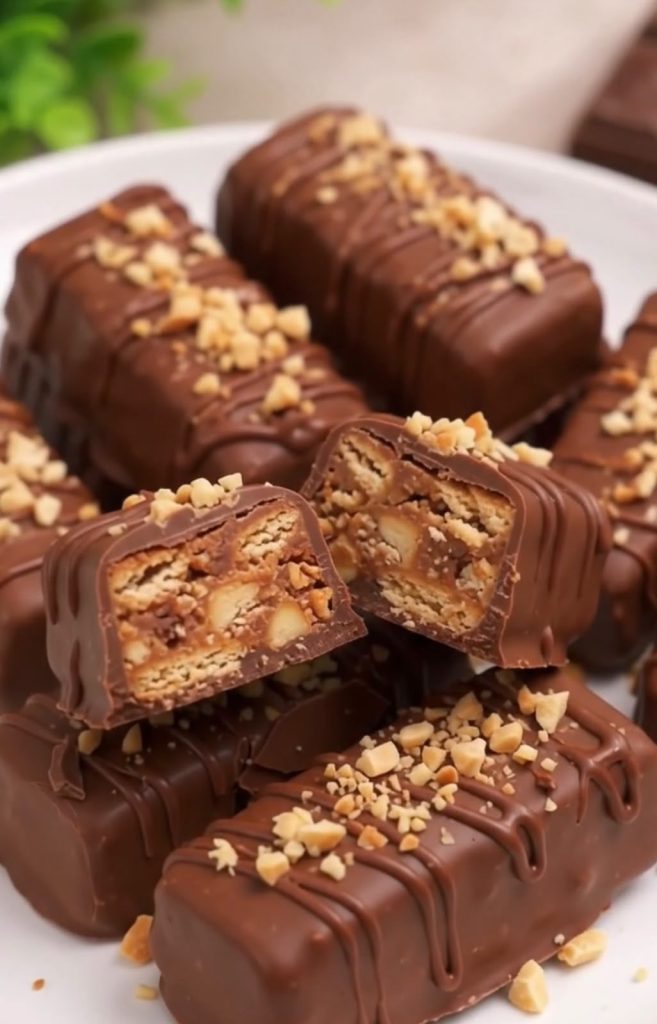
These No-Bake Chocolate Peanut Butter Crunch Bars are the ultimate homemade treat! Each bar features a rich, crunchy filling made with peanut butter, crushed biscuits, and chopped peanuts, surrounded by a smooth milk chocolate coating.
They’re creamy, crunchy, chocolatey, and incredibly easy to make. No oven required!
Perfect for parties, holidays, homemade gifts, or whenever you’re craving something sweet.
⏱️ Recipe Information
- Prep Time: 25 minutes
- Chilling Time: 1 hour 30 minutes
- Total Time: 1 hour 55 minutes
- Servings: 12 bars
- Difficulty: Easy
- Method: No-bake
🛒 INGREDIENTS
For the Crunchy Filling
- 1 cup creamy peanut butter
- 1 cup crushed digestive biscuits or graham crackers
- ½ cup roasted peanuts, roughly chopped
- ½ cup milk chocolate chips
- 2 tablespoons melted butter
- 2 tablespoons powdered sugar
- 1 teaspoon vanilla extract
- ¼ teaspoon salt
For the Chocolate Coating
- 2 cups milk chocolate chips or chopped milk chocolate
- 1 tablespoon coconut oil or neutral vegetable oil
For Decoration
- ¼ cup chopped roasted peanuts
- ¼ cup melted milk chocolate, for drizzling
👩🍳 HOW TO MAKE CHOCOLATE PEANUT BUTTER CRUNCH BARS
Step 1: Prepare the Ingredients
Crush the biscuits into small pieces, leaving some larger crumbs for a satisfying crunch.
Roughly chop the roasted peanuts.
Measure the peanut butter, chocolate, and remaining ingredients before beginning.
Step 2: Melt the Chocolate
Place ½ cup milk chocolate chips in a microwave-safe bowl.
Microwave in 20-second intervals, stirring between each interval, until smooth.
Allow the chocolate to cool slightly.
Step 3: Prepare the Peanut Butter Mixture
In a large mixing bowl, combine the peanut butter, melted butter, powdered sugar, vanilla extract, and salt.
Stir until smooth and creamy.
Step 4: Add the Crunchy Ingredients
Add the crushed biscuits and chopped peanuts.
Pour in the melted chocolate.
Mix everything with a spatula until the ingredients are evenly coated and form a thick, slightly sticky mixture.
Step 5: Shape the Bars
Line a rectangular silicone bar mold with the mixture, dividing it evenly among 12 cavities.
Press firmly with the back of a spoon to eliminate air pockets.
If you don’t have a silicone mold, press the mixture into a parchment-lined square baking pan and cut it into bars after chilling.
Step 6: Chill Until Firm
Place the mold in the refrigerator for approximately 45–60 minutes.
The bars should become firm enough to handle without falling apart.
Step 7: Remove From the Mold
Carefully remove the chilled bars from the silicone mold.
Place them on a parchment-lined tray.
Return them to the refrigerator while preparing the coating.
Step 8: Melt the Chocolate Coating
Place 2 cups of milk chocolate in a heatproof bowl.
Melt gently in the microwave using short intervals or over a double boiler.
Stir in the coconut oil until the chocolate is glossy and smooth.
Step 9: Coat the Bars
Using two forks, dip each chilled peanut butter bar into the melted chocolate.
Turn gently until completely covered.
Lift the bar and allow excess chocolate to drip back into the bowl.
Step 10: Let the Chocolate Set
Transfer the coated bars onto parchment paper.
Refrigerate for approximately 20–30 minutes, or until the chocolate coating becomes firm.
Step 11: Decorate
Drizzle the remaining melted chocolate over the bars in thin lines.
Immediately sprinkle chopped roasted peanuts over the tops before the drizzle hardens.
Step 12: Serve and Enjoy
Arrange the finished bars on a serving plate.
For the best texture, allow them to sit at room temperature for approximately 5 minutes before serving.
Enjoy the combination of smooth chocolate and crunchy peanut butter filling!
⭐ TIPS FOR PERFECT CHOCOLATE CRUNCH BARS
Use creamy peanut butter: It helps bind the filling together and creates a smoother texture.
Don’t crush the biscuits too finely: Small crunchy pieces give the bars their signature texture.
Press the filling firmly: This prevents the bars from crumbling when removed from the mold.
Chill before coating: Cold bars are much easier to dip into melted chocolate.
Avoid overheating chocolate: Melt slowly to maintain a smooth, glossy finish.
Use silicone molds: They create neat, evenly shaped bars and make removal easier.
🍫 DELICIOUS VARIATIONS
Dark Chocolate Crunch Bars
Replace milk chocolate with dark chocolate for a richer, less sweet flavor.
Caramel Peanut Butter Bars
Add a thin layer of thick caramel over the chilled filling before coating with chocolate.
White Chocolate Bars
Use melted white chocolate for the outer coating and decorate with dark chocolate drizzle.
Extra Crunchy Bars
Add ¼ cup crispy rice cereal to the filling for additional crunch.
Almond Butter Bars
Replace peanut butter with almond butter and use chopped roasted almonds.
🧊 STORAGE INSTRUCTIONS
Refrigerator: Store in an airtight container for up to 7 days.
Freezer: Freeze for up to 2 months in a freezer-safe container with parchment paper between layers.
Serving: Allow frozen bars to thaw in the refrigerator before enjoying.
For the best chocolate texture, keep the bars refrigerated until shortly before serving.
📊 NUTRITIONAL INFORMATION
Approximate values per bar, based on 12 servings.
- Calories: 460 kcal
- Protein: 9 g
- Carbohydrates: 39 g
- Total Fat: 32 g
- Saturated Fat: 13 g
- Sugar: 29 g
- Fiber: 3 g
- Sodium: 180 mg
Values vary depending on the ingredients and chocolate brands used.
❓ FREQUENTLY ASKED QUESTIONS
Can I make these bars without an oven?
Absolutely! This is a completely no-bake recipe. The refrigerator helps the filling and chocolate coating become firm.
Can I use crunchy peanut butter?
Yes! Crunchy peanut butter adds even more texture to the filling.
Why is my filling too soft?
Your peanut butter may be particularly runny. Add a few extra tablespoons of crushed biscuits and chill until firm.
Can I use dark chocolate instead?
Yes. Dark chocolate works beautifully and balances the sweetness of the peanut butter filling.
Can I make these ahead of time?
Definitely! Prepare them a day or two before serving and store them in the refrigerator.
Are these bars gluten-free?
Not automatically. To make a gluten-free version, use certified gluten-free biscuits and check the labels of your other ingredients.
❤️ FINAL THOUGHTS
These Homemade No-Bake Chocolate Peanut Butter Crunch Bars combine everything chocolate lovers adore: a smooth chocolate shell, creamy peanut butter, crunchy biscuits, and roasted peanuts.
They’re easy to prepare, beautiful enough for gifting, and perfect for satisfying sweet cravings without turning on the oven.
🍫🥜 Save this recipe for later and share it with someone who loves chocolate and peanut butter! ❤️