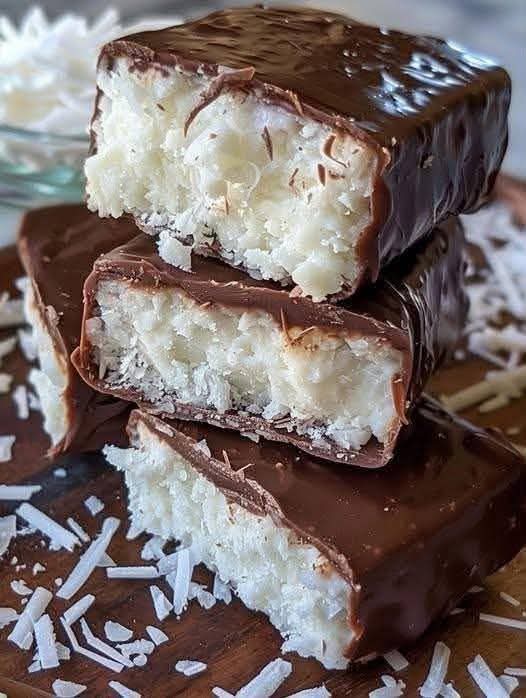
Decadent Homemade Chocolate Coconut Bars Recipe Homemade Bounty Bars
If you are a fan of classic candy bars that combine rich dark chocolate with a sweet, chewy tropical coconut center, this Homemade Chocolate Coconut Bars recipe is guaranteed to satisfy your sweet tooth. Reminiscent of iconic store-bought treats like Bounty or Almond Joy bars, these homemade treats are far superior in flavor, freshness, and quality of ingredients. Crafted with a chewy coconut filling enclosed in a silky, rich chocolate coating, they deliver an incredible balance of textures and rich, indulgent flavor in every single bite.
Whether you are preparing a special dessert for a party, looking for a delicious meal-prep treat to store in your freezer, or seeking an easy no-bake recipe to make with family, these chocolate coconut bars are surprisingly easy to master. In this ultimate guide, we will break down everything you need to know to create bakery-quality chocolate coconut bars at home, complete with ingredient selection advice, expert tips, step-by-step instructions, variations, and storage solutions.
Why You Will Love This Homemade Recipe
Making your own candy bars at home comes with a wide range of benefits that far outweigh buying packaged alternatives from the grocery aisle:
- Pure, Simple Ingredients: You have total control over what goes into your dessert. No artificial preservatives, high-fructose corn syrup, or hydrogenated oils are required.
- No-Bake Convenience: This recipe requires zero oven time, making it an ideal summer dessert when you want to avoid heating up your kitchen.
- Customizable Sweetness: Adjust the sweetness or cacao percentage of your chocolate coating to match your personal preference—from ultra-dark 80% chocolate to smooth milk chocolate.
- Naturally Dietary Friendly: By using simple plant-based ingredients, this recipe can easily be made vegan, gluten-free, and dairy-free without compromising on taste or rich texture.
- Freezer-Friendly Storage: These coconut bars store remarkably well in the refrigerator or freezer, giving you a quick homemade snack ready whenever cravings hit.
Key Ingredients & Substitutions
To achieve the dense, moist coconut center and smooth outer chocolate shell shown in the photo, you will need just a few simple pantry staples:
For the Coconut Filling:
- Unsweetened Shredded Coconut: 3 cups of finely shredded or flaked dried coconut. Fine-grade shredded coconut packs together much better than large chips or thick shreds, creating a tight structure that holds its shape.
- Sweetened Condensed Milk (or Coconut Condensed Milk): 1 cup (about 3/4 of a 14 oz can). This acts as both the binding agent and the primary sweetener, giving the center its iconic chewy, moist texture. For a dairy-free or vegan version, swap with sweetened condensed coconut milk.
- Pure Vanilla Extract: 1 teaspoon of high-quality vanilla extract to enhance and deepen the coconut flavor.
- Pinch of Fine Sea Salt: 1/4 teaspoon of fine sea salt to balance the richness and sweetness of the condensed milk.
- Coconut Oil (Optional): 1 tablespoon of melted unrefined coconut oil. This adds extra aromatic coconut flavor and helps firm up the filling when chilled.
For the Chocolate Coating:
- Quality Chocolate Chips or Chopped Chocolate: 12 ounces (about 2 cups) of semi-sweet, dark, or milk chocolate. Using high-quality chocolate with cocoa butter yields a smooth finish and clean snap.
- Coconut Oil: 1 tablespoon of coconut oil. Adding a small amount of coconut oil to melted chocolate thins it out slightly for easy dipping and creates a glossy, professional finish.
Step-by-Step Instructions
Follow these clear, detailed steps to assemble these stunning no-bake chocolate coconut bars from scratch:
Step 1: Prepare the Pan
Line an 8×8-inch or 9×5-inch loaf pan with parchment paper, leaving an overhang on two sides to act as handles later. Lightly grease or spray the parchment paper with non-stick cooking spray and set the pan aside.
Step 2: Mix the Sweetened Coconut Filling
In a large mixing bowl, add the finely shredded coconut, pure vanilla extract, sea salt, and melted coconut oil (if using). Pour in the sweetened condensed milk (or condensed coconut milk). Using a rubber spatula or clean hands, mix thoroughly until every flake of coconut is evenly coated and the mixture holds together when pressed in your palm.
Step 3: Press and Chill the Filling
Transfer the coconut mixture into your lined baking pan. Using the bottom of a measuring cup or a flat spatula, press the mixture down firmly into an even, dense layer. Pressing firmly is crucial to prevent the bars from crumbling when sliced. Place the pan into the freezer for 25 to 30 minutes (or in the refrigerator for 1 hour) until the coconut layer becomes completely firm and cold.
Step 4: Slice into Uniform Bars
Once chilled, lift the coconut block out of the pan using the parchment paper handles and place it onto a clean cutting board. Using a large, sharp knife, cut the block into rectangular bars (roughly 1 inch wide by 3 inches long) or bite-sized squares. Place the individual cut bars back onto a lined baking sheet and return them to the freezer for an additional 10 minutes while you prepare the melted chocolate.
Step 5: Melt the Chocolate Coating
Combine your chopped chocolate (or chocolate chips) and 1 tablespoon of coconut oil in a heat-safe glass bowl. Microwave in 30-second intervals, stirring thoroughly between each burst, until the chocolate is completely melted, smooth, and glossy. Alternatively, melt the chocolate using a double boiler over gently simmering water. Let the chocolate cool slightly for 3 to 5 minutes so it is warm, not piping hot.
Step 6: Dip and Coat the Bars
Remove the chilled coconut bars from the freezer. Using two forks or a dipping tool, submerge one bar into the melted chocolate, turning quickly to coat all sides evenly. Lift the bar out, tap the fork against the edge of the bowl to allow excess chocolate to drip off, and carefully slide the bar back onto a parchment-lined baking sheet. Repeat for all remaining bars.
Step 7: Set and Serve
If desired, sprinkle a pinch of shredded coconut or sea salt flakes over the top of the warm chocolate coating before it sets. Place the coated bars into the refrigerator for 15 to 20 minutes until the chocolate shell hardens completely into a solid, glossy shell. Slice and enjoy!
Expert Baking Tips for Perfection
To ensure your chocolate coconut bars look and taste like they came straight out of an artisan candy shop, keep these simple techniques in mind:
Press Firmly: The main secret to preventing your bars from falling apart during dipping is compaction. Pack the coconut mixture into the pan as tightly as possible before chilling.
Keep the Coconut Cold: Work quickly when dipping! Cold coconut centers prevent the filling from melting into the warm chocolate bath and help the chocolate set rapidly around the bar.
Choose the Right Coconut: Fine-grade shredded coconut works significantly better than coarse coconut flakes. If you only have large flakes, pulse them in a food processor a few times until they reach a fine crumb consistency.
Tasty Recipe Variations
You can easily adapt this base recipe to create new flavor variations tailored to your specific taste or diet:
1. Almond Joy Style
Before dipping the chilled coconut bars into chocolate, press 2 whole roasted, unsalted almonds onto the top of each coconut bar. Coat in chocolate as directed for a delicious copycat Almond Joy bar.
2. Dark Chocolate & Sea Salt
Use 70% or 85% dark chocolate for the coating and finish each bar with a delicate sprinkle of Maldon sea salt flakes right after dipping. The bitter dark chocolate pairs exceptionally well with the sweet coconut interior.
3. Dairy-Free & Vegan Version
Replace standard sweetened condensed milk with sweetened condensed coconut milk or sweetened condensed oat milk. Combine with dairy-free dark chocolate chips for a 100% plant-based dessert.
4. Matcha or Raspberry Coconut Bars
Fold 1 tablespoon of freeze-dried raspberry powder or 1 teaspoon of culinary-grade matcha powder into the coconut filling for a vibrant pop of color and natural fruit or tea flavor.
Frequently Asked Questions (FAQ)
How should I store homemade chocolate coconut bars?
Store the finished bars in an airtight container lined with parchment paper in the refrigerator for up to 2 weeks. Because the filling contains condensed milk and unrefined coconut oil, keeping them chilled ensures the outer shell stays crisp and the center stays dense.
Can I freeze these bars for long-term storage?
Yes! These bars freeze exceptionally well. Freeze them on a tray until solid, then transfer them to a freezer-safe bag or container for up to 3 months. Thaw in the refrigerator for 15 minutes before serving for a refreshing frozen treat.
Why is my chocolate coating thick and clumpy?
If your chocolate becomes thick or seized, water may have splashed into it or it may have overheated. Stirring in 1 teaspoon of melted vegetable shortening or coconut oil will help smooth the chocolate back out into a pourable consistency.
Storage & Freezing Summary
- Refrigerator Storage: Keep in an airtight container for up to 14 days.
- Freezer Storage: Keep in a sealed freezer bag for up to 90 days.
- Serving Temperature: Enjoy straight out of the fridge for a clean chocolate snap, or let sit at room temperature for 5 minutes for a soft, melt-in-your-mouth texture.
Final Thoughts
These Homemade Chocolate Coconut Bars offer a lush combination of sweet coconut and velvety chocolate. Simple to prepare, visually striking, and packed with incredible flavor, this classic no-bake recipe is sure to become a favorite dessert for coconut lovers everywhere. Prepare a batch this week, keep them stored in your fridge, and enjoy a rich homemade sweet treat whenever you need a quick pick-me-up!