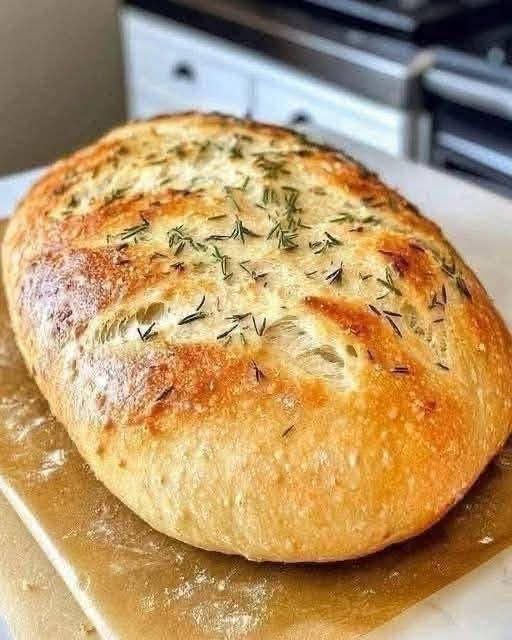
Easy Roasted Garlic Rosemary Artisan Bread Recipe
There is nothing quite like the intoxicating aroma of fresh bread baking in your kitchen, especially when that loaf is infused with fragrant herbs, subtle roasted garlic, and finished with a crispy, golden-brown crust. Homemade No-Knead Garlic Rosemary Artisan Bread brings bakery-quality artisan loaves straight into your home with minimal active effort. If you have ever been intimidated by yeast, kneading, or bread-making mechanics, this forgiving, foolproof recipe will build your confidence. By utilizing a simple Dutch oven baking method, you create a trapped-steam environment that transforms basic ingredients into a rustic, round boule with a crackly, blistered crust and a soft, airy, chewy interior. It is warm, comforting, and guaranteed to impress anyone at your table.
Why You Will Love Homemade Rosemary Garlic Artisan Bread
Baking artisan bread from scratch is often viewed as a complex weekend project requiring hours of strenuous hand-kneading and specialized sourdough starters. However, this high-hydration, no-knead technique simplifies the process entirely. The extended fermentation time allows the gluten network to develop naturally without physical exertion, while developing a rich, complex depth of flavor reminiscent of traditional sourdough.
The combination of woody fresh rosemary, sweet roasted garlic, and a hint of coarse sea salt creates a savory profile that elevates any meal. Slice it thick to serve alongside hearty soups, turn it into the ultimate gourmet sandwich, or simply slather a warm slice with salted butter. Moreover, this recipe relies on pantry staples, making it an economical luxury that costs a fraction of what you would pay at a high-end bakery.
Essential Ingredients for Crusty Rosemary Artisan Bread
Mastering artisan bread begins with understanding your core ingredients. Because this recipe uses only a handful of components, selecting quality staples makes a noticeable difference in your loaf’s rise, crumb texture, and flavor depth.
Choosing the Right Flour
For the best structural results, bread flour is recommended. Bread flour has a higher protein content (typically around 12% to 14%) compared to standard all-purpose flour. Higher protein content fosters stronger gluten development, creating a chewiness and airy structure capable of supporting the moisture content of the dough. However, if you only have unbleached all-purpose flour on hand, it will still yield a fantastic, tender loaf with a slightly lighter crust.
Yeast & Hydration
Instant yeast or active dry yeast both work well for this slow-rise recipe. Instant yeast can be mixed directly into the dry ingredients, whereas active dry yeast benefits from being bloomed in warm water for five minutes until frothy. Hydration levels dictate the interior texture of your bread. Warm water heated to approximately 105°F–110°F (40°C–43°C) activates the yeast without killing the beneficial microbes, giving your dough the lift it needs.
Fresh Rosemary vs. Dried Rosemary
Fresh rosemary is strongly preferred for artisan baking. Fresh needles release natural aromatic oils during the bake, providing a clean, piney fragrance without becoming brittle or wood-like. If using dried rosemary, reduce the amount by half, as dried herbs are far more concentrated, and rehydrate them in a tablespoon of warm water prior to mixing into your flour.
Garlic Infusion Options
You can customize the garlic profile according to your preference. Using roasted garlic cloves yields a mellow, sweet, melted garlic texture throughout the crumb. Alternatively, minced fresh garlic or garlic powder blended into the dry flour delivers a sharp, uniform garlic flavor throughout every slice.
Step-by-Step Guide: How to Bake No-Knead Rosemary Bread
Baking artisan bread is a rewarding process that rewards patience over effort. Follow these straightforward steps to achieve a picture-perfect round loaf.
Step 1: Mix the Dough
In a large mixing bowl, whisk together the flour, salt, yeast, chopped fresh rosemary, and garlic powder (or minced garlic). Pour in the warm water and stir using a wooden spoon or a Danish dough whisk until a shaggy, wet dough forms. Ensure no dry flour pockets remain at the bottom of the bowl. The dough will look loose and sticky, which is exactly what you want for a high-hydration crusty loaf.
Step 2: The First Rise (Bulk Fermentation)
Cover the bowl tightly with plastic wrap or a clean kitchen towel. Place the bowl in a warm, draft-free spot in your kitchen to rise for 2 to 3 hours, or until the dough has doubled in volume and displays a bubbly, spongy surface. For even deeper flavor development, you can place the covered dough in the refrigerator overnight (up to 18 hours) for a slow cold fermentation before shaping.
Step 3: Shape the Boule
Turn the sticky dough out onto a lightly floured surface. Using floured hands, gently fold the edges of the dough toward the center, rotating as you go to form a smooth, round ball (a boule). Generously dust a sheet of parchment paper with flour or cornmeal, transfer the shaped dough seam-side down onto the parchment paper, cover lightly, and allow it to rest for 30 minutes while preheating your oven.
Step 4: Preheat Your Dutch Oven
While the dough undergoes its final rest, place an empty 4- to 6-quart cast-iron Dutch oven with its lid inside your oven. Preheat the oven to 450°F (230°C). Heating the heavy Dutch oven creates an intense heat chamber that mimics professional deck ovens used by commercial bakeries.
Step 5: Score and Bake
Carefully remove the blazing hot Dutch oven using heavy oven mitts and place it on your stove. Uncover the dough and use a sharp knife or razor blade to score a quick 1/2-inch deep slash across the top of the loaf; this allows steam to escape controlledly during the initial rise. Sprinkle extra chopped fresh rosemary and flaky sea salt on top. Lift the parchment paper carrying the dough and lower it directly into the hot Dutch oven. Cover with the lid and bake for 30 minutes with the lid on, then remove the lid and bake uncovered for another 12 to 15 minutes until the crust turns a rich, golden mahogany color.
Expert Baking Tips for the Perfect Golden Crust
Achieving a bakery-style crackly crust requires a few specific environmental conditions during the baking process.
The Power of Steam in a Dutch Oven
The initial 30 minutes of baking with the lid on traps the natural moisture escaping from the wet dough. This trapped steam gelatinizes the starches on the dough surface, keeping the outer crust soft long enough for maximum expansion (known as “oven spring”). Once the lid is removed, the trapped moisture dissipates, allowing the sugars in the flour to caramelize into a crisp, dark brown crust.
Scoring Techniques for Maximum Oven Spring
Scoring your loaf is not just aesthetic; it prevents your bread from bursting open at weak seam points along the sides. Make quick, confident slashes about half an inch deep. An angled cut encourages the bread to expand upward and create a crisp edge along the score mark.
Cool Completely Before Slicing
Resist the strong temptation to slice into your hot bread immediately after pulling it from the oven. Bread continues to bake and set internally as it cools. Slicing too early traps steam and crushes the delicate crumb structure, resulting in a gummy texture. Allow the loaf to cool on a wire rack for at least 45 to 60 minutes before cutting.
Delicious Flavor Variations & Add-Ins
Once you master this base rosemary garlic bread, you can easily adapt the dough with various complementary ingredients:
- Cheddar & Jalapeño: Fold 1 cup of cubed sharp cheddar cheese and 2 tablespoons of diced fresh jalapeños into the dough during the initial mixing step.
- Parmesan & Olive: Add 1/2 cup of freshly grated Parmesan cheese and 1/3 cup of chopped Kalamata olives for a distinctly Mediterranean flair.
- Sun-Dried Tomato & Basil: Swap the rosemary for fresh basil and add 1/3 cup of drained, chopped sun-dried tomatoes.
- Whole Wheat Blend: Substitute up to 1 cup of the white bread flour with whole wheat flour for an earthier, nuttier taste and added dietary fiber.
What to Serve with Garlic Rosemary Bread
This versatile rustic loaf complements a wide array of savory meals:
- Comforting Soups and Stews: Perfect for dipping into tomato basil soup, rich beef stew, french onion soup, or creamy potato soup.
- Pasta Dishes: Serve thick slices alongside fettuccine alfredo, traditional spaghetti bolognese, or baked ziti to soak up extra sauce.
- Charcuterie & Cheese Boards: Slice thinly and pair with sharp white cheddar, brie, cured meats, fig jam, and extra virgin olive oil for dipping.
- Avocado Toast & Sandwiches: Use toasted slices as a high-flavor foundation for turkey bacon clubs or gourmet fried egg avocado toasts.
How to Store, Freeze, and Reheat Homemade Bread
- Storing at Room Temperature: Store uncut bread on your countertop wrapped in a clean linen towel or stored cut-side down on a wooden cutting board for up to 2 days. Avoid plastic bags for the first 24 hours, as plastic seals in residual moisture and softens the crispy crust.
- Freezing: Slice the fully cooled loaf into individual portions. Place parchment paper between slices, transfer them into a heavy-duty freezer bag, and freeze for up to 3 months.
- Reheating: To revive a whole day-old loaf, splash the crust lightly with water and bake in a 375°F (190°C) oven for 8 to 10 minutes until crisp. For frozen individual slices, pop them directly into a toaster for a quick, fresh-tasting slice anytime.
Frequently Asked Questions
Can I make this bread without a Dutch oven?
Yes! While a Dutch oven yields the best crust, you can place a pizza stone or heavy baking sheet in the oven to preheat. Place your scored loaf on parchment paper directly on the hot stone and add a pan of boiling water to the bottom rack of the oven to generate steam during the first 20 minutes of baking.
Why is my bread dense instead of airy?
Dense bread is typically caused by expired yeast, under-proofing, or using too much flour. Ensure your water is warm (not hot), check your yeast expiration date, and measure flour by weight using a digital scale or by using the scoop-and-level method rather than packing flour into measuring cups.
Can I let the dough rise in the fridge overnight?
Absolutely! Cold fermentation in the refrigerator for 12 to 18 hours enhances the bread’s flavor profile, making it taste similar to traditional sourdough. Bring the cold dough back toward room temperature while your oven preheats before baking.
Print-Ready Recipe Card: Roasted Garlic Rosemary Artisan Bread
- Prep Time: 15 minutes
- Rise Time: 2 hours 30 minutes
- Cook Time: 45 minutes
- Total Time: 3 hours 30 minutes
- Yield: 1 round boule (approx. 8 slices)
- Course: Side / Bread
- Cuisine: American / European Artisan
Ingredients
- 3 and 1/4 cups (400g) bread flour (or unbleached all-purpose flour)
- 1 and 1/2 teaspoons fine sea salt
- 1 teaspoon instant yeast
- 2 tablespoons fresh rosemary, finely chopped
- 1 teaspoon garlic powder (or 4 cloves roasted garlic, mashed)
- 1 and 1/2 cups (360ml) warm water (105°F–110°F)
- Coarse sea salt and extra chopped rosemary (for top topping)
Instructions
- In a large bowl, whisk together flour, fine sea salt, instant yeast, chopped rosemary, and garlic powder.
- Add warm water and stir with a sturdy spoon until a wet, shaggy dough forms.
- Cover the bowl tightly with plastic wrap and let it rise at room temperature for 2 to 3 hours until doubled and bubbly.
- Turn dough onto a floured surface, fold edges into the center to form a round shape, and transfer onto a sheet of parchment paper. Let rest for 30 minutes.
- While dough rests, place a 5-quart Dutch oven with lid inside your oven and preheat to 450°F (230°C).
- Carefully remove the hot Dutch oven. Score the top of the dough with a 1/2-inch deep slash, sprinkle with coarse sea salt and fresh rosemary, and lower the dough (with parchment paper) into the pot.
- Cover with lid and bake for 30 minutes. Remove lid and bake uncovered for 12 to 15 minutes until golden brown.
- Transfer bread to a wire rack and cool for at least 45 minutes before slicing.
Final Thoughts
Baking your own artisan bread at home is one of the most fulfilling culinary projects you can undertake, and this No-Knead Roasted Garlic & Rosemary Artisan Bread recipe delivers incredible results with minimum hassle. The combination of crackly crust, pillowy crumb, and herbaceous garlic flavor turns any dinner into a special event. Try this recipe this weekend and enjoy fresh, warm bakery-style bread straight from your own oven!