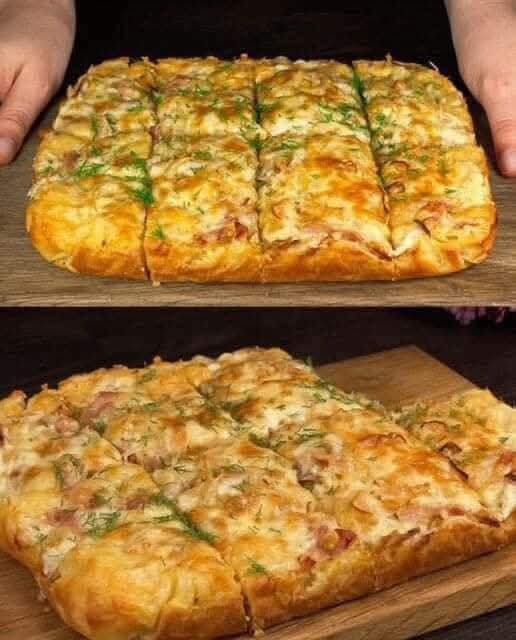
The Ultimate Cheesy Garlic Slab Bread Recipe A CrowdBaking Masterpiece
There is something universally comforting about the combination of warm, freshly baked bread, aromatic garlic, and melted, golden cheese. While traditional garlic bread is a staple companion to pasta nights, transforming it into a dedicated sheet-pan slab bread turns a simple side dish into an extraordinary culinary centerpiece. This thick, airy, and soft-crumbed slab bread behaves like a hybrid of deep-dish pizza dough and classic Italian focaccia, providing a sturdy yet pillowy base capable of holding an abundant layer of premium toppings. Perfect for game day gatherings, family dinner parties, or weekend meal prep, this recipe delivers a bakery-quality experience directly from your home oven. By learning a few foundational dough hydration tips and cheese melting techniques, you will be able to create a stunning, pull-apart bread that stays perfectly soft on the inside with a beautifully caramelized perimeter.
Why This Homemade Sheet-Pan Slab Bread Is Superior
Baking bread on a flat sheet pan or rimmed baking tray offers incredible advantages over traditional loaf pans or individual artisanal boules. It maximizes the surface area available for toppings, ensuring that every single slice you cut receives an equal distribution of rich garlic butter and bubbly cheese.
The Perfect Balance of Pillowy Crumb and Crispy Edges
A phenomenal slab bread relies entirely on contrasting textures. The bottom of the dough cooks in direct contact with a light layer of olive oil on the baking sheet, essentially frying the lower crust to a gorgeous, crisp golden-brown. Meanwhile, the interior dough remains incredibly soft, open-crumbed, and airy, absorbing the pooling oils and garlic juices without becoming heavy or dense. This structural balance prevents the bread from turning soggy underneath the weight of the melted cheese layer.
A Highly Adaptable Base for Content Creators and Home Bakers
From an editorial and culinary standpoint, this foundational sheet-pan dough formula is incredibly forgiving. Whether you are a seasoned baker looking to experiment with long-term cold fermentation or a beginner looking for a reliable, fast-rising weekend bake, the dough adapts seamlessly. It can be prepared by hand in a single bowl or mixed effortlessly with a standard kitchen stand mixer, making it a highly accessible option for home cooks of all skill levels.
Comprehensive Ingredients Breakdown and Selection Guide
To achieve that signature melt-in-your-mouth texture paired with a robust, savory flavor profile, selecting the correct ingredients is paramount. Because this recipe relies on simple, accessible pantry items, the quality and type of each component directly influence your final baking success.
Flour Selection: Bread Flour vs. All-Purpose Flour
The foundation of your slab bread’s elasticity and height begins with your flour choice. For the absolute best results, high-protein bread flour containing roughly twelve to fourteen percent protein is highly recommended. The elevated protein content allows for the development of a strong, stretchy gluten network that traps expanding gas bubbles during the proofing stages, resulting in a thick, beautifully aerated slab. If you only have all-purpose flour on hand, you can still achieve a fantastic result, though the final crumb structure will be slightly tighter, more delicate, and less chewy than a traditional bread flour version.
The Trio of Cheeses for Maximum Flavor and Melt
Relying on a single type of cheese often leaves baked breads lacking in either structural stretch or depth of flavor. For a truly professional finish, a balanced combination of three distinct cheeses is ideal:
- Low-Moisture Mozzarella: This is the absolute backbone of your cheese layer. It provides that classic, dramatic, and long elastic stretch that everyone loves when pulling a fresh piece of bread apart. Avoid using fresh mozzarella packed in water for this specific recipe, as its high moisture content will weep into the bread during baking, making the upper crust soggy.
- Sharp Cheddar or Monterey Jack: Adding a finely shredded medium-to-sharp cheddar introduces a beautiful, rich depth of flavor and a vibrant golden hue that contrasts beautifully with the pale mozzarella.
- Finely Grated Parmesan or Romano: A final dusting of a hard, aged cheese introduces a punch of savory umami and sharp saltiness that cuts through the richness of the dairy fats, helping the top surface caramelize into a professional, spotted crust.
Fresh Garlic and Green Herb Enhancements
Never compromise by using pre-peeled commercial garlic jars or garlic powder for the primary topping element. Freshly minced or grated garlic cloves carry natural sulfur compounds that release a sweet, mellow aroma when baked gently in butter. To balance the intense savory notes of the garlic and cheese, finishing the hot bread with a generous scatter of fresh green herbs—such as finely chopped dill, flat-leaf Italian parsley, or aromatic chives—adds a necessary pop of brightness, visual contrast, and a clean aroma that elevates the entire presentation.
Step-by-Step Instructions for Making Cheesy Slab Bread
Creating this sheet-pan masterpiece is a highly visual, satisfying process. Follow these detailed production steps to ensure your dough rises perfectly and your toppings melt into a cohesive, golden layer.
Step 1: Mixing and Kneading the High-Hydration Dough
In a large mixing bowl or the bowl of your stand mixer, combine one and a half cups of warm water (roughly one hundred and five degrees Fahrenheit) with one packet of active dry yeast and a teaspoon of honey or sugar. Allow the mixture to sit undisturbed for five minutes until a thick, frothy foam forms on the surface, indicating the yeast is alive and active. Add three and a half cups of bread flour, two tablespoons of olive oil, and two teaspoons of fine sea salt.
If using a stand mixer fitted with the dough hook attachment, mix on low speed for six to eight minutes until the dough clears the sides of the bowl and forms a smooth, smooth, and slightly tacky ball. If mixing by hand, turn the shaggy dough out onto a lightly floured surface and knead firmly for ten minutes. Place the smooth dough ball into a lightly oiled bowl, cover it with a damp kitchen towel, and let it rise in a warm spot for one hour, or until it has fully doubled in size.
Step 2: Stretching the Dough and the Second Proof
Pour two tablespoons of high-quality olive oil directly onto a large rimmed baking sheet (roughly eleven-by-seventeen inches). Use your hands to spread the oil completely across the bottom and sides of the pan. Turn your risen dough out directly into the center of the oiled tray. Gently press your fingertips into the dough, pushing it outward from the center toward the corners of the pan.
If the dough feels tight and continually snaps back, do not force it; cover it with a piece of plastic wrap, let the gluten relax for ten minutes, and then resume stretching. Once the dough completely fills the pan in an even, flat layer, use your fingers to press deep dimples across the entire surface, similar to a focaccia. Cover the pan gently and let it undergo a second rise for twenty to30 minutes until it looks puffy and full of tiny surface air bubbles.
Step 3: Preparing and Applying the Garlic Butter Base
While the dough completes its second rise, preheat your conventional oven to four hundred and twenty-five degrees Fahrenheit (two hundred and eighteen degrees Celsius). In a small saucepan or microwave-safe bowl, melt four tablespoons of unsalted butter. Stir in four to five cloves of finely minced fresh garlic and a tiny pinch of salt. Cook gently for just sixty seconds to allow the garlic to infuse into the warm butter without browning.
Using a pastry brush or the back of a spoon, gently drizzle and spread this aromatic garlic butter across the entire surface of your puffed dough, ensuring the liquid settles deep inside the dimples you created earlier. Take care not to press down too hard, as you want to preserve the delicate air pockets inside the proofed dough.
Step 4: Layering the Cheeses and Mastering the Bake
Evenly scatter your shredded low-moisture mozzarella and sharp cheddar across the entire surface of the garlic buttered dough, carrying the cheese layer all the way out to the absolute edges of the pan. This technique allows the perimeter cheese to melt against the hot metal rim, creating a highly prized, crispy, and caramelized cheese crust known as a frico. Finish with a final dusting of finely grated Parmesan cheese.
Slide the pan into the middle rack of your preheated oven and bake for twenty to twenty-five minutes. Keep a close eye on the oven during the final minutes; the slab bread is done when the dough is fully baked through and the cheese has transformed into a bubbling, deeply golden blanket with beautiful dark-brown spots scattered across the surface.
Step 5: Finishing, Slicing, and Serving
Carefully remove the hot baking sheet from the oven and place it onto a heat-safe wire rack or wooden cutting board. Immediately take your finely chopped fresh herbs—such as dill and parsley—and scatter them evenly across the bubbling hot cheese. The residual heat from the melted dairy will instantly activate the essential oils in the fresh herbs, releasing an incredible aroma across your kitchen.
Allow the bread to cool undisturbed inside the pan for five to ten minutes; this brief resting window allows the melted cheese to set slightly, making it much cleaner to slice. Use a sharp rocking pizza cutter or a large chef’s knife to slice the slab bread into uniform squares or rectangles. Serve warm while the cheese remains perfectly melted and stretchy.
Professional Technical Tips for Achieving Bakery-Quality Crumb
Even with a simple sheet-pan recipe, paying attention to small culinary details can dramatically upgrade the quality, lightness, and texture of your finished bread.
Controlling Dough Temperature and Hydration
The absolute secret to an airy, open crumb structure inside your slab bread is maintaining a higher dough hydration level. A wetter dough creates more steam inside the hot oven, forcing the gluten network to expand rapidly and creating those beautiful, irregular pockets of air. When mixing your dough, ensure your water is warm but never hot to the touch, as temperatures exceeding one hundred and twenty degrees Fahrenheit will accidentally kill the yeast cells, resulting in a dense, flat, and heavy brick of bread.
Achieving the Perfect Frico Caramelized Edge
If you love the intensely savory, crispy burnt-cheese edges found on high-end artisan pan pizzas, you can easily replicate that effect here. When applying your cheese mixture, actively press a generous handful of the shredded mozzarella and cheddar firmly down against the junction where the dough meets the vertical metal rim of the baking sheet. As the pan heats up in the oven, the fats from the cheese will cook against the hot metal, forming a crisp, deeply savory, and incredibly delicious perimeter that locks in the moisture of the interior bread crumb.
Comprehensive Storage, Reheating, and Advance Prep Protocols
Because this cheesy slab bread contains a high moisture content and a rich layer of dairy fats, storing and reheating it properly ensures that the leftovers retain their original pillowy soft interior and crispy bottom crust.
Refrigerator Storage and Layering Methods
Allow any remaining squares of slab bread to cool completely to room temperature before packing them away. Storing warm cheesy bread inside a closed container creates trapped condensation, which turns the crisp crust soggy and ruins the texture. Place the completely cooled slices into an airtight food storage container. If you need to stack the pieces to save space, place a small square of parchment paper or wax paper between the layers to prevent the cheese toppings from sticking to the undersides of the top pieces. Stored properly in the refrigerator, the bread will remain perfectly fresh and delicious for up to three to four days.
The Best Methods for Reheating Leftovers Perfectly
To bring your refrigerated slab bread back to its original glory, avoid utilizing the microwave, as it tends to turn yeast breads rubbery and makes the cheese unpleasantly greasy. Instead, choose one of these superior reheating methods:
- The Conventional Oven Method: Preheat your oven or toaster oven to three hundred and seventy-five degrees Fahrenheit. Place the cold slices of slab bread directly onto a baking sheet or a piece of aluminum foil. Bake for eight to ten minutes until the interior bread is heated completely through and the top cheese layer becomes hot, bubbly, and stretchy once again.
- The Skillet Method: Place a non-stick or cast-iron skillet over medium-low heat on your stovetop. Place the slice of bread directly into the dry pan, crust side down. Cover the skillet tightly with a lid or a piece of foil. The direct heat from the bottom of the skillet will recrisp the lower crust beautifully, while the trapped steam under the lid melts the cheese topping perfectly in roughly three to five minutes.
Frequently Asked Questions
Can I make this slab bread dough ahead of time?
Yes, this dough is an excellent candidate for a slow, cold fermentation process in the refrigerator, which actually enhances the overall flavor profile of the bread. After mixing and completing the initial kneading step, place your dough ball into an oiled container, cover it tightly with plastic wrap to prevent it from drying out, and store it in the refrigerator for up to twenty-four to forty-eight hours. The cold temperature slows down the yeast activity, allowing the natural grain enzymes to break down starches into complex sugars, resulting in a much deeper, more complex flavor and a beautiful rustic aroma when baked. When you are ready to bake, simply bring the dough to room temperature, stretch it onto your oiled pan, and complete the second proof as directed.
What is the best way to prevent the garlic from burning and turning bitter?
Garlic contains a high amount of natural sugars that can quickly burn and turn unpleasantly bitter if exposed to direct, intense dry heat for extended periods. To protect your minced garlic in this recipe, ensure it is thoroughly coated and combined with the melted unsalted butter before spreading it over the dough. Furthermore, burying the garlic butter layer underneath the generous blanket of shredded mozzarella and cheddar cheese acts as a protective shield, allowing the garlic to gently steam and infuse into the bread dough safely without coming into direct contact with the intense top heat of the oven.
Can I add extra savory meat toppings to this recipe?
Absolutely. This sturdy slab bread can easily support a variety of additional savory toppings. If you want to add meats like diced ham, crispy crumbled bacon, or sliced pepperoni, simply scatter them evenly over the cheddar and mozzarella layer just before the pan slides into the oven. To ensure the bread remains perfectly light and airy, avoid overloading the surface with excessively heavy or wet toppings, as too much weight can restrict the oven spring of the rising dough.
Conclusion
Mastering the art of a homemade cheesy garlic slab bread is a incredibly rewarding baking project that brings instant joy to any dining table. By respecting the fermentation process of your high-protein bread flour, utilizing a smart combination of structural and flavorful cheeses, and finishing with a vibrant scatter of fresh green herbs, you create a dish that stands out in both texture and flavor. This sheet-pan method eliminates the stress of traditional bread shaping while delivering an incredibly consistent, crowd-pleasing result every single time you bake. Gather your quality pantry staples, allow your dough the time it needs to rise beautifully, and enjoy the comforting, delicious process of crafting the ultimate cheesy garlic slab bread for your family and friends.