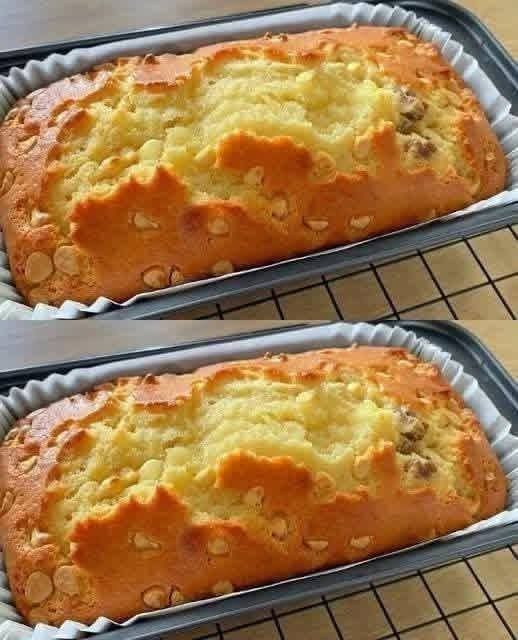
The Ultimate Moist White Chocolate Chip Loaf Cake Recipe A Baker s Guide to Perfection
Baking a perfect loaf cake is an art form that brings immense comfort to kitchens worldwide. The humble loaf cake, with its golden-brown crust and tight yet tender crumb, serves as the ultimate canvas for a wide variety of rich flavor profiles. Among the endless iterations of quick breads and pound cakes, the white chocolate chip loaf cake stands out as a luxurious, sweet, and deeply satisfying treat. This detailed guide explores how to craft a bakery-quality white chocolate loaf cake that remains incredibly moist for days while delivering a beautiful balance of buttery goodness and sweet, creamy cocoa butter pockets. Whether you are hosting a morning brunch, preparing a sweet companion for your afternoon espresso, or looking for a comforting weekend baking project, this recipe delivers on every front.
Why This White Chocolate Loaf Cake Stands Out From the Rest
Achieving the perfect balance of moisture, sweetness, and structure in a loaf cake requires understanding how ingredients interact under heat. Many white chocolate baked goods suffer from being overly sweet or dry because white chocolate lacks the bitter solids found in dark chocolate to counteract sugar levels. This specific recipe uses a carefully engineered batter formula that introduces acidity and rich dairy elements to balance out the sweetness, resulting in a complex and sophisticated flavor profile.
The Secrets Behind the Perfect Golden-Brown Crust
A stellar loaf cake is defined by its exterior appearance just as much as its interior texture. The beautiful, deep golden crust of this loaf is achieved through the natural caramelization of sugars and the Maillard reaction between dairy proteins and carbohydrates. By lining your loaf pan with high-quality parchment paper and choosing the right bakeware material, you allow the heat to distribute evenly across the surface of the batter. This creates a signature split down the center of the loaf, exposing a pale, tender interior wrapped in a beautifully caramelized, crisp perimeter.
The Food Science of an Ultra-Moist Cake Crumb
The primary challenge when baking any loaf cake is preventing it from drying out during its extended stay in the oven. Because loaf cakes are deep and dense, they require a longer baking time than standard layers cakes or cupcakes. To protect the structural integrity and moisture levels of the crumb, this recipe relies on a combination of high-fat unsalted butter and full-fat sour cream. The lactic acid present in sour cream breaks down gluten strands in the all-purpose flour, ensuring that the finished cake has a melt-in-your-mouth quality rather than a tough, bread-like texture.
Comprehensive Ingredients Breakdown and Selection Guide
To ensure your loaf cake turns out identically to high-end bakery versions, selecting premium ingredients is paramount. Because quick breads rely on a short list of pantry staples, the quality of each component directly impacts the depth of flavor and overall mouthfeel of the final product.
Choosing Between All-Purpose Flour and Cake Flour
The structural foundation of your loaf cake relies heavily on your choice of flour. All-purpose flour is ideal for this recipe because it contains a moderate protein content of roughly ten to twelve percent. This provides enough structural strength to support the heavy white chocolate chips, preventing them from sinking completely to the bottom of the pan during the baking process. If you prefer an exceptionally delicate, fine-textured pound cake consistency, you can substitute a portion of the all-purpose flour with cake flour, though you must ensure your mixing technique is precise to maintain structural stability.
The Importance of Real Cocoa Butter White Chocolate
Not all white chocolate is created equal, and your choice of chocolate can make or break this recipe. Many commercial baking chips sold in grocery stores do not actually contain real cocoa butter; instead, they utilize palm oil or other hydrogenated vegetable fats combined with artificial flavorings. For the best results, look for white chocolate baking chunks or professional-grade couverture chocolate discs that list cocoa butter as the primary fat source. Real white chocolate melts smoothly into the surrounding batter during baking, creating luxurious pools of sweet cream flavor rather than remaining hard, waxy, and unpleasantly sweet.
Balancing Fats: The Roles of Butter, Oil, and Sour Cream
While unsalted dairy butter provides the nostalgic, rich flavor that defines classic European pastries, incorporating a small amount of neutral vegetable oil or a high-fat cultured dairy product like sour cream adds exceptional longevity to the moisture levels of the cake. Butter solidifies at room temperature, which can sometimes make a cake feel firm or dry the day after it is baked. By introducing sour cream or full-fat Greek yogurt into the wet mixture, you introduce stable liquid fats and moisture molecules that keep the cake remarkably soft, tender, and fresh for up to five full days.
Step-by-Step Instructions for Making the Ultimate Loaf Cake
Success in baking relies heavily on the sequence of operations and temperature control of your starting ingredients. Before you begin assembling your batter, ensure that your eggs, butter, and sour cream have all sat out on your kitchen counter long enough to reach uniform room temperature, as cold ingredients will cause the batter to separate and curdle.
Preparing Your Bakeware and Oven Environment
Start by preheating your conventional oven to three hundred and fifty degrees Fahrenheit or one hundred and seventy-five degrees Celsius. Oven accuracy is critical for dense loaf cakes, so utilizing an independent oven thermometer is highly recommended. Take an eight-by-four-inch or a nine-by-five-inch metal loaf pan and grease the interior thoroughly with a small amount of softened butter or non-stick baking spray. Cut a sheet of parchment paper so that it fits the width of the pan precisely while leaving a few inches of overhang on the long sides; this creates an efficient sling that allows you to lift the finished cake out effortlessly without damaging the delicate crust.
The Creaming Method: Building a Strong Air Matrix
In a large mixing bowl or the bowl of a stand mixer fitted with the paddle attachment, combine your softened unsalted butter and granulated sugar. Turn the mixer to medium-high speed and allow it to run for a full three to five minutes. This process, known as the creaming method, forces the sharp sugar crystals through the solid butter, creating millions of microscopic air pockets. You will know the process is complete when the mixture transforms from a dense, yellow paste into an incredibly pale, fluffy, and voluminous mass that holds its shape against the side of the bowl.
Incorporating Eggs and Emulsifying the Wet Base
With the mixer running on low speed, add your room-temperature eggs one at a time, ensuring that each egg is completely integrated into the fat matrix before introducing the next. Eggs act as a natural emulsifier, binding the water-based liquids with the solid fats of the butter. If your eggs are too cold, they will cause the butter to seize, resulting in a curdled appearance that yields a dense, heavy cake. Once the eggs are fully incorporated, pour in your pure vanilla extract and your full-fat sour cream, mixing gently until the wet base is completely smooth and uniform.
Sifting and Folding the Dry Components Safely
In a separate medium bowl, whisk together your all-purpose flour, baking powder, and a fine pinch of sea salt. Sifting these dry components together breaks up any stubborn flour clumps and ensures that the leavening agent is perfectly distributed throughout the flour. Add the dry ingredients into your wet butter mixture in two distinct stages. Use a flexible rubber spatula to fold the ingredients together by hand rather than using the electric mixer. Gently cut down through the center of the batter, sweep around the bottom of the bowl, and fold over the top until the flour just disappears; over-mixing at this stage develops excess gluten, which makes the loaf tough.
Strategically Coating and Folding White Chocolate Chips
To ensure your white chocolate chips remain beautifully suspended throughout the entire height of the loaf rather than dropping to the bottom of the pan, toss your chocolate chips with a single teaspoon of all-purpose flour in a small bowl before adding them to the batter. The light dusting of flour creates surface friction, allowing the chips to cling to the thick cake batter during the initial stages of baking. Gently fold the coated chocolate chips into the batter with a couple of final turns of your spatula, reserving a small handful to press directly into the top of the loaf just before it slides into the oven.
Professional Technical Tips for Baking Success Every Time
Even with a flawless recipe, small variances in kitchen environments, pan materials, and oven dynamics can influence your baking outcomes. Implementing a few professional pastry chef techniques ensures a spectacular result regardless of external variables.
Choosing the Right Baking Pan Material
The material of your loaf pan plays a massive role in how heat transfers to your cake batter. Light-colored aluminum or heavy aluminized steel pans are the industry standard because they reflect heat evenly, allowing the interior of the cake to bake fully without burning the exterior edges. If you are utilizing a dark-colored non-stick metal pan, keep in mind that dark surfaces absorb heat much faster, which can cause your crust to become overly dark or bitter before the center is cooked through; to counter this, reduce your oven temperature by twenty-five degrees Fahrenheit and extend the baking time slightly. Glass or ceramic baking dishes retain heat for a long time, which can lead to a dense crumb structure along the edges.
The Skewer Test and Monitoring Internal Doneness
Because loaf cakes are thick, relying purely on visual cues or timer alarms can occasionally lead to under-baked centers. Your cake is fully baked when the top is springy to a gentle touch and a long wooden skewer or toothpick inserted directly into the deepest center of the loaf emerges completely clean or with just a few moist crumbs attached. If you encounter wet, glossy batter on the skewer, the cake requires more time. For absolute precision, you can utilize an instant-read digital kitchen thermometer; a perfectly baked loaf cake should register an internal temperature between two hundred and two hundred and five degrees Fahrenheit.
Creative Flavor Variations and Customizations
Once you have mastered the foundational white chocolate loaf cake recipe, you can adapt the batter to highlight a variety of seasonal ingredients, texturizers, and flavor enhancers. White chocolate pairs beautifully with tart fruits, aromatic spices, and toasted elements.
The Sweet and Tart Raspberry White Chocolate Twist
One of the most classic flavor pairings in the pastry world is the combination of sweet white chocolate and tart red raspberries. To incorporate fruit into this loaf, gently fold a half-cup of fresh or freeze-dried raspberries into the batter along with the chocolate chips. Avoid using frozen raspberries directly without thawing and draining them first, as their excess water content can create wet, soggy pockets inside the cake crumb. The vibrant acidity of the berries cuts through the buttery richness of the cake, creating a beautiful color contrast and an incredibly balanced flavor profile.
Macadamia Nut and Toasted Coconut Excursion
For a texture-rich, tropical-inspired variation, you can introduce chopped macadamia nuts and unsweetened flaked coconut into the loaf batter. Take a half-cup of raw macadamia nuts, chop them into uniform pieces, and toast them in a dry skillet over medium heat for three minutes until they become fragrant and lightly golden. Allow the nuts to cool completely before folding them into the batter alongside the white chocolate chips. The rich, buttery crunch of the macadamia nuts balances the soft texture of the cake, while the white chocolate adds a creamy sweetness that mimics a classic gourmet cookie flavor.
Comprehensive Storage, Freezing, and Serving Guidelines
Preserving the exceptional texture and moisture of your homemade loaf cake requires proper handling once it emerges from the oven. Managing how the cake cools and how it is shielded from air exposure dictates its quality over the subsequent days.
The Crucial Post-Bake Cooling Window
When your loaf cake finishes baking, resist the urge to remove it from the hot pan immediately. The structure of a warm cake is incredibly fragile, and pulling on the parchment sling right away can cause the center of the loaf to collapse or crack apart. Allow the cake to rest undisturbed inside the pan on a wire cooling rack for fifteen to twenty minutes. This allows the internal starches to set and the proteins to firm up safely. After this initial cooling window, use the parchment paper handles to gently lift the loaf out of the pan and place it directly onto the wire rack to cool completely to room temperature before slicing. Slicing a warm cake allows essential steam to escape, which can dry out the remaining loaf prematurely.
Maintaining Long-Term Freshness at Room Temperature
To prevent your white chocolate loaf cake from drying out, store it inside an airtight cake dome or a heavy-duty plastic container at room temperature. If you do not have a dedicated container, wrap the cooled loaf tightly in two layers of plastic wrap, ensuring that the cut surfaces are completely sealed against the air. Stored properly at room temperature away from direct sunlight, this high-moisture loaf cake will remain incredibly soft, flavorful, and moist for up to four or five days. Avoid storing the cake in the refrigerator, as the circulating cold, dry air accelerates the staling process of wheat starches, turning the crumb firm and crumbly.
Advanced Freezing and Thawing Protocols
This white chocolate chip loaf cake freezes beautifully, making it an excellent option for forward-planning meal prep or holiday baking. To freeze the entire loaf, ensure it has cooled absolutely to room temperature, wrap it securely in plastic wrap, and follow with an outer layer of heavy aluminum foil to prevent freezer burn. Alternatively, you can pre-slice the loaf into individual portions and wrap each slice independently in plastic wrap before storing them together in a zip-top freezer bag. Frozen loaf cakes keep perfectly for up to three months. To thaw, simply place the wrapped loaf or individual slices on your kitchen counter for a few hours until they reach room temperature, or warm a slice gently in the microwave for fifteen seconds for a freshly baked experience.
Frequently Asked Questions About Baking Loaf Cakes
Can I use liquid food coloring to create a colorful marbled effect?
Yes, you can easily create a beautiful visual contrast by separating a third of your finished batter into a small bowl and mixing in a few drops of high-quality gel food coloring or a tablespoon of high-quality cocoa powder. Drop alternating spoonfuls of the plain batter and the colored batter into your lined loaf pan, then use a butter knife to gently swirl the mixtures together in a figure-eight motion before baking. Gel colors are preferred over liquid food colorings because they provide intense color output without altering the delicate moisture balance and hydration levels of the cake batter.
Why did my white chocolate chips melt completely into the batter?
If your white chocolate chips seem to disappear entirely or leave behind large, empty holes instead of distinct pockets of chocolate, it is highly likely that you utilized a low-quality brand of chocolate chips that lacks genuine cocoa butter. Inferior baking chips containing cheap vegetable oils melt at a much lower temperature and liquefy completely into the surrounding cake starches during baking. To maintain perfect chip definition and a satisfying bite, always select real white chocolate chunks, high-grade couverture discs, or premium baking brands that clearly display a high cocoa butter percentage on their nutritional labels.
How do I adapt this recipe for a smaller mini-loaf pan size?
If you want to bake this recipe using mini-loaf pans to create individual gifts or smaller portion sizes, you can utilize the exact same batter formula without making changes to the ingredient ratios. Divide the thick batter evenly among your greased and lined mini pans, ensuring that you only fill each pan to roughly two-thirds of its total height to allow sufficient room for expansion. Because smaller pans heat through to the center much faster, you will need to reduce the total baking time significantly; check the mini loaves after twenty to twenty-five minutes using the skewer test to ensure they do not over-bake and dry out.
Conclusion
Mastering the art of the perfect loaf cake is a deeply rewarding culinary achievement that fills your home with the warm, nostalgic aroma of a professional bakery. By understanding the science of the creaming method, selecting high-quality real white chocolate containing pure cocoa butter, and utilizing sour cream to maintain an ultra-moist crumb structure, you can create an exceptional dessert that stands out in both presentation and flavor. This white chocolate chip loaf cake delivers a perfect balance of comforting textures and luxurious sweetness that will quickly make it a favorite in your regular baking rotation. Gather your premium ingredients, follow the steps carefully, and enjoy the process of crafting a flawless, golden loaf cake that satisfies every sweet craving.