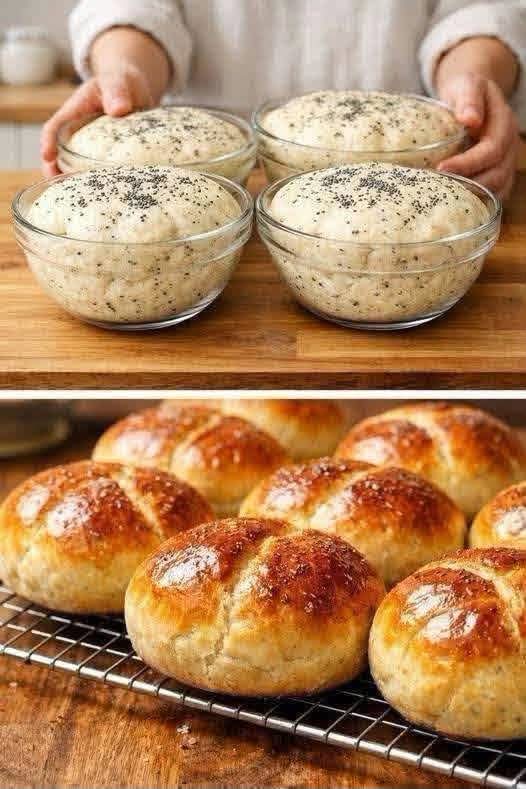
The Ultimate Soft and Fluffy Seeded Dinner Rolls Recipe
There is nothing quite like the irresistible smell of freshly baked bread wafting through your home. These soft, fluffy seeded dinner rolls feature an extraordinarily tender crumb, a glistening golden-brown crust, and a delicate speckling of seeds—such as poppy, chia, or nigella—kneaded straight into the dough and sprinkled across the top. Whether you are searching for a everyday side dish to complement weeknight soups, a showstopping addition to a holiday feast, or the ideal foundation for gourmet slider sandwiches, this comprehensive recipe delivers bakery-quality results right from your home kitchen. In this detailed guide, we will break down every single step, baking technique, and ingredient interaction required to transform basic pantry staples into pillowy, golden rolls every single time.
Why You Will Love Baking Homemade Seeded Rolls
If you have ever felt intimidated by yeast bread recipes, rest assured that this enriched dough is wonderfully forgiving, supple, and a complete pleasure to knead and shape.
First, the texture of these rolls simply cannot be matched by commercial alternatives. Standard grocery store rolls often rely on artificial softeners, dough conditioners, and heavy preservatives that leave the bread feeling crumbly or rubbery. Preparing them fresh in your kitchen allows you to achieve an impossibly airy center paired with a thin, glossy crust.
Second, portioning the dough into individual glass bowls or baking tins during proofing allows each roll to expand upward, creating a beautifully rounded, plump shape. The gentle slashes on top release steam during the initial oven spring, preventing jagged tears and giving the rolls an artisan look.
Finally, these rolls offer fantastic versatility. You can slather them in warm herb butter, stuff them with roasted turkey and cranberry sauce, or use them as mini brioche-style burger buns for dinner.
Key Ingredients for Soft, Golden Dinner Rolls
Achieving a pillow-soft crumb alongside a deeply golden finish relies on the harmonious interaction of a few key ingredients.
Flour Selection: All-Purpose vs. Bread Flour
Unbleached all-purpose flour provides the ideal structural balance, offering enough protein for a buoyant rise while keeping the crumb light and tender. If you prefer a chewier texture with maximum height, bread flour can be substituted seamlessly due to its higher gluten content.
The Leavening Power of Active Dry Yeast
Yeast is the living heart of this recipe, producing the carbon dioxide gas bubbles that expand during proofing and baking. Properly blooming active dry yeast in a warm liquid ensures that your dough rises reliably without any flat, dense results.
Enriching the Crumb: Whole Milk, Eggs, and Butter
While artisan baguettes rely on lean doughs containing only flour, water, salt, and yeast, dinner rolls require enrichment. Whole milk provides crucial hydration while softening gluten strands, an egg adds rich flavor and structure, and melted butter seals in moisture so your rolls remain soft for days after baking.
Flavorful Seeds: Poppy, Chia, or Nigella
Incorporating small seeds directly into the dough adds a subtle nutty undertone and visual appeal throughout the crumb. An additional dusting across the top before baking gives each roll a satisfying texture contrast.
Step-by-Step Guide to Perfect Seeded Dinner Rolls
Follow this step-by-step process to mix, proof, shape, and bake your homemade rolls with total confidence.
Step 1: Blooming the Yeast
Begin by whisking together warm milk (heated precisely between 105°F and 110°F), a tablespoon of sugar, and active dry yeast in a large mixing bowl. Allow the liquid to rest undisturbed for 5 to 10 minutes. Once a thick, foamy layer forms across the surface, your yeast is officially active and ready for baking.
Step 2: Mixing the Enriched Dough
To the foamy yeast mixture, stir in room-temperature melted butter, a whole egg, fine sea salt, and a tablespoon of poppy or chia seeds. Gradually add the flour, mixing with a wooden spoon or a stand mixer equipped with a dough hook attachment until a shaggy, cohesive dough starts to pull away from the bowl.
Step 3: Kneading for Structure
Turn the dough onto a lightly floured surface or keep it running in your mixer on low-medium speed. Knead continuously for 8 to 10 minutes until the dough becomes silky, elastic, and smooth. A properly kneaded dough should pass the windowpane test: a small piece stretched between your fingers should expand into a thin, translucent sheet without immediately tearing.
Step 4: The First Bulk Fermentation
Shape the dough into a smooth ball and place it inside a lightly oiled bowl, flipping it once to coat the top. Cover tightly with a damp kitchen towel or plastic wrap. Set the bowl in a warm, draft-free spot for 60 to 90 minutes, or until the dough doubles in volume.
Step 5: Portioning, Shaping, and Proofing
Gently press down on the risen dough to vent trapped air pockets. Divide the dough evenly into individual portions weighing approximately 80 to 90 grams each. Roll each piece against an un-floured countertop with a cupped hand to form a tight, smooth ball. Nest the dough balls into oiled glass bowls or a baking sheet, cover loosely, and allow them to proof a second time for 30 to 45 minutes until light and puffy.
Step 6: Glazing, Slicing, and Baking
Preheat your oven to 375°F (190°C). Whisk an egg with a tablespoon of water or milk and gently brush the mixture over the tops of the puffy dough balls for a rich, glossy sheen. Using a razor blade or sharp bread knife, score a shallow cross across the top of each roll, then sprinkle with remaining seeds. Bake for 18 to 22 minutes until the tops turn a deep mahogany gold and the internal temperature reaches 190°F.
Essential Baking Secrets for Success
Temperature Precision Matters
Avoid using milk that is too hot. Liquids exceeding 120°F will kill the yeast organisms, leaving you with dense dough that refuses to rise. Always aim for a comfortable, lukewarm temperature.
Focus on Surface Tension
When shaping your individual dough portions, ensure you create a tight, seamless skin on top. High surface tension directs the expansion upward during baking, keeping the rolls spherical rather than letting them spread flat.
Scoring Swiftly
Make your scores swift and shallow. Heavy-handed slicing will cause the delicate, proofed dough to deflate right before it hits the oven.
Frequently Asked Questions
How should I store leftover dinner rolls?
Allow the rolls to cool completely to room temperature on a wire rack. Store them in an airtight bag at room temperature for up to 3 days. Reheat them in a 300°F oven for 5 minutes to revive their fresh-baked softness.
Can I freeze these rolls for later?
Yes, fully baked rolls freeze exceptionally well. Once cooled, wrap them tightly in foil and store in a freezer bag for up to 3 months. Thaw at room temperature and warm in the oven before serving.
Can I prepare the dough in advance?
You can mix and knead the dough, then place it in the refrigerator for a slow overnight bulk fermentation. The next morning, bring the cold dough to room temperature, shape into balls, perform the final proof, and bake as directed.
Complete Seeded Dinner Rolls Recipe Card
Ingredients
- 3 1/2 cups unbleached all-purpose flour
- 1 packet (2 1/4 teaspoons) active dry yeast
- 2 tablespoons granulated sugar
- 1 cup whole milk, warmed (105°F–110°F)
- 1/4 cup unsalted butter, melted and cooled
- 1 large egg, room temperature
- 1 1/2 teaspoons fine sea salt
- 1 1/2 tablespoons poppy seeds or chia seeds (divided)
- 1 egg + 1 tablespoon water (for egg wash)
Instructions
- In a bowl, combine warm milk, sugar, and yeast; let bloom for 5–10 minutes until foamy.
- Add melted butter, egg, salt, 1 tablespoon of seeds, and flour. Mix until dough comes together.
- Knead for 8–10 minutes until smooth and elastic.
- Transfer to an oiled bowl, cover, and let rise for 60–90 minutes until doubled in size.
- Divide dough into equal portions, shape into tight round balls, and place into oiled baking dishes.
- Cover and let proof for 30–45 minutes until puffy.
- Brush with egg wash, cut a shallow cross on top of each roll, and sprinkle with remaining seeds.
- Bake at 375°F (190°C) for 18–22 minutes until golden brown. Cool on a wire rack and serve warm.
Mastering homemade dinner rolls is one of the most satisfying achievements for any home baker. With simple ingredients, proper proofing, and a light seed topping, you can create soft, golden rolls that effortlessly outshine any restaurant flatbread or packaged roll.