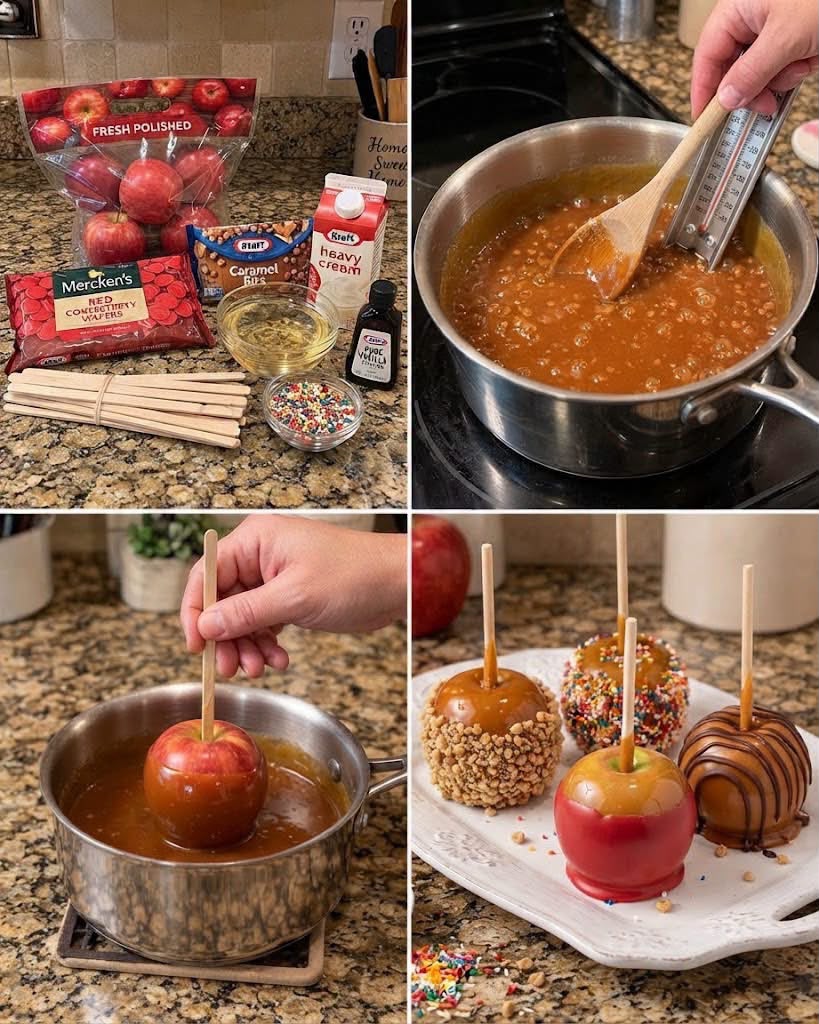
Nothing says fall quite like a beautiful homemade caramel apple! These easy caramel apples combine crisp, juicy apples with a thick, buttery caramel coating and delicious toppings like melted chocolate, crunchy nuts, and colorful sprinkles.
Whether you’re preparing treats for Halloween, a fall party, Thanksgiving, or a family gathering, this homemade caramel apple recipe is guaranteed to impress. The best part? You can customize every apple with your favorite toppings!
⏱️ Recipe Information
- Prep Time: 20 minutes
- Cook Time: 15 minutes
- Cooling Time: 30 minutes
- Total Time: 1 hour 5 minutes
- Servings: 8 caramel apples
- Difficulty: Easy to Moderate
🛒 INGREDIENTS
For the Caramel Apples
- 8 medium fresh apples (Granny Smith, Honeycrisp, or Gala)
- 16 oz (about 2⅔ cups) caramel bits or soft caramel candies
- 3 tablespoons heavy cream
- 1 teaspoon vanilla extract
- 8 sturdy wooden apple sticks
For the Optional Chocolate Coating
- 1 cup red candy melts
- ½ cup milk or dark chocolate melting wafers
- 1 teaspoon vegetable oil, if needed for thinning the coating
For Decorating
- ½ cup finely chopped peanuts or pecans
- ¼ cup rainbow sprinkles
- ¼ cup mini chocolate chips (optional)
- Extra melted chocolate for drizzling
👩🍳 HOW TO MAKE HOMEMADE CARAMEL APPLES
Step 1: Wash the Apples
Wash all eight apples thoroughly under warm running water to help remove any wax coating.
Dry each apple completely with a clean kitchen towel. This is important because caramel will not stick properly to wet apples.
Step 2: Insert the Wooden Sticks
Remove the stems from the apples.
Carefully insert a sturdy wooden stick into the center of each apple, pushing it approximately halfway through.
Make sure the sticks are secure enough to hold the apples during dipping.
Step 3: Prepare the Baking Tray
Line a large baking sheet with parchment paper or a silicone baking mat.
Lightly grease the parchment paper to prevent the caramel from sticking.
Set the prepared tray aside.
Step 4: Prepare the Caramel Mixture
Place the caramel bits and heavy cream into a medium, heavy-bottomed saucepan.
Heat over low to medium-low heat, stirring constantly with a wooden spoon or heat-resistant spatula.
Continue stirring until the caramel melts into a smooth, thick, glossy sauce.
Avoid overheating because caramel can burn quickly.
Step 5: Add the Vanilla
Once the caramel is completely melted, remove the saucepan from the heat.
Stir in the vanilla extract until fully incorporated.
Allow the caramel to cool for approximately 1–2 minutes so it thickens slightly while remaining easy to dip.
Step 6: Dip the Apples
Hold one apple by its wooden stick and carefully lower it into the warm caramel.
Slowly rotate the apple until most of its surface is covered with a thick, even layer.
Lift the apple above the saucepan and allow excess caramel to drip back into the pot.
Gently scrape excess caramel from the bottom against the saucepan’s edge.
Step 7: Add the Crunchy Toppings
While the caramel is still sticky, roll selected apples in finely chopped peanuts or pecans.
For colorful caramel apples, immediately sprinkle rainbow sprinkles over the coating.
Press the toppings gently into the caramel so they adhere properly.
Step 8: Let the Caramel Set
Place the coated apples onto the prepared baking sheet.
Refrigerate for approximately 20–30 minutes, or until the caramel becomes firm enough to handle.
Keep the apples separated so their coatings do not touch.
Step 9: Melt the Chocolate
Place the chocolate melting wafers into a microwave-safe bowl.
Microwave in 20-second intervals, stirring after each interval, until smooth.
If necessary, add a small amount of vegetable oil to thin the chocolate for easier dipping.
Step 10: Make Chocolate-Drizzled Apples
Once the caramel has set, drizzle melted chocolate over some of the apples using a spoon or piping bag.
Move the chocolate back and forth to create beautiful decorative lines.
Let the chocolate harden before serving.
Step 11: Prepare the Red Candy Coating
Melt the red candy melts according to the package directions.
For the bright red apple shown in the photos, use a separate clean, completely dry apple and dip it directly into the melted red coating.
Rotate until evenly covered and allow the excess coating to drip off.
Place on parchment paper until firm.
Step 12: Arrange and Serve
Arrange the finished apples on a large white serving platter.
Display a variety of decorations, including:
- Classic glossy caramel apples
- Caramel apples rolled in chopped nuts
- Rainbow sprinkle caramel apples
- Chocolate-drizzled caramel apples
- Bright red candy-coated apples
Serve once the coatings have completely set.
⭐ COOKING TIPS FOR PERFECT CARAMEL APPLES
- Choose crisp apples. Granny Smith apples provide a delicious tart contrast to the sweet caramel. Honeycrisp and Gala are excellent sweeter alternatives.
- Remove the wax coating. Store-bought apples often have a thin wax layer that can prevent caramel from sticking. Wash them thoroughly and dry completely.
- Keep apples cool before dipping. Chilled, dry apples help the caramel firm up faster.
- Avoid overheating the caramel. Melt the caramel slowly over gentle heat, stirring frequently to prevent scorching.
- Decorate immediately. Nuts and sprinkles stick best while the caramel is still soft.
- Use melting wafers for decorating. They melt smoothly and generally set more reliably than ordinary chocolate chips.
- Don’t dip into dangerously hot caramel. Let the caramel cool slightly before dipping, and handle the saucepan carefully to avoid burns.
- Serve apples at their freshest. Homemade caramel apples taste best when the apples remain crisp and the coatings are freshly set.
🍫 DELICIOUS CARAMEL APPLE VARIATIONS
Chocolate Caramel Apples
Dip apples in caramel, let the coating set, then drizzle with melted dark or milk chocolate.
Peanut Crunch Caramel Apples
Roll freshly dipped caramel apples in finely chopped roasted peanuts for a sweet and salty combination.
Rainbow Sprinkle Apples
Cover warm caramel with colorful sprinkles for a fun birthday party or Halloween treat.
Double Chocolate Apples
Coat caramel apples with melted chocolate and finish with mini chocolate chips.
Classic Red Candy Apples
Use a separate candy-melt coating for a bright red finish. This version has a different texture from traditional hard-crack candy apples.
❄️ HOW TO STORE HOMEMADE CARAMEL APPLES
Refrigerator
Store finished caramel apples in an airtight container in the refrigerator for up to 3 days.
For best quality, keep the apples whole until ready to eat.
Before Serving
Remove the apples from the refrigerator about 10–15 minutes before serving to slightly soften the caramel.
Can You Freeze Caramel Apples?
Freezing is not recommended because the apples may become watery or mushy after thawing, and the coating can separate.
Make-Ahead Tip
Prepare the caramel apples one day before your party and keep them refrigerated until serving.
For easier eating, slice apples just before serving. Do not leave cut caramel apples sitting at room temperature for extended periods.
📊 NUTRITIONAL INFORMATION
Estimated nutrition per classic caramel apple, without extra toppings:
- Calories: 350
- Protein: 3 g
- Carbohydrates: 69 g
- Total Fat: 8 g
- Saturated Fat: 5 g
- Fiber: 4 g
- Sugar: 59 g
- Sodium: 170 mg
Nutrition values are approximate and depend on apple size, caramel brand, coating thickness, and optional toppings.
❓ FREQUENTLY ASKED QUESTIONS
Why is my caramel sliding off the apples?
This usually happens when the apples are wet, have a wax coating, or the caramel is too hot and thin. Dry the apples thoroughly and let the caramel cool slightly before dipping.
What are the best apples for caramel apples?
Granny Smith, Honeycrisp, and Gala apples work well because they are firm, crisp, and flavorful.
Can I make caramel apples without a candy thermometer?
Yes! This recipe uses ready-made caramel bits, so you can melt them gently with heavy cream without cooking sugar to a precise candy temperature.
Can I use chocolate chips instead of melting wafers?
Yes, but chocolate chips may produce a thicker coating and take longer to set. Melting wafers are generally easier for dipping and decorating.
How long do caramel apples need to set?
Most caramel apples need approximately 20–30 minutes in the refrigerator to become firm, although thicker coatings may require additional time.
❤️ FINAL THOUGHTS
These homemade caramel apples are the perfect combination of juicy fruit, buttery caramel, and delicious crunchy toppings.
They’re fun to decorate, beautiful to serve, and ideal for fall celebrations, Halloween parties, holiday gatherings, or homemade edible gifts.
With just a few simple ingredients, you can create impressive caramel apples that look like they came straight from a candy shop.
🍎 Save this easy caramel apple recipe for later, and share it with someone who loves sweet homemade treats!