The Ultimate Easy Homemade Ice Cream Recipe Creamy No Churn Ice Cream Without a Machine
Nothing beats the rich, velvety taste of freshly made homemade ice cream on a warm day. For decades, home cooks believed that achieving that perfectly smooth, ice-crystal-free churned texture required an expensive electric ice cream maker, rock salt, and hours of tedious prep work. Luckily, modern home kitchen techniques have completely revolutionized frozen dessert making. With just a few basic pantry ingredients and a standard blender or mixer, you can whip up restaurant-quality, ultra-creamy homemade ice cream right in your own kitchen.
Homemade no-churn ice cream gives you complete control over your ingredients, flavor profiles, and sweetness levels. Say goodbye to commercial tubs filled with artificial stabilizers, excess high-fructose corn syrup, and synthetic flavorings. By combining high-fat dairy with rich sweetened condensed milk, you create an effortless frozen treat that scoops beautifully straight from the freezer. In this comprehensive guide, we will break down the culinary science behind no-churn ice cream, explore essential ingredients, provide step-by-step instructions, share popular flavor variations like strawberry and tropical mango, and provide troubleshooting tips to ensure your homemade tubs turn out perfect every single time.
Why You Will Love Making No-Churn Ice Cream at Home
Making no-churn ice cream in storage tubs or plastic containers is one of the most rewarding culinary projects you can undertake at home. Whether you are baking for family gatherings, meal-prepping sweet summer snacks, or experimenting with unique flavor combinations, this method delivers remarkable results with minimal effort.
First, accessibility is key. You do not need any bulky, expensive kitchen appliances taking up valuable counter space. If you have a blender, a hand mixer, or even a sturdy balloon whisk, you already have everything required to make a gourmet batch. Second, the active prep time takes less than 10 to 15 minutes. Once your base liquid is blended and poured into reusable airtight containers, your freezer does all the heavy lifting. Third, it is endlessly customizable. From vibrant fresh strawberry and creamy vanilla to exotic citrus, chocolate fudge, or cookie dough crumble, one master base recipe can be transformed into dozens of distinct flavors.
The Secret Science Behind Creamy No-Churn Ice Cream
To understand why this recipe works so flawlessly without churn blades, it helps to understand the science of frozen desserts. Traditional churned ice cream relies on a motorized paddle that constantly scrapes and rotates liquid ice cream custard while freezing it. This constant motion incorporates microscopic air pockets (known in the dairy industry as “overrun”) while breaking up water molecules so they cannot form large, crunchy ice crystals.
In a no-churn recipe, we achieve the exact same structural result through two clever ingredient interactions:
Whipped Dairy Air Matrix: Heavy whipping cream contains between 36% and 40% butterfat. When whipped or high-speed blended, fat molecules trap tiny air bubbles, creating a stable foam structure. This trapped air mimics the air incorporated by commercial churning equipment, giving the finished dessert its light, scoopable density.
Sugar and Water Depression: Sweetened condensed milk is whole milk that has had most of its water evaporated before being combined with pure sugar. Because sugar lowers the freezing point of liquids and condensed milk contains very little free water, it prevents hard ice crystals from forming. The combination of whipped heavy cream fat and concentrated sugar syrup creates an ultra-smooth, silky mouthfeel even when frozen solid.
Essential Ingredients for the Perfect Base
Because this recipe relies on a minimal ingredient list, choosing high-quality components is essential for achieving optimal flavor and texture.
1. Cold Heavy Whipping Cream
Heavy whipping cream or heavy cream with at least 36% butterfat content forms the foundational body of your ice cream. Fat is crucial here because it coats the palate, prevents iciness, and allows the mixture to hold whipped air. Always keep your heavy cream thoroughly chilled in the coldest part of your refrigerator until the exact moment you are ready to use it. Cold cream whips much faster and reaches greater volume than room-temperature cream.
2. Sweetened Condensed Milk
One full 14-ounce (396\text{g}) can of sweetened condensed milk acts as both the sweetener and the texture stabilizer. Do not confuse sweetened condensed milk with evaporated milk; evaporated milk lacks the concentrated sugar density required to prevent ice crystal formation and will result in a rock-hard, icy block.
3. Pure Vanilla Extract and Salt
A generous tablespoon of pure vanilla extract adds warm aromatic depth and enhances all other flavor additions. Even when making fruit-based ice creams like strawberry or mango, vanilla provides a rich background note. A tiny pinch of fine sea salt is equally vital—it cuts through the intense sweetness of condensed milk and balances the overall flavor profile.
Kitchen Tools and Equipment Needed
Having your equipment ready before starting ensures a seamless preparation process:
- High-Speed Blender or Electric Hand Mixer: Used to aerate the heavy cream and blend fruit purees smoothly.
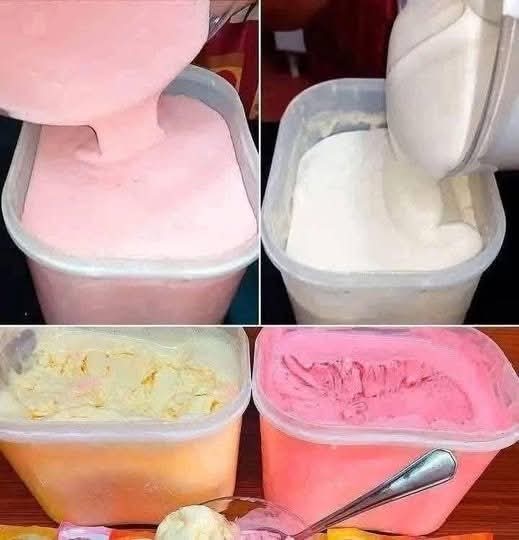
- Airtight Plastic or Silicone Storage Tubs: As seen in traditional home batch recipes, durable freezer-safe plastic containers with tight-fitting lids are ideal for storing and scooping your frozen desserts.
- Large Silicone Spatula: Essential for gently folding fruit purees or flavor swirls into the cream base without deflating the whipped structure.
- Measuring Cups and Spoons: For accurate dairy and extract ratios.
Step-by-Step Instructions: How to Make No-Churn Blender Ice Cream
Follow these straightforward steps to prepare, blend, flavor, and freeze your homemade ice cream tubs.
Step 1: Chill Your Storage Containers and Equipment
For the best volume expansion, place your metal or plastic storage tubs, mixing bowl, and blender jar in the freezer for 15 to 20 minutes prior to starting. Cold surfaces keep the fat in heavy cream stable during high-speed blending or whipping.
Step 2: Prepare the Master Base
Pour 2 cups (480\text{ml}) of ice-cold heavy whipping cream into your chilled mixing bowl or high-speed blender. Whip or blend on medium-high speed until medium-soft peaks form. If using a blender, pulse in short 5-second bursts to monitor the texture; avoid over-blending, which can accidentally turn your cream into butter.
In a separate large bowl, combine one 14-ounce can of sweetened condensed milk, 1 tablespoon of pure vanilla extract, and a pinch of salt. Whisk until smooth.
Step 3: Combine and Aerate
Gently transfer one-third of your whipped heavy cream into the sweetened condensed milk mixture. Use a silicone spatula to fold the two together until lightened. Gently fold in the remaining whipped cream using broad, sweeping circular strokes. Take your time during this step—gentle folding preserves the trapped air bubbles that give ice cream its velvety texture.
Step 4: Divide and Add Your Favorite Flavors
At this stage, you have a master vanilla ice cream base. You can pour it directly into your freezer tubs as-is, or divide the batter into separate bowls to create a variety of flavors in different containers.
Step 5: Pour, Cover, and Freeze
Pour the finished ice cream batter into clean, freezer-safe plastic or silicone tubs. Smooth the top surface with an offset spatula. To prevent ice crystals from forming on top, press a piece of wax paper or parchment paper directly onto the surface of the liquid before sealing the container with its airtight lid. Freeze on a flat shelf in your freezer for at least 6 hours, or preferably overnight, until firm and scoopable.
Vibrant Flavor Variations to Try
One master batch of base ice cream can easily be split to create a stunning spread of colorful frozen treats. Here are four popular homemade flavor combinations:
Fresh Strawberry Ice Cream
In a blender, combine 1.5 cups of fresh ripe strawberries with 2 tablespoons of sugar and 1 teaspoon of lemon juice. Puree until completely smooth. Fold the strawberry puree directly into half of your master base until a uniform pastel pink color is achieved. For extra texture, fold in small diced strawberry chunks right before pouring into your storage container.
Creamy Mango or Tropical Citrus Swirl
Blend 1.5 cups of fresh or thawed frozen mango chunks with a tablespoon of lime juice until silky smooth. Pour half of your plain cream base into your tub, dollop generous spoonfuls of bright yellow mango puree over the top, and pour the remaining cream base over it. Use a butter knife to gently swirl the mango puree through the cream, creating an eye-catching marbled pattern.
Classic Double Vanilla Bean
Scrape the seeds from one whole vanilla bean pod directly into your sweetened condensed milk before folding with heavy cream. The tiny black vanilla flecks add an elegant, high-end aesthetic and intense aromatic flavor that rivals luxury creamery brands.
Decadent Chocolate Fudge Brownie
Sift \frac{1}{2} cup of unsweetened Dutch-processed cocoa powder into your sweetened condensed milk before combining it with whipped cream. Fold in fudge sauce, chocolate chips, or crumbled brownie pieces for a rich, ultra-indulgent chocolate experience.
Pro Tips for Achieving the Ultimate Creamy Texture
- Use Reusable Airtight Containers: Shallow, wide plastic tubs or silicone containers freeze ice cream faster and more evenly than deep glass bowls. Shallow containers also make scooping smooth, rounded ice cream balls significantly easier.
- Add a Touch of Liquid Sweetener or Alcohol: Adding 1 tablespoon of neutral alcohol (such as vodka or fruit liqueur) or liquid corn syrup to the base lowers the freezing point slightly, keeping the ice cream soft and easily scoopable right out of the freezer.
- Keep Your Freezer at the Correct Temperature: Ensure your home freezer is set to 0^\circ\text{F} (-18^\circ\text{C}). Fluctuating freezer temperatures cause ice cream to melt slightly and refreeze, leading to undesirable icy textures.
Troubleshooting Common Homemade Ice Cream Problems
Why Is My Ice Cream Hard and Icy?
Iciness occurs when too much water is introduced into the recipe or low-fat dairy is substituted. Always use heavy cream with at least 36% fat and avoid low-fat or skim milks. If adding fresh fruit purees, simmer the fruit puree on the stove for 5 to 10 minutes beforehand to evaporate excess water content before cooling and folding it into the base.
Why Did My Cream Turn Grainy or Separated?
Over-whipping heavy cream breaks down the fat emulsion, turning the liquid into butter and buttermilk. When using a blender or hand mixer, stop as soon as soft, pillowy peaks form. If your cream looks clumpy or curdled, it has been over-processed.
Why Does My Ice Cream Melt Very Quickly?
No-churn ice cream made with condensed milk tends to have a slightly softer melting point than commercial churned ice cream packed with artificial gum stabilizers. Keep your ice cream tubs stored in the back of the freezer rather than on the freezer door, where temperature fluctuations occur every time the door opens.
Storage and Shelf Life Guidelines
Proper storage is crucial for maintaining flavor freshness and preventing freezer burn over time.
- Refrigeration & Freezing: Always store your ice cream tubs sealed tightly with an airtight lid in the coldest section of your freezer.
- Shelf Life: Homemade no-churn ice cream is best consumed within 2 to 3 weeks. Because it contains no artificial preservatives, the fresh dairy flavor is most vibrant during the first 14 days.
- Preventing Freezer Burn: Always press a layer of plastic wrap or parchment paper directly against the surface of the ice cream before snapping the lid on. This prevents cold air from coming into direct contact with the surface and forming freezer frost.
Frequently Asked Questions (FAQs)
Can I make no-churn ice cream without sweetened condensed milk?
Sweetened condensed milk is the structural key to no-churn ice cream because of its low water content and high sugar concentration. While you can make custard-based ice creams with milk, cream, and egg yolks, those traditional bases require constant churning in an ice cream machine to stay smooth.
Can I use dairy-free alternatives for this recipe?
Yes! You can make an exceptional vegan no-churn ice cream using well-chilled full-fat canned coconut cream (whipped to soft peaks) combined with sweetened condensed coconut milk. The higher fat content in coconut cream provides a rich, silky texture similar to dairy heavy cream.
How long does it take for homemade ice cream to set in the freezer?
In standard shallow plastic tubs, no-churn ice cream typically takes 6 hours to set completely. For optimal scooping structure, freezing overnight for 8 to 12 hours is recommended.
Conclusion
Mastering Homemade No-Churn Ice Cream is one of the easiest ways to bring gourmet, customizable desserts into your everyday kitchen routine. By pairing chilled heavy whipping cream with rich sweetened condensed milk, you eliminate the need for complicated machinery while achieving a decadent, melt-in-your-mouth texture. Whether you stick to classic vanilla, swirl in fresh seasonal strawberry purees, or experiment with tropical mango twists, filling your freezer with colorful homemade tubs promises a delicious reward for dessert lovers of all ages. Prep your ingredients, whip up a fresh batch today, and enjoy the pure delight of homemade ice cream whenever a sweet craving strikes!