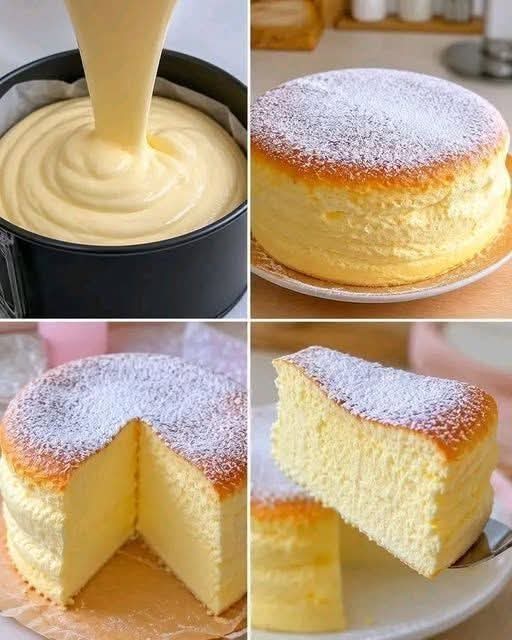
Fluffy Japanese Cotton Soufflé Cheesecake The Ultimate Bakery Style Recipe
If you have ever wanted to recreate the iconic, cloud-like Japanese Cotton Soufflé Cheesecake at home, this foolproof recipe is your key to dessert perfection. Combining the rich, tangy creaminess of a classic cheesecake with the airy, feather-light rise of a French soufflé, this famous dessert literally melts on your tongue with every single bite. Dusted lightly with powdered sugar and boasting a golden, delicate crust, it is as beautiful to look at as it is divine to eat.
Unlike dense Western-style baked cheesecakes that rely on heavy cream and whole eggs to create a firm texture, Japanese soufflé cheesecake achieves its signature jiggly bounce through whipped egg whites gently folded into a velvety cream cheese base. Baked gently in a hot water bath, this technique ensures the cake bakes evenly without drying out or collapsing.
In this ultimate recipe guide, you will learn the exact science behind achieving a crack-free surface, step-by-step batter preparation, water bath baking techniques, flavor variations, and expert tips to guarantee a picture-perfect cheesecake every time.
Why You Will Love This Japanese Soufflé Cheesecake
This world-famous dessert stands out for several fantastic reasons:
- Unmatched Feather-Light Texture: Fluffy, airy, and ultra-tender, giving you a melt-in-your-mouth experience that is never heavy on the stomach.
- Balanced Sweetness: Features a subtle cream cheese richness paired with a delicate hint of vanilla and lemon, making it lightly sweet rather than overwhelming.
- Stunning Jiggly Bounce: The whipped meringue structure gives the cake a delightful, bouncy wobble that makes for an impressive presentation.
- Pantry-Friendly Ingredients: Made using basic kitchen staples like cream cheese, eggs, milk, sugar, butter, and cornstarch.
- Versatile Serving Temperature: Delicious served warm straight from the oven when it is at its fluffiest, or thoroughly chilled in the fridge for a denser, melt-in-your-mouth mousse texture.
The Culinary Science of the Perfect Soufflé Cheesecake
Achieving a tall, crack-free Japanese cheesecake requires an understanding of how air, heat, and moisture interact during baking.
The Power of Soft-Peak Meringue
The primary secret to a soufflé cheesecake’s signature rise is whipping the egg whites to soft-to-medium peaks rather than stiff peaks. Stiffly beaten egg whites contain large, rigid air pockets that expand rapidly in a hot oven, causing the top of the cake to split or crack open. Soft peaks create smaller, flexible air bubbles that expand slowly and evenly as the cake bakes, resulting in a smooth top and a fine, uniform crumb.
Gentle Baking via Water Bath (Bain-Marie)
Baking the cheesecake inside a deep water bath buffers the direct oven heat. The surrounding water keeps the outer pan temperature at a constant 212°F (100°C), allowing the delicate egg proteins to set gently without scorching or curdling. Furthermore, the steam generated by the hot water keeps the surface moist, preventing a dry skin from forming and cracking under pressure.
Slow Cooling to Prevent Deflation
Because soufflé cakes rely on trapped steam and expanded air pockets for volume, cooling the cake too quickly in cold air causes the air inside to contract rapidly, leading to drastic shrinkage. Letting the cake cool gradually inside the warm oven with the door slightly ajar allows the delicate structure to set permanently.
Essential Kitchen Tools
Having the right tools ready before you begin is essential for soufflé baking success:
- 6-inch or 8-inch Solid Round Cake Pan (or Springform Pan): A solid pan prevents water leaks during the water bath process. If using a springform pan, wrap the outer bottom in multiple heavy-duty aluminum foil layers.
- Parchment Paper: Used to line both the bottom and inner sides of the pan, extending 2 inches above the rim to support the rising cake.
- Electric Hand Mixer or Stand Mixer: Essential for whipping the egg whites to precise soft peaks.
- Large Deep Roasting Pan: Holds the hot water for the water bath setup.
- Fine-Mesh Sifter: Used for sifting flour and cornstarch into the batter and dusting powdered sugar on top.
- Rubber Spatula: Critical for folding the delicate meringue into the cream cheese batter without deflating air.
Ingredients Breakdown
For the Cream Cheese Base:
- 8 oz (225g) Cream Cheese: Full-fat cream cheese, softened at room temperature.
- 3 tablespoons (45g) Unsalted Butter: Cut into small cubes, softened.
- 1/3 cup (80ml) Whole Milk: Provides smooth, rich moisture.
- 6 Large Egg Yolks: At room temperature, separated from whites.
- 1 tablespoon Fresh Lemon Juice: Adds a subtle tangy brightness that cuts through the cream.
- 1 teaspoon Pure Vanilla Extract: Enhances sweet dairy notes.
- 1/3 cup (40g) All-Purpose Flour: Sifted, to structure the cake.
- 2 tablespoons (20g) Cornstarch: Sifted, keeps the crumb soft, fine, and velvety.
For the Meringue:
- 6 Large Egg Whites: Cold egg whites whip up into more stable, fine air bubbles.
- 1/4 teaspoon Cream of Tartar (or 1 teaspoon lemon juice): Stabilizes the egg white proteins.
- 1/2 cup (100g) Granulated White Sugar: Added gradually to anchor the meringue structure.
For Garnish:
- 1 to 2 tablespoons Powdered Sugar: For a clean, classic finish.
Step-by-Step Instructions: How to Bake Japanese Cheesecake
Follow these detailed, step-by-step instructions to create a flawless, bakery-worthy soufflé cheesecake.
Step 1: Prep the Pan and Preheat
Preheat your oven to 320°F (160°C). Grease a deep 6-inch or 8-inch round cake pan with butter. Line the bottom with a circle of parchment paper, and line the sides with a parchment paper collar that extends roughly 2 inches above the top edge of the pan. If using a springform pan, wrap the outside securely with 3 layers of heavy-duty aluminum foil to keep water out.
Step 2: Melt Cream Cheese, Butter, and Milk
Fill a medium saucepan with 1 inch of water and bring to a gentle simmer over low heat. Place a heatproof bowl over the saucepan (creating a double boiler, ensuring the water does not touch the bottom of the bowl). Add the cream cheese, butter, and whole milk to the bowl. Stir continuously with a whisk until completely melted, smooth, and lump-free. Remove the bowl from the heat and allow it to cool to warm room temperature.
Step 3: Whisk in Yolks, Flavorings, and Dry Ingredients
Whisk the 6 egg yolks into the warm cream cheese mixture one at a time until fully integrated. Stir in the lemon juice and vanilla extract. Sift the all-purpose flour and cornstarch together directly over the bowl. Whisk gently until the batter is velvety and smooth. Pass the batter through a fine-mesh sieve into a clean bowl to eliminate any remaining tiny lumps. Set aside.
Step 4: Whip the Meringue to Soft Peaks
In a clean, dry glass or metal bowl, beat the 6 cold egg whites on low speed until frothy. Add the cream of tartar (or lemon juice). Increase the speed to medium and begin adding the granulated sugar one tablespoon at a time. Continue whipping until the egg whites form glossy, soft peaks that gently curl over at the tip when the beaters are lifted. Do not over-whip to stiff peaks.
Step 5: Gently Fold Meringue into Batter
Add one-third of the whipped meringue into the cream cheese batter. Use a balloon whisk to gently mix until combined; this lightens the dense base. Next, switch to a rubber spatula and gently fold the remaining meringue into the batter in two additions. Use a gentle sweep down the middle, across the bottom, and up the side, rotating the bowl as you fold. Stop as soon as no white streaks remain—do not overmix!
Step 6: Assemble the Water Bath and Bake
Pour the silky batter into your lined cake pan from a height of about 6 inches (this breaks any large trapped air bubbles). Tap the pan gently against the countertop 2 to 3 times to bring excess air bubbles to the surface. Place the cake pan inside a larger deep baking pan or roasting dish. Set the dish on the middle rack of your preheated oven. Carefully pour hot (not boiling) water into the outer dish until it reaches halfway up the side of the cake pan.
Step 7: The Low-and-Slow Baking Schedule
- Bake at 320°F (160°C) for 25 minutes to help the cake rise evenly.
- Reduce the oven temperature to 275°F (135°C) and bake for an additional 55 to 60 minutes until the top is golden brown and a skewer inserted in the center comes out clean.
- Turn off the oven, prop the oven door open slightly with a wooden spoon, and leave the cake inside to rest in the water bath for 15 to 20 minutes.
Step 8: Unmold, Dust, and Serve
Carefully remove the pan from the water bath. Peel away the parchment paper collar gently while the cake is warm. Place a serving plate over the top and invert, or carefully lift the cake using the parchment paper handles. Dust the golden top lightly with sifted powdered sugar. Serve warm for maximum fluffiness, or chill in the refrigerator for 4 hours to enjoy a denser cream cheese texture.
Pro Tips for Bakery-Level Perfection
- Never Over-Whip Egg Whites: Stiff, dry egg whites are the number one cause of cracked tops. Stop whipping as soon as the whites hold a soft, drooping peak.
- Keep the Bowl Oil-Free: Any trace of fat or oil on your mixing bowl or beaters will prevent egg whites from whipping to proper volume. Wipe your bowl with a drop of lemon juice before starting.
- Avoid Opening the Oven Door: Opening the oven door during the first 45 minutes lets heat escape rapidly, causing the cake to drop prematurely.
- Bake Low and Slow: Low temperatures prevent the air inside the egg whites from expanding too fast, which maintains a smooth, uncracked top surface.
Creative Recipe Variations
- Matcha Green Tea Soufflé Cheesecake: Sift 1.5 tablespoons of high-grade culinary matcha powder along with the flour and cornstarch for a vibrant green, earthy flavor profile.
- Chocolate Soufflé Cheesecake: Replace 2 tablespoons of all-purpose flour with 2 tablespoons of unsweetened cocoa powder, and add 1/4 cup of melted dark chocolate to the warm cream cheese base.
- Citrus Bliss Soufflé Cake: Add 1 tablespoon of finely grated fresh orange or lemon zest to the cream cheese batter for an extra aromatic citrus kick.
Storage and Serving Guidelines
- Refrigeration: Store leftover cheesecake covered in an airtight container in the refrigerator for up to 4 days.
- Reheating for Warm Fluffiness: If you prefer the warm, jiggly texture after chilling, microwave an individual slice for 10 to 15 seconds.
- Freezing: Due to its high moisture and delicate meringue structure, freezing Japanese soufflé cheesecake is not recommended, as thawing breaks down its tender texture.
Frequently Asked Questions (FAQs)
Why did my Japanese cheesecake crack on top?
Cracking is usually caused by over-whipping the egg whites to stiff peaks, baking at an excessively high temperature, or omitting the hot water bath. Sticking to soft peaks and low bake temperatures ensures a smooth top.
Why did my cake shrink or deflate after baking?
A small degree of shrinkage (about 1/2 inch) is normal as steam cools. However, drastic deflation occurs if the cake is taken out of the hot oven suddenly without a gradual cooling phase, or if the meringue was under-whipped.
Can I make this without a water bath?
A water bath is essential for this recipe. Without surrounding moisture and gentle heat distribution, the bottom and edges of the cake will cook too fast, dry out, and burn before the center sets.
Can I use low-fat cream cheese?
Full-fat cream cheese is strongly recommended. Low-fat variants contain higher water content and chemical additives that weaken the delicate cake structure, resulting in a dense or watery outcome.
Conclusion
This Fluffy Japanese Cotton Soufflé Cheesecake is the ultimate baking achievement that brings together melt-in-your-mouth lightness, rich creaminess, and a stunning golden presentation. By following low-and-slow baking techniques, whipping your meringue to soft peaks, and using a hot water bath, you can easily master this bakery classic right in your own kitchen. Bake one today, dust it with powdered sugar, and experience every bouncy, cloud-like slice!