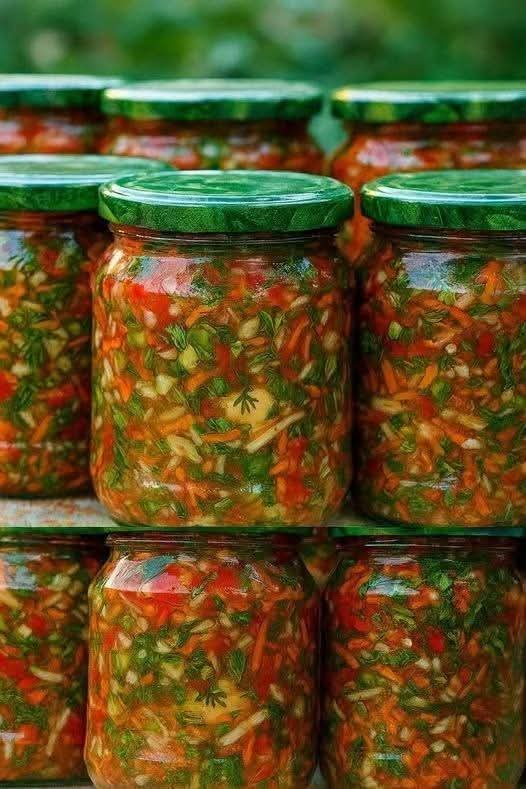
Homemade Pickled Garden Vegetable Relish The Ultimate Preserved Salad in Jars
If you are searching for a versatile, colorful, and nutrient-packed preserve that captures the fresh flavors of peak harvest season, this Homemade Pickled Garden Vegetable Relish is the perfect recipe for your kitchen. Packed into glass mason jars with a finely chopped blend of sweet carrots, red bell peppers, crisp onions, fresh herbs, and aromatic garlic, this pickled vegetable mix delivers an irresistible crunch and tangy burst of flavor to any meal.
Unlike store-bought condiments that rely on heavy artificial preservatives and excess sodium, making your own garden vegetable salad preserve allows you to control every single ingredient. Whether you use it as a vibrant topping for grilled meats, a flavorful base for winter soups and stews, a zesty spread for sandwiches and burgers, or a ready-to-eat side salad straight from the jar, this recipe turns fresh garden produce into long-lasting culinary gold.
In this ultimate canning and preserving guide, you will learn the secrets to selecting the best fresh vegetables, step-by-step preparation and brining techniques, proper glass jar storage, serving ideas, and expert tips to ensure your vegetable relish stays colorful, crisp, and delicious for months.
Why You Will Love Homemade Garden Vegetable Relish
This traditional preserved vegetable mix has earned its place as a pantry staple for many fantastic reasons:
- Explosion of Fresh Garden Flavors: Combines sweet, savory, tangy, and herbal notes into a perfectly balanced relish that elevates ordinary dishes.
- Ultimate Meal-Prep Shortcut: Pre-chopping and preserving these aromatic vegetables saves immense prep time during busy weeknight dinner cooking.
- Reduces Garden Waste: An ideal solution for using up abundant garden harvests of carrots, peppers, onions, dill, and parsley before they spoil.
- Long Shelf Life: Packed in a balanced vinegar and oil brine, these jars store beautifully in the refrigerator or cellar for extended enjoyment.
- Nutrient-Dense Condiment: Filled with raw dietary fiber, essential vitamins, and plant-based antioxidants from fresh vegetables and herbs.
Key Components of a Flawless Vegetable Preserve
Understanding how each ingredient functions within the preserve ensures your relish maintains its vibrant color, crisp bite, and harmonious flavor profile over time.
1. The Aromatic Vegetable Base
The body of this relish relies on a rainbow blend of sturdy vegetables. Finely shredded carrots provide natural sweetness and a brilliant orange hue. Diced red bell peppers contribute a juicy, sweet crunch, while red or white onions offer a sharp, savory backbone. Garlic slivers infuse the entire jar with warm, pungent depth.
2. Fresh Green Herbs
Copious amounts of finely chopped fresh herbs—particularly dill, parsley, and green onion tops—are essential to this recipe. The herbs add a vibrant green contrast throughout the jar and infuse the pickling liquid with an earthy, aromatic punch that brightens heavy winter meals.
3. The Balanced Vinegar and Oil Brine
The liquid matrix binds the vegetables together while acting as a natural preservative. A combination of vinegar (for essential acidity), high-quality oil (to lock in moisture and soften flavor), sugar, and sea salt creates a sweet-and-sour bath that gently cures the raw vegetables without making them soft or soggy.
Essential Kitchen Tools
Before you begin prepping your vegetables, gather these basic kitchen items to make the process effortless and sanitary:
- Glass Mason Jars with Airtight Lids: Standard pint (16 oz) or half-pint (8 oz) glass jars with clean metal or plastic lids work best.
- Food Processor or Sharp Chef’s Knife: A food processor with a coarse grating or pulse blade speeds up slicing and chopping significantly.
- Large Stainless Steel or Glass Bowl: For tossing the chopped vegetables and herbs evenly before packing.
- Small Saucepan: Used to heat the vinegar, salt, and sugar brine until fully dissolved.
- Canning Funnel and Spoon: Makes transferring the dense vegetable mix into narrow jar openings clean and spill-free.
Ingredients Breakdown
To prepare approximately 6 to 8 pint-sized jars of pickled garden vegetable relish, gather the following ingredients:
For the Fresh Vegetable Mix:
- 4 large Carrots: Peeled and finely grated or shredded.
- 4 medium Red Bell Peppers: Cored, seeded, and finely diced.
- 2 large Yellow or Red Onions: Finely chopped.
- 1 large head of Fresh Garlic: Cloves peeled and minced or thinly slivers.
- 1 large bunch Fresh Dill: Wash, thoroughly dry, and finely chop.
- 1 large bunch Fresh Flat-Leaf Parsley: Wash, thoroughly dry, and finely chop.
- 1 bunch Green Onions (Scallions): Finely sliced (optional, for extra color and mild onion bite).
For the Preserving Brine:
- 2 cups Water: Filtered water preferred.
- 1.5 cups Apple Cider Vinegar or White Distilled Vinegar (5% acidity): Provides essential preserving acidity.
- 1/2 cup Extra-Virgin Olive Oil or Sunflower Oil: Creates a rich mouthfeel and protects vegetable color.
- 3 tablespoons Granulated Sugar or Honey: Balances the sharp acid of the vinegar.
- 2 tablespoons Fine Sea Salt or Pickling Salt: Iodine-free salt preserves vegetable crispness.
- 1 teaspoon Whole Black Peppercorns: Adds subtle warm spice notes throughout the jars.
- 1/2 teaspoon Red Pepper Flakes: Optional, for a gentle background heat.
Step-by-Step Instructions: How to Prepare Garden Relish in Jars
Follow these clear, detailed steps to assemble, pack, and preserve your homemade vegetable relish.
Step 1: Prepare and Sterilize the Jars
Wash your glass mason jars, lids, and bands in hot, soapy water, then rinse thoroughly. Place the clean jars into a large pot of simmering water for 10 minutes to sterilize them, or run them through a hot rinse cycle in your dishwasher. Set the warm jars on a clean kitchen towel.
Step 2: Prep and Chop the Vegetables
Thoroughly wash all produce and dry completely with clean towels—removing excess water prevents diluting the preserving brine. Shred the carrots using the coarse side of a box grater or a food processor attachment. Finely dice the red bell peppers, onions, and garlic. Mince the fresh dill, parsley, and scallions.
Step 3: Toss the Vegetable Blend
In a very large mixing bowl, combine the shredded carrots, diced peppers, onions, garlic, and minced green herbs. Using clean hands or large wooden spoons, toss the mixture thoroughly for 2 to 3 minutes until all colors and textures are evenly distributed throughout the bowl.
Step 4: Prepare the Warm Preserving Brine
In a medium saucepan, combine the water, apple cider vinegar, oil, sugar, sea salt, black peppercorns, and red pepper flakes. Place over medium heat and stir continuously for 3 to 4 minutes until the sugar and salt crystals have completely dissolved and the liquid comes to a bare simmer. Remove from heat.
Step 5: Pack the Glass Jars
Position your canning funnel over the mouth of a warm jar. Spoon the mixed vegetable blend tightly into the jar, pressing down gently with the back of a spoon to eliminate large air pockets. Pack the vegetables until they reach roughly 1/2 inch below the top rim of the jar. Repeat for all jars.
Step 6: Pour the Brine and Release Air Bubbles
Slowly pour the warm liquid brine over the packed vegetables in each jar, ensuring all vegetable solids are completely submerged. Leave 1/2 inch of headspace at the top of each jar. Gently tap the bottom of each jar on a wooden cutting board, or slide a clean butter knife down the inner sides, to release any trapped air bubbles.
Step 7: Seal and Refrigerate
Wipe the rims of the glass jars with a damp, clean paper towel to remove any stray vegetable particles or oil. Place the lids on top and screw the bands on until fingertip tight. Allow the filled jars to cool to room temperature on the counter for 1 hour, then transfer them directly into the refrigerator. Let the relish marinate for at least 24 to 48 hours before opening to allow the flavors to meld together.
Pro Tips for Long-Lasting Freshness and Crispiness
To guarantee your preserved garden relish stays bright, crunchy, and safe to eat, keep these culinary secrets in mind:
- Dry Herbs and Vegetables Completely: Trapped wash water on raw herbs and vegetables dilutes the vinegar concentration, which can cause vegetables to soften prematurely. Ensure everything is bone-dry before chopping.
- Use Non-Iodized Salt: Regular table salt contains anti-caking additives and iodine that can darken vegetables and turn the pickling liquid cloudy. Always use pure sea salt, Kosher salt, or canning salt.
- Keep Vegetables Fully Submerged: Any vegetable bits sticking up above the liquid level can oxidize and lose color. Ensure the brine completely covers the top of the vegetable mix.
- Chop Uniformly: Using a food processor ensures that hard root vegetables (like carrots) match the size of soft herbs and peppers, resulting in a cohesive relish texture.
Delicious Ways to Serve Garden Vegetable Relish
This flavorful preserve is far more than just a salad—it serves as a multi-purpose flavor booster for dozens of dishes:
1. As a Sandwich and Burger Topping
Spoon a generous layer of this crunchy, tangy relish over grilled beef burgers, turkey burgers, hot dogs, or sausage rolls to cut through rich, fatty meats.
2. Stirred into Winter Soups and Stews
Add 3 to 4 tablespoons of this preserved vegetable mix directly into simmering chicken soup, beef stew, lentil soup, or rice pilaf during the last 5 minutes of cooking. It acts as an instant instant flavor base (zazharka) that adds garden-fresh taste.
3. Paired with Grilled Meats and Fish
Serve a bowl of chilled relish alongside roasted chicken, grilled pork chops, or seared salmon fillet for a refreshing contrast in texture and temperature.
4. Folded into Dips and Grain Bowls
Mix 2 tablespoons of vegetable relish into sour cream, Greek yogurt, or cream cheese to create a quick, savory dip for crackers, or toss it into warm quinoa and farro bowls.
Creative Recipe Variations
Feel free to customize this vegetable relish based on your garden yield and heat preferences:
Spicy Jalapeño Garden Relish
Finely dice 2 fresh jalapeño or serrano peppers (with seeds included) and toss them into the vegetable mix for a fiery, spicy kick.
Italian Herb Preserve
Replace the dill and parsley with fresh basil, oregano, and thyme, and use red wine vinegar in place of apple cider vinegar for an Italian antipasto flavor profile.
Cabbage and Beet Crunch Relish
Add 1 cup of finely shredded purple cabbage and 1/2 cup of grated raw red beet. The beet will turn the entire mix into a dazzling dark magenta color with an earthy sweetness.
Storage and Preservation Guidelines
- Refrigeration Storage: Because this quick-pickling method uses oil and is not heat-processed in a pressure canner, store sealed jars in the refrigerator at all times. Unopened jars will keep fresh and crisp for 3 to 4 months.
- Once Opened: Once a jar is opened, use a clean spoon every time you remove relish to prevent introducing bacteria. Consume opened jars within 3 weeks.
- Freezing: Freezing this relish is not recommended, as ice crystals break down the cell walls of raw carrots and peppers, resulting in a mushy texture upon thawing.
Frequently Asked Questions (FAQs)
Can I preserve this at room temperature on the pantry shelf?
Because this recipe contains oil and a dense raw vegetable mix, it must be stored in the refrigerator unless processed using a validated water-bath canning recipe without oil. Refrigeration keeps the produce crisp and completely safe.
Why is the oil floating at the top of my jar?
Oil is naturally less dense than water and vinegar, so it will separate and float to the top as the jars rest. Simply shake or stir the jar well with a fork before serving to redistribute the oil and spices evenly.
Can I use different vegetables in this relish?
Absolutely! You can substitute or add finely diced cucumbers, green bell peppers, radishes, cauliflower florets, or celery. Just maintain the overall ratio of vegetables to pickling brine.
Conclusion
This Homemade Pickled Garden Vegetable Relish is an absolute essential for anyone who loves vibrant flavors, efficient meal prep, and traditional home preservation. Combining a colorful array of crunchy garden vegetables with aromatic herbs and a tangy vinegar brine, it brings a bright pop of summer fresh taste to your table all year round. Pack a few jars today, store them in your fridge, and enjoy the convenience of a ready-to-serve garden relish whenever hunger strikes!