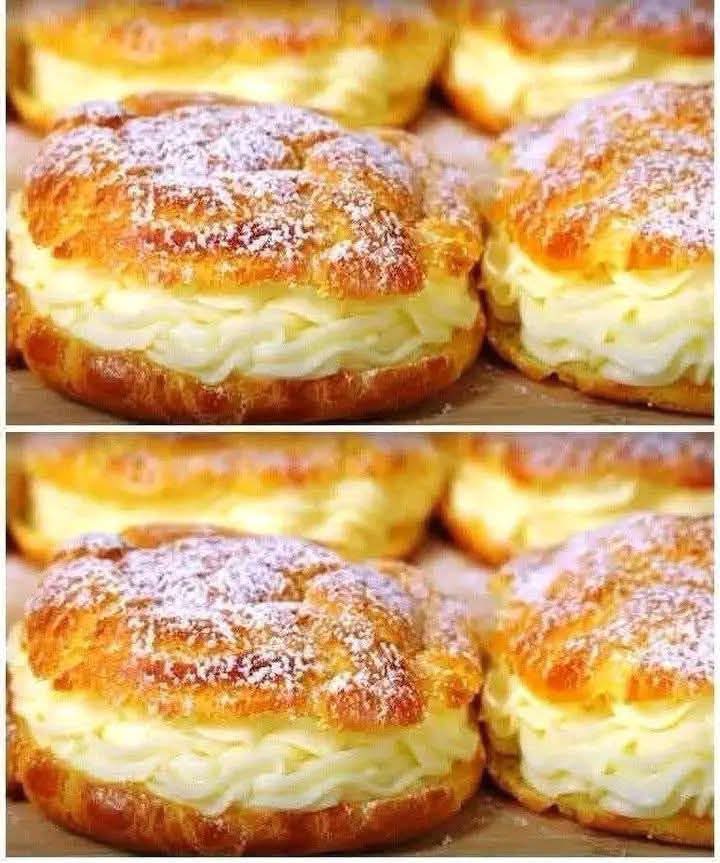
The Ultimate Guide to Perfect Homemade Cream Puffs Master Choux Pastry Every Time
Few desserts evoke the same sense of elegant indulgence and French pastry prestige quite like a perfectly golden, airy cream puff. Known classically as choux à la crème, these delectable treats feature a delicately crisp, hollow pastry shell filled to the brim with velvety, sweetened cream and dusted with a snow-like layer of powdered sugar. While they look like they belong behind the glass counter of a high-end Parisian patisserie, the truth is that mastering cream puffs at home is entirely achievable. Unlike traditional cakes or breads, choux pastry does not rely on biological yeast or chemical leavening agents like baking powder to rise. Instead, it harnesses the physical power of trapped steam to expand rapidly in a hot oven, ballooning into light, hollow spheres ready to be filled with your favorite sweet mixtures. This comprehensive guide will demystify the science behind choux pastry, provide a foolproof step-by-step recipe, and equip you with the essential techniques needed to achieve flawless pastry shells every single time.
Decoding the Magic of Choux Pastry
To successfully bake cream puffs, it is incredibly helpful to understand the simple yet precise food science that makes choux pastry (pâte à choux) completely unique in the baking world.
The Role of Steam as a Leavening Agent
Most baked goods achieve their airy texture through gases produced by yeast or chemical reactions from baking soda. Choux pastry, however, is a high-moisture dough that relies entirely on steam. The process begins on the stovetop, where water, butter, and flour are cooked together into a paste to gelatinize the starches in the flour. This gelatinization locks in moisture and creates a flexible, cohesive structure capable of trapping gas. When the raw pastry shapes are placed into a high-heat oven, the liquid inside quickly turns to steam. Because the outer layer of the dough sets into a flexible skin, the expanding steam pushes outward, inflating the pastry like a balloon and leaving a perfectly hollow cavity in the center as it bakes through.
Why Precise Ingredient Ratios Matter
Choux pastry relies on a delicate balance between liquid, fat, starch, and protein. Water provides the necessary moisture for steam generation, while butter adds rich flavor and coats the flour particles to keep the interior tender. Flour provides the vital structural framework through its gluten proteins, which stretch as the steam expands and then solidify to keep the pastry shell from collapsing. Finally, eggs act as the ultimate emulsifier and structure-builder. They add moisture for more steam, proteins that set upon baking to form a sturdy wall, and fats that yield a gorgeous, glossy finish. Missing any of these metrics by even a tiny bit can result in a dough that is either too runny to hold its shape or too dense to rise properly.
Essential Ingredients for Choux Pastry and Cream Filling
To create the ultimate homemade cream puffs, gather these simple, high-quality kitchen staples.
For the Choux Pastry Shells
- 1 cup all-purpose flour (spooned and leveled precisely)
- 1 cup water (or half whole milk and half water for a richer flavor and darker browning)
- 1/2 cup unsalted butter (cut into small cubes for even melting)
- 4 large eggs (at room temperature)
- 1/4 teaspoon fine sea salt
- 1 teaspoon granulated sugar (optional, for a hint of sweetness and enhanced browning)
For the Velvety Whipped Cream Filling
- 2 cups heavy whipping cream (well-chilled)
- 1/2 cup powdered sugar (plus extra for dusting across the finished puffs)
- 1 teaspoon pure vanilla extract or vanilla bean paste
Step-by-Step Instructions: The Cooked Pastry Base
Follow these initial steps carefully on your stovetop to create a perfectly balanced pastry paste.
Cooking the Panade
In a medium, heavy-bottomed saucepan, combine the water, cubed unsalted butter, sea salt, and granulated sugar. Place the pan over medium heat and bring the mixture to a full, rolling boil, ensuring the butter is completely melted by the time the liquid begins to bubble. The moment the mixture boils, remove the pan from the heat source and dump the entire cup of all-purpose flour into the liquid all at once. Grab a sturdy wooden spoon or a silicone spatula and stir vigorously. The flour will rapidly absorb the liquid and form a clumpy paste. Return the pan to medium heat and continue stirring and mashing the dough against the bottom and sides of the pan for roughly two minutes. This step cooks out the raw flour taste and dries out the paste; you will know it is ready when the dough pulls away cleanly from the sides of the pan to form a smooth, cohesive ball, leaving a thin film on the bottom of the saucepan.
Incorporating the Eggs
Transfer the hot dough immediately into the bowl of a stand mixer fitted with the paddle attachment, or into a large heat-proof mixing bowl if using a hand mixer. Turn the mixer on low speed for two minutes to allow the steam to escape, cooling the dough down slightly so it does not scramble the eggs when they are added. Whisk your four room-temperature eggs together in a measuring cup. With the mixer running on medium-low speed, add the eggs in four separate, small additions, allowing each pour to become completely absorbed before adding the next. Initially, the batter will look slippery and separated, but it will come together into a smooth paste with continued mixing. Stop adding egg before the final splash if your dough reaches the perfect consistency: a smooth, glossy, and pipeable paste that holds its shape but falls off a lifted spatula in a clean, sharp “V” shape.
Shaping and Baking for a Perfect Rise
Transform your prepared choux paste into beautifully domed pastry shells with these baking techniques.
Piping with Precision
Preheat your oven to 400 degrees Fahrenheit (204 degrees Celsius) and line a large baking sheet with parchment paper or a silicone baking mat. Transfer your glossy choux paste into a large pastry bag fitted with a wide, plain round piping tip. Hold the bag completely vertical, about a half-inch above the parchment paper, and squeeze with steady pressure to create rounds that are roughly two inches in diameter and one inch high, leaving about two inches of space between each puff to allow for dramatic expansion. Once you finish piping, you may notice small, pointed peaks on top of your rounds where you lifted the piping bag. Dip your fingertip into a bowl of cold water and gently press down these points to smooth them out, which prevents the tips from burning in the oven.
The Two-Stage Baking Method
Slide the baking sheet onto the middle rack of your preheated oven and bake at 400 degrees Fahrenheit for 20 minutes without ever opening the oven door. This high temperature triggers the rapid expansion of steam, forcing the pastries to puff up beautifully. After 20 minutes, turn the oven temperature down to 350 degrees Fahrenheit (177 degrees Celsius) and continue baking for another 10 to 15 minutes until the shells are deeply golden-brown, firm to the touch, and feel exceptionally light and hollow. Never open the oven door during the first 25 minutes of baking, as a sudden rush of cool air will cause the fragile, steam-inflated walls to collapse instantly. Once fully baked, remove the pan from the oven and immediately prick the side or bottom of each shell with a toothpick or a sharp paring knife, allowing the residual internal steam to escape so the shells stay beautifully crisp as they cool completely on a wire rack.
Crafting the Perfect Sweet Cream Filling
While the pastry shells cool to room temperature, you can prepare the simple, elegant cream filling that gives these pastries their signature decadence.
Whipping to Stiff Peaks
In a large, chilled mixing bowl, combine your cold heavy whipping cream, powdered sugar, and pure vanilla extract. Use an electric hand mixer or a stand mixer fitted with the whisk attachment to beat the cream on medium-low speed initially to prevent splashing, then increase the speed to medium-high. Watch the cream closely as it thickens; you want to whip it until it forms sturdy, stiff peaks that hold their shape perfectly when the beaters are lifted. Be careful not to over-whip the cream past this stage, as it will quickly lose its silky, smooth texture and become grainy and buttery. Transfer the sweet vanilla cream into a clean piping bag fitted with a star or open-round tip and refrigerate it until you are ready to assemble your cream puffs.
Assembling and Serving Your Masterpiece
With your crispy, hollow shells completely cooled and your whipped cream chilled, you are ready to assemble your French pastries.
The Slice and Pipe Method
The most classic and visually stunning way to assemble cream puffs is the method shown in the beautiful reference images. Use a sharp serrated knife to carefully slice off the top third of each cooled pastry shell, revealing the naturally hollow cavity inside. Grab your prepared piping bag of vanilla cream and pipe a generous, decorative swirl of cream directly into the bottom half of the shell, letting the cream billow slightly over the edges. Gently place the pastry top back onto the cream swirl like a little hat. Just before serving, place a small amount of powdered sugar into a fine-mesh strainer and dust it lightly across the tops of the assembled cream puffs, creating an elegant, professional finish.
Pro-Tips for Troubleshooting Choux Pastry
If your first batch doesn’t turn out perfectly, choux pastry can almost always be corrected by adjusting your moisture control or egg addition techniques.
What to Do If Your Puffs Deflate
If your cream puffs look magnificent inside the oven but flatten out into sad, dense pancakes the moment you pull them out, it means the structural walls did not have enough time to dry out and solidify completely. The interior of a choux shell is incredibly moist, and if pulled too early, that moisture will condense and pull the soft walls downward. To fix this next time, ensure your shells achieve a deep, rich golden color before removing them, and never skip the step of pricking each hot shell with a toothpick to let the trapped steam vent safely into the air.
Managing the Running Consistency of Dough
If your dough is too runny and spreads out flat on the baking sheet instead of holding a high dome, you likely added too much egg or did not dry the flour paste sufficiently on the stovetop. Remember that the egg quantity in recipes is always an estimate because egg sizes vary. Always add the final egg slowly and perform the spatula “V-test” regularly. If your dough is already too runny, do not try to fix it by stirring raw flour directly into the batter. Instead, make a half-batch of eggless cooked paste on the stove and gently beat it into your runny batter until the perfect, thick, pipeable consistency is restored.
Frequently Asked Questions
Can I fill these cream puffs with something other than whipped cream? Yes, choux pastry shells are incredibly versatile and can hold a wide array of fillings. For a richer French alternative, fill them with a classic pastry cream (crème pâtissière), a decadent chocolate ganache, or a bright lemon curd. You can even omit the sugar from the pastry dough and fill the crispy shells with savory ingredients like herbed goat cheese, chicken salad, or pimento cheese to create elegant appetizers for a cocktail party.
How far in advance can I make cream puffs? You can easily bake the pastry shells up to two days in advance. Store the completely cooled, unfilled shells in an airtight container at room temperature. To restore their original shatteringly crisp texture before filling, simply pop the empty shells onto a baking sheet and bake them in a 350-degree Fahrenheit oven for 5 minutes, allowing them to cool completely before piping in your cream. Once filled, cream puffs should be served within a few hours, as the moisture from the cream will slowly soften the pastry walls over time.
Can I freeze unfilled cream puff shells? Absolutely, unfilled choux shells freeze beautifully for up to two months. Place the completely cooled, baked shells in a single layer on a baking sheet and freeze until solid, then transfer them to a heavy-duty freezer-safe zip-top bag. When a craving strikes, thaw the empty shells at room temperature for 15 minutes, crisp them up in a 350-degree Fahrenheit oven for 5 minutes, let them cool, and they will taste exactly like they were freshly baked.
Conclusion
Mastering the art of homemade cream puffs is a beautiful milestone in any home baker’s journey. By understanding how trapped steam expands choux pastry and practicing the precise addition of eggs, you can consistently create light, crispy, and hollow pastry shells that serve as the ultimate canvas for sweet fillings. Whether you keep it classic with a generous swirl of vanilla whipped cream and a delicate dusting of powdered sugar or experiment with rich pastry creams and chocolate glazes, these elegant treats are guaranteed to delight your family and friends. Embrace the process, trust the science behind the rise, and enjoy every single airy, sweet, and luxurious bite of your beautiful homemade pastry creations.