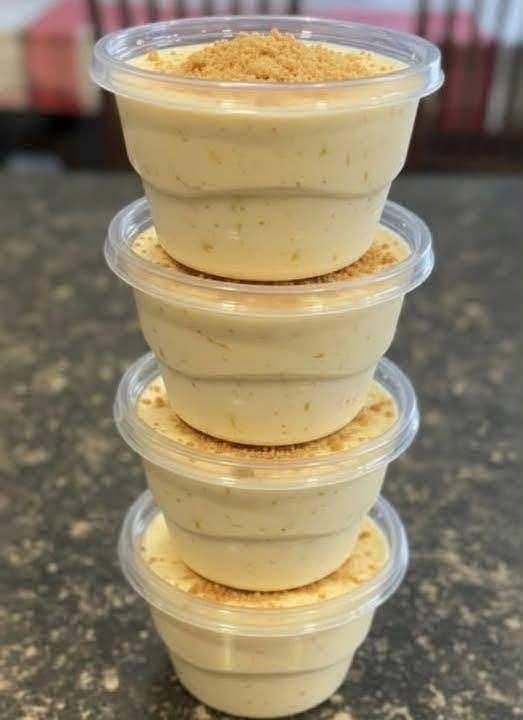
Ultimate Easy Banana Pudding Cups Recipe The Best Homemade Dessert Cups
Few desserts in the world of comfort food carry the nostalgic charm and universal appeal of classic homemade banana pudding. With its velvety creaminess, sweet fruit flavor, and delicate crunch of crushed cookies, this timeless sweet treat has been a centerpiece at family gatherings, holiday tables, and summer barbecues for generations. Transforming this traditional casserole-style dish into individual, single-serve banana pudding cups elevates it from a humble family favorite into an elegant, party-ready dessert that looks as amazing as it tastes.
Serving desserts in individual cups offers a modern twist that guest after guest will appreciate. Whether you are prepping for a birthday party, hosting a holiday dinner, catering a formal event, or simply setting up your weekly meal prep treats, banana pudding cups provide perfect portion control and effortless serving. There is no messy scooping, no uneven layers, and no fighting over who gets the crispest cookie pieces. Every single cup delivers a beautiful, balanced ratio of light cream, sweet ripe bananas, and buttery cookie crumble.
In this ultimate comprehensive guide, you will find a complete, tested recipe for making restaurant-quality banana pudding cups from scratch. We will explore the science of preventing banana browning, detailed step-by-step assembly instructions, creative flavor twists, storage guidelines, and expert kitchen tips that guarantee flawless results every single time.
What Makes Individual Banana Pudding Cups the Ultimate Dessert?
While classic family-style banana pudding baked in a large glass casserole dish will always hold a special place in sweet culinary history, single-serve dessert cups offer distinct advantages that make them superior for modern entertaining.
The Charm of Single-Serve Dessert Cups
Individual dessert cups create an immediate visual appeal. When stacked or displayed on a dessert table, clear plastic or glass cups showcase the precise, contrasting layers of rich cream, yellow fruit slices, and golden crumb bases. This visual structure invites guests to indulge and makes your homemade creation look like it came straight from a gourmet bakery display case.
Perfect Texture and Layering
When banana pudding is served out of a large communal dish, the initial scoops often collapse, mixing all elements into a homogenous paste. Individual cups preserve structural integrity. By carefully piping or spooning equal amounts into each container, you preserve distinct textural boundaries. You get the crunch of the cookie crust at the bottom, the velvety smooth mousse in the middle, and the fresh bite of fruit throughout.
Ideal for Events, Meal Prep, and Parties
Portability is one of the biggest reasons home bakers and professional caterers love individual dessert cups. Fitted with matching snap-on lids, these cups can be transported to potlucks, picnics, tailgates, or outdoor venues without any risk of spilling or crushing. They keep fresh in the refrigerator, allowing hostesses to prepare dessert completely ahead of time and enjoy their party without spending time serving in the kitchen.
Key Ingredients for Restaurant-Quality Banana Pudding Cups
To build a truly luxurious banana pudding cup with a dense, cloud-like texture that stays stable for days, selecting the right ingredients is critical. Each component plays a specific role in balancing sweetness, richness, and structural strength.
1. Fresh Ripe Bananas
The star of the show must be selected at peak ripeness. Look for bananas that are bright yellow with light brown speckles. Bananas that are completely green lack sweetness and natural aroma, while overripe, heavily bruised bananas are overly mushy and will release excess moisture into your pudding base. Yellow bananas with small brown sugar spots offer the ideal balance of firm texture and sweet fragrance.
2. The Creamy Pudding Base
- Instant Vanilla or Banana Cream Pudding Mix: Using instant pudding powder creates a firm, reliable chemical matrix that sets quickly without needing cooked cornstarch steps.
- Cold Whole Milk or Ice Water: Whole milk adds fat and protein that support a silky mouthfeel and stable structure.
- Sweetened Condensed Milk: A staple in traditional Southern-style recipes, sweetened condensed milk introduces a rich, velvety body and subtle caramelized sweetness that plain milk alone cannot match.
- Heavy Whipping Cream or Frozen Whipped Topping: Folding softly whipped cream into the set pudding base converts a heavy custard into a light, airy, mousse-like mixture that holds up beautifully in layered cups.
3. The Crunchy Cookie Layers
- Vanilla Wafers (Nilla Wafers): The undisputed classic choice. Vanilla wafers absorb just enough moisture from the surrounding pudding to soften into a cake-like texture while maintaining their structural outline.
- Graham Crackers: Crushed honey or cinnamon graham crackers provide a wonderful buttery crunch with a subtle spiced depth that pairs naturally with sweet fruit.
- Shortbread or Biscoff Cookies: For an upscale flavor profile, speculoos or butter shortbread crumbs bring warm cinnamon and caramelized butter notes to the dessert.
4. Flavor Enhancers and Optional Additions
- Pure Vanilla Extract: A teaspoon of high-quality vanilla extract boosts the aromatic depth of the cream base.
- Fresh Lemon Juice: A light brushing of citrus juice on banana slices prevents oxidation and keeps your fruit looking bright yellow.
- Sea Salt: A tiny pinch of fine salt cuts through the heavy sweetness of condensed milk and balances the overall flavor profile.
Complete Equipment Checklist
Before starting your dessert prep, gather the following basic kitchen tools to streamline assembly:
- Individual Dessert Cups: 5-ounce to 8-ounce clear plastic or glass cups (preferably with fitted dome lids if transporting).
- Large Mixing Bowls: For whisking the pudding base and whipping the heavy cream.
- Electric Hand Mixer or Stand Mixer: Essential for achieving stiff, stable whipping cream peaks quickly.
- Whisk and Silicone Spatula: For gentle folding without deflating the aerated cream.
- Pastry Piping Bag or Zip-Top Bag: Makes filling individual cups clean, fast, and uniform without smearing cream on the cup walls.
- Rolling Pin and Sealable Plastic Bag: For crushing cookies into clean, uniform crumbs.
Step-by-Step Instructions: How to Make Easy Banana Pudding Cups
This simple, no-bake recipe yields approximately 8 to 10 standard 6-ounce dessert cups and takes less than 20 minutes of active prep time.
Step 1: Prepare the Vanilla Pudding Base
In a large bowl, combine one 14-ounce can of sweetened condensed milk with 1.5 cups of ice-cold water or cold whole milk. Whisk thoroughly until completely blended. Sprinkle one 3.4-ounce package of instant vanilla pudding mix (or banana cream pudding mix) over the liquid. Whisk vigorously for 2 full minutes until the powder dissolves and the mixture begins to thicken. Cover the bowl and place it in the refrigerator for 10 to 15 minutes to allow the pudding to set completely firm.
Step 2: Whip and Fold in the Cream
In a separate chilled mixing bowl, add 1.5 cups of cold heavy whipping cream and 1 teaspoon of pure vanilla extract. Using an electric hand mixer or stand mixer fitted with a whisk attachment, beat on medium-high speed until stiff peaks form. Remove the chilled pudding base from the refrigerator. Add one-third of the whipped cream to the pudding base and whisk vigorously to lighten the mixture. Next, add the remaining whipped cream and gently fold it into the pudding using a silicone spatula until no white or yellow streaks remain. The texture should look fluffy, light, and hold soft billows.
Step 3: Prep the Cookie Crumbs and Fresh Bananas
Place 1.5 cups of vanilla wafers or graham crackers into a gallon-sized sealable plastic bag. Use a rolling pin or smooth meat mallet to crush the cookies into a mix of fine sand and small coarse pieces. Slice 3 large, ripe bananas into uniform 1/4-inch round slices. Optional: lightly toss the banana slices in 1 tablespoon of fresh lemon juice or pineapple juice to maintain bright color.
Step 4: Layer the Individual Dessert Cups
Line up your clear dessert cups on a clean tray.
- Base Layer: Spoon 1 generous tablespoon of crushed cookie crumbs into the bottom of each cup.
- Fruit Layer: Arrange a layer of sliced bananas flat on top of the crumbs.
- Cream Layer: Fill a piping bag with your whipped pudding cream. Pipe a smooth layer over the bananas, filling roughly one-third of the cup volume.
- Second Layer: Repeat with another layer of cookie crumbs, fresh banana slices, and a second generous layer of cream, bringing the filling near the top rim of the cup.
- Garnish: Finish each cup with a dusting of fine cookie crumbs and place a single whole vanilla wafer or fresh banana slice right in the center.
Step 5: Chill, Garnish, and Serve
Snap the lids onto your dessert cups or cover the tray loosely with plastic wrap. Place the cups in the refrigerator for at least 2 to 4 hours before serving. This resting window is critical: it allows the dry cookie crumbs to absorb moisture from the pudding, softening them into a soft, cake-like layer while letting the flavors meld into harmony.
Pro Kitchen Secrets: How to Keep Bananas from Turning Brown
The single biggest challenge when making banana-based desserts ahead of time is oxidation. When cut bananas interact with oxygen in the air, enzymes cause the fruit tissue to turn brown and soft. Follow these tested culinary methods to keep your fruit yellow and fresh for days:
The Citrus Juice Method
Tossing fresh banana slices in mild acid slows down the browning enzyme reaction. Fresh lemon juice, lime juice, orange juice, or pineapple juice all work effectively. To prevent adding sharp sour notes to your sweet dessert, dilute 1 tablespoon of lemon juice in 2 tablespoons of cold water, toss the sliced bananas briefly, and pat them dry on paper towels before layering.
Complete Pudding Encasement
Oxygen exposure is necessary for browning to occur. When assembling your cups, make sure the banana slices are fully buried inside the pudding layer rather than sticking out or touching the sides of the cup where air pockets exist. Sealing the fruit completely within the creamy pudding shields it from atmospheric oxygen.
Slicing Technique and Timing
Use a clean, sharp stainless steel chef’s knife when slicing bananas. Dull blades crush plant cells, releasing more oxidative enzymes and accelerating browning. Slice your fruit right before cup assembly rather than letting cut fruit sit on a chopping board.
Creative Flavor Variations and Recipe Upgrades
While the classic vanilla wafer and fresh banana pairing is hard to top, you can easily customize this base recipe to create exciting signature flavors.
1. Salted Caramel Banana Pudding Cups
Drizzle a teaspoon of warm homemade or store-bought salted caramel sauce over the cookie base and top cream layers. The buttery, burnt-sugar notes of caramel pair spectacularly with sweet bananas.
2. Chocolate Banana Cream Dessert Cups
Swap half of the vanilla pudding for instant chocolate fudge pudding to create alternating layers of dark chocolate mousse and banana cream. Garnish top cups with mini chocolate chips or shaved dark chocolate curls.
3. Peanut Butter Banana Cream Cups
Warm 1/3 cup of creamy peanut butter in the microwave for 15 seconds until runny, then whisk it directly into the condensed milk and pudding base before folding in whipped cream. Top with crushed roasted peanuts and banana slices.
4. Gluten-Free and Dairy-Free Adaptations
Make this recipe allergen-friendly by substituting traditional wafers for certified gluten-free graham crackers or vanilla cookies. Swap the sweetened condensed milk and heavy cream for full-fat canned coconut milk and plant-based whipping cream alternatives.
Storage, Prep-Ahead, and Shelf-Life Guidelines
Knowing how to properly store and prepare your banana pudding cups ensures your dessert stays fresh and presentable for your entire event.
How Far in Advance Can You Make Banana Pudding Cups?
For peak flavor and visual presentation, assemble your cups 12 to 24 hours before serving. This gives the cookies enough time to soften while keeping the bananas firm and sweet.
Best Practices for Refrigeration
Keep cups stored in an airtight container or fitted with individual plastic lids in the coldest part of your refrigerator (usually the back shelf). Avoid storing them in the refrigerator door, where temperature fluctuations occur every time the door opens. Properly chilled cups remain fresh for up to 3 to 4 days.
Why Freezing Banana Pudding is Not Recommended
Freezing banana pudding is strongly discouraged. Extreme cold damages the delicate cell structure of raw bananas, causing them to turn black, mushy, and watery upon defrosting. Additionally, dairy-based whipped puddings separate and become grainy when thawed.
Nutritional Highlights and Calorie Breakdown
Banana pudding cups offer a balance of satisfying fats, quick energy, and natural fruit nutrients. A standard 6-ounce individual cup prepared according to this classic recipe provides approximately:
- Calories: 320–360 kcal
- Protein: 5g
- Carbohydrates: 48g
- Dietary Fiber: 2g
- Fat: 14g (including healthy fats from whole dairy)
- Potassium: Excellent natural source from fresh whole bananas
By controlling portion sizes using individual cups, you can enjoy a comforting, indulgent dessert while easily monitoring nutritional intake.
Frequently Asked Questions (FAQs)
Can I use cooked pudding instead of instant pudding?
While cooked pudding offers a classic taste, instant pudding is strongly recommended for layered cups. Cooked pudding stays warmer longer and can melt whipped cream, resulting in a runny base. Instant pudding sets firm cold and maintains the structural strength needed for clean layering.
How many dessert cups does this recipe make?
This recipe yields approximately 8 to 10 standard 6-ounce cups, or 12 to 14 smaller 4-ounce party shot cups.
What are the best plastic cups to use for individual desserts?
Clear 5-ounce to 8-ounce heavy-duty plastic dessert cups with clear dome lids are ideal. Dome lids leave plenty of room for garnishes, whipped cream swirls, and whole cookie toppers without crushing the top design.
Why is my banana pudding liquidy or loose?
Runny pudding occurs if the milk used was not cold enough, if the instant pudding was under-whisked, or if frozen whipped topping was folded in while still icy instead of fully thawed. Always use ice-cold liquids and allow the pudding base to set in the fridge before folding in whipped cream.
Can I use homemade whipped cream instead of store-bought?
Yes! Fresh homemade whipped cream whipped to stiff peaks delivers a lighter, cleaner flavor than frozen whipped topping. Just ensure you whip it firmly so it holds its shape inside the layers.
Final Thoughts: A Crowd-Pleasing Dessert Made Simple
These Easy Banana Pudding Cups combine nostalgic comfort with clean, modern presentation. By pairing silky vanilla cream base, fresh sweet bananas, and rich cookie crumbs into individual portion cups, you create a dessert that is as practical as it is delicious. Perfect for meal prep, family celebrations, or large catered parties, this foolproof recipe delivers consistent, mouthwatering results every time. Gather your ingredients, prepare your cups, and enjoy a sweet homemade treat that everyone will remember!