Ultimate Guide to Homemade Seeded Whole Grain Bread Easy Healthy and Perfect for Daily Baking
There is something uniquely comforting about the aroma of freshly baked bread wafting through a home, a sensory experience that commercial store-bought loaves simply cannot replicate. Among the vast world of baking, homemade seeded whole grain bread stands out as a true masterpiece of nutrition, texture, and deep, complex flavor. While baking yeast bread from scratch can sometimes feel intimidating to beginners, this recipe simplifies the process to ensure a foolproof, perfectly risen loaf with a tight yet tender crumb and a beautifully blistered, seed-encrusted crust. By combining the earthy depth of whole wheat flour with the nutritional powerhouse of golden flaxseeds, this loaf delivers a satisfyingly rustic chew and a nutty flavor profile that elevates simple sandwiches, morning toast, and hearty dinner accompaniments. This comprehensive guide will walk you through every stage of mastering the perfect loaf of seeded whole grain bread, including the underlying science of yeast fermentation, essential ingredient choices, step-by-step techniques, and troubleshooting tips to ensure baking success every single time.
Why Bake Whole Grain Bread at Home?
In an era dominated by convenience foods, taking the time to bake your own whole grain bread offers immense rewards that extend far beyond superior taste and texture. Understanding exactly what goes into your daily bread is the first step toward a more mindful and wholesome lifestyle.
Complete Control Over Ingredients
When you flip over a package of commercial whole wheat bread from the supermarket, you are often greeted by a long list of chemical preservatives, high fructose corn syrup, artificial conditioners, and excessive sodium designed to extend shelf life rather than enhance quality. Baking your own loaf at home gives you complete agency over every single ingredient that enters your body. You can select premium stone-ground flours, opt for unrefined natural sweeteners like raw honey or pure maple syrup, and completely eliminate chemical stabilizers or hydrogenated fats, resulting in a clean, wholesome food source for you and your family.
Maximum Nutritional Density
Whole grain flours retain all three components of the grain kernel: the bran, the germ, and the endosperm. White flour, conversely, undergoes heavy processing that strips away the nutrient-dense bran and germ, leaving behind mostly starch. By utilizing whole wheat or sprouted grain flour as the foundation of this recipe, you preserve a high concentration of dietary fiber, essential B vitamins, iron, magnesium, and zinc. The addition of whole seeds, such as the flaxseeds adorning this loaf, infuses each slice with essential omega-3 fatty acids, plant-based protein, and powerful antioxidants, making it a functional food that actively supports cardiovascular and digestive health.
Therapeutic and Rewarding Process
Baking bread from scratch is widely regarded as a deeply therapeutic and grounding kitchen ritual. The tactile sensation of kneading the dough, the patient anticipation during the proofing stages, and the visual transformation of a simple mixture of flour and water into a golden, towering loaf offer a profound sense of accomplishment. It forces us to slow down, connect with traditional culinary arts, and enjoy a mindful break from the fast-paced digital world.
The Essential Ingredients and Their Roles
To achieve the perfect balance between a hearty texture and a soft, sandwich-friendly crumb, it is helpful to understand how each component functions within the dough matrix. Bread baking is a science, and every ingredient has a specific structural purpose.
The Choice of Flour
The foundation of a great loaf relies heavily on selecting the correct flour. For this recipe, we utilize a combination of whole wheat flour and high-protein unbleached bread flour. Whole wheat flour introduces the rich, nutty flavor and dense nutritional profile, but the sharp edges of the bran flakes can cut through gluten strands, potentially resulting in a heavy, flat loaf. To counteract this, blending in a portion of white bread flour provides an abundance of strong gluten-forming proteins, ensuring the dough can trap carbon dioxide gas efficiently and achieve a beautiful, high rise during the baking process.
The Magic of Seeds
Seeds add incredible textural contrast and a rich, nutty depth to whole grain bread. In this specific variation, whole flaxseeds are utilized both within the dough and generously pressed across the exterior crust. Flaxseeds are exceptionally rich in alpha-linolenic acid (ALA), an essential plant-based omega-3 fatty acid. When baked onto the crust, the intense dry heat of the oven toasts the seeds, unlocking an irresistible aroma and a delightful crunch that contrasts beautifully with the soft interior crumb. You can also customize the blend by incorporating sunflower seeds, sesame seeds, pumpkin seeds, or chia seeds depending on your flavor preferences.
Liquid, Sweetener, and Fat
The liquid component hydrates the flour proteins, allowing gluten to form, while simultaneously activating the dormant yeast cells. Warm water or a mixture of water and milk should be kept between 105°F and 115°F; anything hotter will kill the live yeast, while colder liquids will severely delay the rising time. A small amount of natural sweetener, such as honey or molasses, acts as immediate fuel for the yeast to accelerate fermentation, while also lending a subtle sweetness that balances the naturally bitter notes of whole wheat bran. Finally, a touch of healthy fat, such as extra virgin olive oil or softened butter, coats the gluten strands, ensuring the final crumb remains tender and preventing the loaf from drying out quickly.
The Ultimate Step-by-Step Seeded Whole Grain Bread Recipe
This baseline recipe is structured to be approachable for bakers of all skill levels, yielding one spectacular, artisan-quality loaf that looks and tastes like it came from a high-end European bakery.
Ingredients List
- 2 cups whole wheat flour (preferably stone-ground)
- 1.5 cups unbleached bread flour (plus extra for dusting)
- 1 packet (2.5 teaspoons) active dry yeast or instant yeast
- 1.25 cups warm water (110°F)
- 2 tablespoons raw honey or pure maple syrup
- 2 tablespoons extra virgin olive oil or melted butter
- 1.5 teaspoons fine sea salt
- 1/3 cup whole flaxseeds (divided: half for the dough, half for the crust topping)
- 1 egg white beaten with 1 tablespoon of water (for the egg wash)
Step 1: Activating the Yeast
If you are using active dry yeast, it must be dissolved and activated before mixing the dough. In a large mixing bowl or the bowl of a stand mixer, combine the warm water, honey, and active dry yeast. Give the mixture a gentle stir and let it sit undisturbed for 5 to 10 minutes. As the yeast wakes up and begins consuming the sugars in the honey, a thick, frothy, and foamy layer will develop on the surface of the water, accompanied by a distinct, pleasant beer-like aroma. If your mixture fails to foam, your yeast may be expired or the water was too hot, and you will need to discard it and start fresh with a new packet.
Step 2: Mixing the Dough
Once the yeast is beautifully active, add the olive oil and sea salt to the bowl. In a separate container, whisk together the whole wheat flour, bread flour, and half of the flaxseeds. Gradually add the flour mixture into the liquid ingredients, stirring with a heavy wooden spoon or a dough whisk until a shaggy, cohesive dough begins to form and pull away from the sides of the bowl. If the dough feels excessively wet and sticky, add bread flour one tablespoon at a time; if it feels overly dry, add a tiny splash of warm water.
Step 3: Kneading for Structural Strength
Turn the shaggy dough out onto a lightly floured countertop. Using the heels of your hands, push the dough firmly away from you, fold it back over itself, rotate it 90 degrees, and repeat the process. Knead continuously for 8 to 10 minutes by hand, or 5 to 7 minutes using a stand mixer fitted with a dough hook attachment. As you knead, the proteins in the flour align and form a strong, elastic network. You will know the dough is perfectly kneaded when it transforms from a rough, sticky mass into a smooth, supple, and slightly tacky ball that springs back completely when gently poked with a finger.
Step 4: The First Rise (Bulk Fermentation)
Lightly grease a large, clean bowl with a drizzle of olive oil. Place the kneaded dough ball into the bowl, rolling it around once to ensure the entire surface is coated in a thin layer of oil, which prevents a dry skin from forming. Cover the bowl tightly with a damp clean kitchen towel or plastic wrap to trap moisture. Place the bowl in a warm, draft-free location in your kitchen—such as an unlit oven with the oven light turned on—and allow the dough to rise for 1 to 1.5 hours, or until it has fully doubled in size.
Step 5: Shaping the Loaf and Seeding the Crust
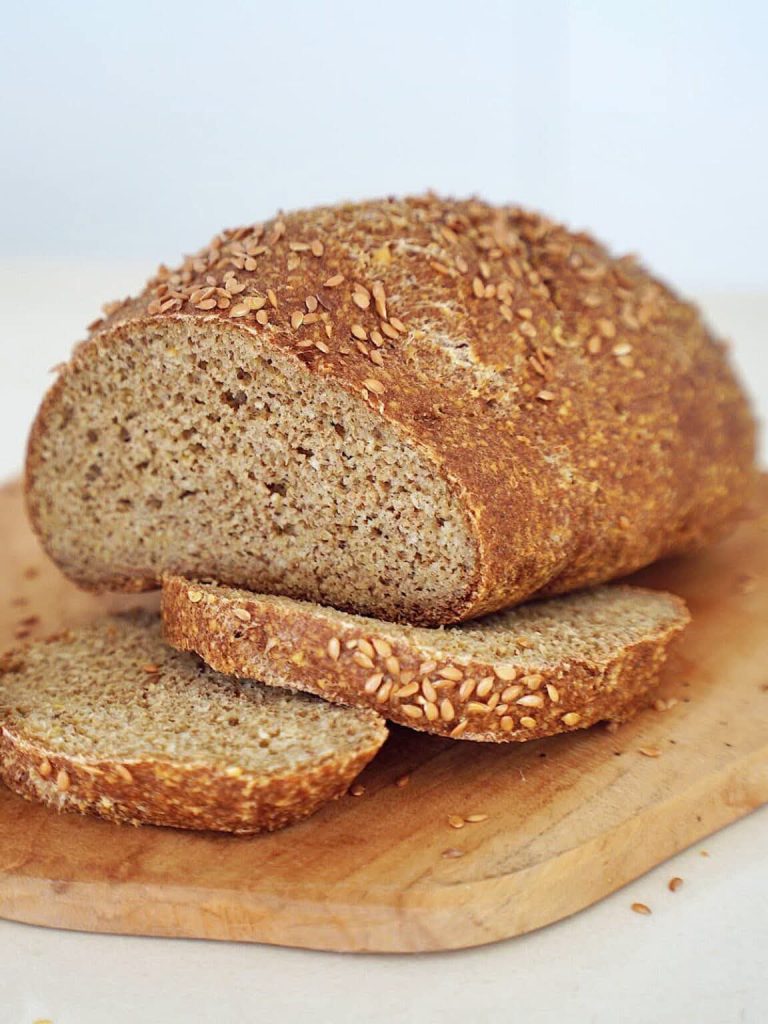
Gently punch down the risen dough to deflate the accumulated carbon dioxide gas bubbles. Turn the dough onto a lightly floured surface and pat it out into a flat rectangle roughly 9 by 12 inches. Starting from the short end closest to you, roll the dough up tightly into a firm cylinder, pinching the final seam securely shut with your fingers. To apply the beautiful seed topping seen in the image, brush the top and sides of the shaped loaf generously with the prepared egg white wash. Spread the remaining flaxseeds in an even layer on a flat tray or clean countertop, and gently roll the wet side of the loaf directly over the seeds, pressing lightly so they adhere firmly to the exterior.
Step 6: The Second Proofing
Place the shaped and seeded loaf, seam-side down, into a standard 8.5 by 4.5-inch loaf pan that has been lightly greased or lined with parchment paper. Cover the pan loosely with a lightweight kitchen towel and let it undergo its second rise for roughly 45 to 60 minutes. The dough should rise beautifully above the rim of the baking pan, creating a proud, rounded crown.
Step 7: Baking to Golden Perfection
While the loaf is finishing its second rise, preheat your oven to 375°F (190°C). Once fully proofed, place the loaf pan onto the center rack of the preheated oven. Bake for 35 to 40 minutes. If you notice the flaxseeds on the top crust are browning too quickly or risking burning after the 20-minute mark, simply tent a piece of aluminum foil loosely over the top of the loaf for the remaining baking time. The bread is fully baked when the crust turns a deep, rich golden brown and the bottom of the loaf sounds completely hollow when removed from the pan and tapped with your knuckles. For ultimate accuracy, an instant-read digital thermometer inserted into the very center of the loaf should read between 195°F and 200°F.
Step 8: The Cooling Ritual
Carefully remove the hot bread from its baking pan immediately upon exiting the oven and transfer it to a wire cooling rack. While it is incredibly tempting to slice into a warm, fragrant loaf of bread right away, it is absolutely imperative to let it cool completely for at least one full hour. As bread cools, the internal starch structure sets and completes the cooking process, while the trapped steam gradually dissipates. Slicing into a hot loaf will cause the steam to collapse the delicate internal cells, resulting in a gummy, wet texture.
Advanced Tips for Baking Success
Achieving a picture-perfect loaf like the one shown requires attention to detail. Incorporating these professional baking practices will instantly elevate your home baking game.
Weighing Your Ingredients for Precision
While measuring cups are common in home kitchens, volume measurements can vary drastically depending on how tightly packed the flour is. For the absolute most consistent results, invest in a digital kitchen scale and weigh your ingredients in grams. A standard cup of flour can vary by as much as 20 to 30 grams depending on environmental humidity and scooping technique, which can easily throw off the hydration balance of your dough and result in a dense loaf.
The Importance of the Windowpane Test
To verify if your dough has been kneaded sufficiently without guessing, use the windowpane test. Tear off a small, golf-ball-sized piece of dough and gently stretch it from the center outwards using your thumbs and forefingers. If you can stretch the dough thin enough that light passes through it without the dough tearing, your gluten network is perfectly developed. If it snaps or tears quickly, it requires a few more minutes of vigorous kneading.
Managing Kitchen Temperature
Yeast behavior is entirely dictated by the temperature of its environment. If your kitchen is cool or drafty during the winter months, your rising times may double. Conversely, during hot summer months, the dough may rise much faster than anticipated. Always judge your dough by its physical volume and appearance—whether it has truly doubled in size—rather than strictly watching the clock.
Creative Flavor Combinations and Variations
Once you have mastered this foundational recipe, you can begin experimenting with an array of mix-ins and toppings to create custom artisan loaves.
Honey Walnut and Flaxseed
Add a half-cup of toasted, coarsely chopped walnuts into the dough along with the flaxseeds during the mixing process. The combination of earthy walnuts, sweet honey, and crunchy flaxseeds creates an exceptional loaf that pairs exquisitely with sharp cheeses, fresh figs, or a smear of salted butter.
Rosemary and Roasted Garlic Whole Grain
Fold in two tablespoons of finely chopped fresh rosemary and a few cloves of mashed roasted garlic into the dough matrix. Top the exterior crust with flaxseeds and a light sprinkling of flaky sea salt before baking to create a deeply savory, aromatic loaf perfect for pairing with Italian dinners and hearty stews.
Ancient Grains and Multiseed Blend
Swap out half of the whole wheat flour for alternative ancient grain flours, such as spelt, rye, or einkorn flour. Replace the simple flaxseed topping with a robust mix of pumpkin seeds, sunflower seeds, black sesame seeds, and poppy seeds to create an intensely textured, multi-tonal crust that offers incredible visual appeal and nutritional complexity.
Proper Storage and Slicing Techniques
Because homemade bread contains absolutely no artificial preservatives, it requires proper handling to maintain its freshness and prevent it from going stale too quickly.
The Best Way to Store Homemade Bread
Store your completely cooled loaf at room temperature wrapped in a clean paper bag, a cotton bread bag, or a dedicated wooden bread box. This allows for minimal airflow, preserving the crisp integrity of the crust while keeping the interior crumb soft. Avoid storing homemade bread in the refrigerator, as the cool environment accelerates a process called starch retrogradation, which draws moisture away from the crumb and causes the bread to go stale significantly faster.
Freezing for Extended Freshness
If you cannot consume the entire loaf within three days, freezing is the absolute best solution. Slice the loaf completely before freezing, then place the individual slices into a heavy-duty freezer bag with small pieces of parchment paper separating each slice. When you are ready to eat, simply pull a single slice directly from the freezer and pop it straight into your toaster for a fresh-baked taste and texture in minutes.
Choosing the Right Knife
To achieve clean, beautiful slices like those shown in the image without crushing the loaf, always use a high-quality, long-serrated bread knife. Use a gentle, sawing motion rather than pressing straight down down with force. This allows the teeth of the blade to cleanly saw through the crisp, seed-covered crust and glide effortlessly through the tender internal crumb.
Frequently Asked Questions (FAQs)
Can I make this recipe entirely with whole wheat flour?
While you can make a 100% whole wheat loaf, it will turn out significantly denser, heavier, and less risen than the loaf pictured. Whole wheat flour contains bran particles that disrupt gluten development. Blending it with high-protein bread flour ensures the loaf retains a soft, airy, and sandwich-friendly structure while still delivering all the flavor benefits of whole grains.
Why did my bread collapse in the oven?
An oven collapse typically happens when the dough has been over-proofed during the second rise. If the dough is left to rise for too long in the pan, the yeast produces more gas than the gluten network can physically support. When exposed to the intense heat of the oven, the fragile gas bubbles rupture, causing the center of the loaf to deflate. Always bake the loaf when it has risen just above the rim of the pan and springs back slowly when touched.
Can I substitute instant yeast for active dry yeast?
Yes, absolutely. If you prefer to use instant yeast or rapid-rise yeast, you can bypass the initial activation step entirely. Simply mix the instant yeast directly into the dry flours, add the warm water, honey, and oil all at once, and proceed straight to kneading the dough, which can save you about 10 minutes of preparation time.
How do I get more seeds to stick to the crust?
The secret to a heavily seeded crust is utilizing an egg white wash rather than plain water or milk. Egg white acts as a natural, edible culinary glue that binds the flaxseeds securely to the surface of the dough, ensuring they remain firmly attached to the crust during both the final oven rise and the subsequent slicing process.
Conclusion
Baking a stunning loaf of seeded whole grain bread at home is an incredibly fulfilling culinary journey that rewards you with immense nutritional benefits, unparalleled flavor, and a deep sense of artisanal pride. By understanding the simple science of gluten development, respecting the proofing stages, and finishing the loaf with a generous, toasted flaxseed crust, you can confidently walk away from the supermarket bread aisle forever. Whether slathered with homemade jam for breakfast, packed into a nutritious lunchtime sandwich, or served alongside a comforting bowl of soup, this rustic, wholesome loaf is destined to become a beloved staple in your weekly kitchen repertoire. Gather your quality flours, activate your yeast, and enjoy the timeless, magical art of home bread baking.