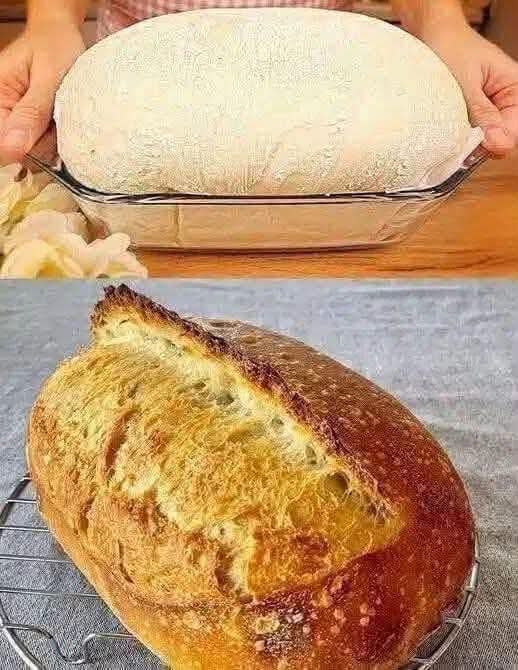
Easy Glass Pan Sourdough Bread Recipe with Crispy Crust
Baking a bakery-quality loaf of artisanal sourdough at home is a deeply rewarding experience. Featuring a blistered golden-brown crust, a dramatic ear expansion, and an airy, soft internal crumb, this sourdough loaf shows that you do not need expensive Dutch ovens or professional bakery stone decks to achieve perfection. Utilizing a simple glass loaf dish or pyrex pan to proof and bake, this straightforward recipe guides you through creating a rustic, flavorful loaf from scratch.
Why You Will Love Baking Sourdough in a Glass Pan
While heavy cast iron Dutch ovens are traditionally recommended for sourdough, glass baking dishes are an accessible alternative that yields incredible results.
Clear Visibility During Proofing and Baking
Using transparent glass cookware allows you to easily monitor your dough’s expansion and gas structure during the final rise. You can visually inspect how much air has built up along the sides without disturbing the delicate dough shape.
Exceptionally Crispy Crust and Tender Crumb
Glass distributes heat evenly, allowing the bread dough to spring upward efficiently during initial baking. When paired with steam—achieved by covering the dish during the first phase of baking—the crust develops a golden sheen with micro-blisters, while keeping the interior soft and chewy.
Simple, Beginner-Friendly Process
If you are new to bread making, handling a glass loaf dish or loaf mold makes shaping and transferring your sourdough stress-free compared to maneuvering hot cast iron pots.
Essential Ingredients and Equipment
Creating a classic sourdough bread relies on just three foundational ingredients transformed by time and fermentation.
Simple Ingredients
- Active Sourdough Starter: 100 grams of bubbly, fully mature sourdough starter (fed within 4 to 8 hours prior to baking).
- Bread Flour: 450 grams of high-protein unbleached bread flour for strong gluten structure and maximum rise. You can substitute 50 grams with whole wheat flour for an earthier flavor profile.
- Warm Water: 310 grams of filtered, unchlorinated water (roughly 70% hydration level).
- Fine Sea Salt: 10 grams of fine sea salt or non-iodized kosher salt to control fermentation and enhance flavor.
Key Equipment
- Glass baking pan or deep pyrex loaf dish
- Digital kitchen scale for accurate weight measurements
- Mixing bowl and silicone spatula
- Parchment paper
- Sharp razor blade or baker’s lame for scoring
Step-by-Step Instructions
Follow this detailed breakdown to mix, stretch, ferment, score, and bake your sourdough loaf to perfection.
Step 1: Mixing and Autolyse
- In a large bowl, whisk together 100g of active starter and 310g of warm water until liquid is milky and smooth.
- Add 450g of bread flour to the mixture. Stir with a spatula or wooden spoon until all dry flour patches disappear and a shaggy dough forms.
- Cover the bowl with a damp cloth and let it rest for 30 to 45 minutes (the autolyse phase) to hydrate the flour and kickstart natural gluten development.
Step 2: Add Salt and Perform Stretch-and-Folds
- Sprinkle 10g of fine sea salt evenly over the rested dough along with a small splash (about 10ml) of warm water.
- Dimple the salt into the dough with wet fingers, then perform your first set of stretch-and-folds: reach under one side of the dough, stretch it upward gently, and fold it over the top. Rotate the bowl 90 degrees and repeat for all four corners.
- Cover the bowl and let it rest at room temperature for 30 minutes.
- Perform 3 more sets of stretch-and-folds spaced 30 minutes apart over the next 1.5 to 2 hours. Notice how the dough becomes smooth, elastic, and glossy.
Step 3: Bulk Fermentation and Shaping
- Allow the dough to bulk ferment at room temperature (around 70°F–75°F / 21°C–24°C) until it expands by roughly 50% to 75% in volume and shows visible air bubbles on top.
- Lightly dust your work surface with flour and tip out the dough.
- Gently pull the edges outward into a rectangle, then fold the sides inward like a letter. Roll the dough up into a tight log shape to create surface tension.
- Line your glass pan with a sheet of parchment paper. Carefully transfer the shaped loaf into the prepared glass pan with the smooth side facing upward.
Step 4: Final Rise and Cold Retard
- Cover the glass pan loosely with a clean towel or plastic bowl cover.
- Let the dough rest at room temperature for 45 minutes, then transfer the glass pan into the refrigerator for a cold fermentation period of 8 to 16 hours. Cold proofing slows yeast action while enhancing complex sour flavors and making the dough firm for clean scoring.
Step 5: Scoring and Baking
- Preheat your oven to 450°F (230°C). Place an oven-safe metal rimmed baking tray on the bottom oven rack.
- Remove your chilled loaf directly from the refrigerator.
- Using a razor blade or sharp baker’s lame, score a long, single slash down the length of the dough at a 45-degree angle (1/2 inch deep) to allow controlled expansion during baking.
- Place the glass pan into the center rack of the oven. Immediately pour 1 cup of hot water into the bottom metal tray to create a burst of baking steam, then quickly close the oven door.
- Bake with steam at 450°F (230°C) for 25 minutes.
- Carefully remove the steam tray from the bottom rack, reduce the oven temperature to 410°F (210°C), and bake for another 18 to 22 minutes until the crust turns a rich golden-amber color.
Pro Tips for Sourdough Baking Success
Mastering temperature control and baking mechanics ensures consistently stunning loaves every time.
Master the Water Steam Effect
Steam is essential during the initial 20 minutes of baking because it keeps the dough surface supple, allowing the loaf to expand fully before the outer crust sets. Creating steam in your oven ensures a prominent “ear” slice and a light, airy crumb.
Always Allow Full Cooling Before Slicing
Resist the temptation to cut into your hot loaf immediately after removing it from the oven. Sourdough continues to cook internally as steam leaves the loaf. Let it rest on a wire cooling rack for at least 2 hours to avoid a gummy texture.
Frequently Asked Questions
Can glass bakeware shatter in a hot oven?
Always use high-quality, oven-safe tempered glass or Pyrex bakeware. Avoid extreme thermal shocks by not placing cold glass directly onto hot metal stove tops or pouring cold liquids into a hot glass pan.
How do I know when bulk fermentation is done?
Bulk fermentation is complete when the dough has visibly puffed up, feels light and aerated, displays smooth dome edges, and shows small air bubbles under the surface.
How should I store homemade sourdough bread?
Store cooled bread uncut on the counter in a paper bag or bread box for up to 3 days to maintain crustiness. To store long term, slice the loaf and freeze the slices in an airtight freezer bag for up to 3 months.
Baking bread at home is a simple craft built on patience and quality ingredients. With this easy glass pan sourdough method, you can enjoy fresh, golden, crackling sourdough loaves right from your kitchen counter.