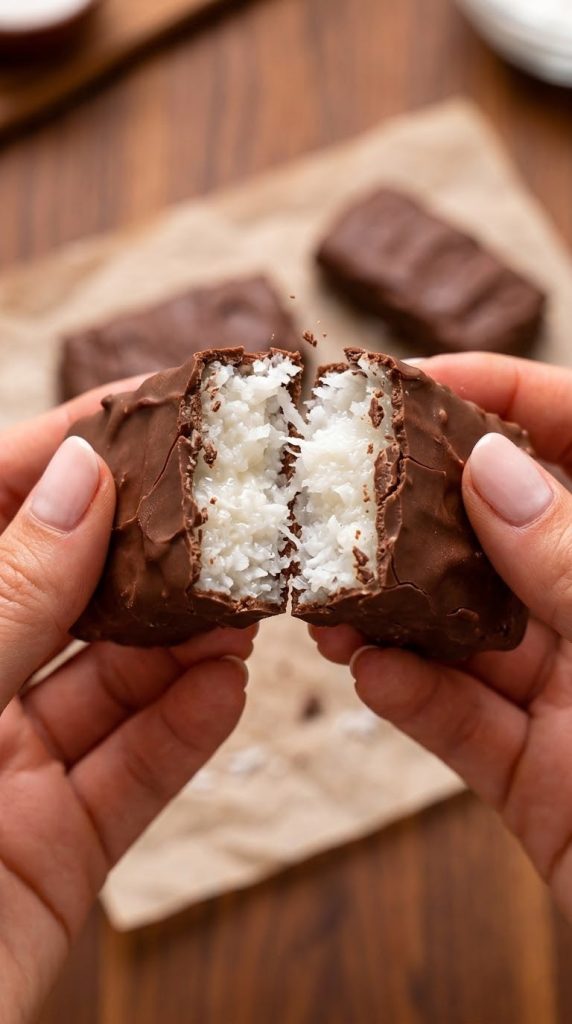
Rich Chocolate, Sweet Coconut & an Irresistibly Soft Center! 🥥
If you love the combination of creamy coconut and rich milk chocolate, these homemade chocolate coconut bars are about to become your new favorite treat!
Inspired by classic Mounds candy bars, this easy no-bake recipe features a sweet, chewy coconut filling wrapped in a smooth chocolate coating. Every bite delivers the perfect balance of tropical coconut flavor and delicious chocolate.
The best part? You only need a few simple ingredients, and there’s no oven required!
These homemade coconut candy bars are perfect for holiday celebrations, Christmas candy trays, homemade gifts, family gatherings, or whenever you’re craving something sweet.
⏱️ Recipe Information
- Prep Time: 20 minutes
- Chilling Time: 1 hour 30 minutes
- Total Time: 1 hour 50 minutes
- Servings: 16 bars
- Difficulty: Easy
- Cooking Method: No-Bake
- Category: Dessert / Homemade Candy
🥥 Ingredients
For the Coconut Filling
- 3 cups sweetened shredded coconut
- 3/4 cup sweetened condensed milk
- 2 tablespoons unsalted butter, softened
- 1 teaspoon pure vanilla extract
- 1/8 teaspoon salt
For the Chocolate Coating
- 2 cups milk chocolate chips or semi-sweet chocolate chips
- 1 tablespoon coconut oil or vegetable shortening (optional, for a smoother coating)
Optional Additions
- 1/4 cup toasted coconut flakes
- 1/4 teaspoon coconut extract for stronger coconut flavor
- Whole almonds for an Almond Joy-inspired variation
- A small pinch of flaky sea salt
👩🍳 How to Make Homemade Chocolate Coconut Bars
Step 1: Prepare Your Ingredients
Measure all the ingredients before starting.
Place the shredded coconut into a large mixing bowl. Make sure your butter is softened so it blends easily into the coconut mixture.
Step 2: Add the Sweetened Condensed Milk
Pour the sweetened condensed milk over the shredded coconut.
Use a silicone spatula or wooden spoon to begin mixing the ingredients together.
The condensed milk will bind the coconut flakes and create a sweet, sticky filling.
Step 3: Add Butter and Vanilla
Add the softened butter, vanilla extract, and salt.
Mix thoroughly until the ingredients are evenly combined.
The coconut mixture should be thick, moist, and sticky enough to hold together when pressed.
If it feels too wet, add a little more shredded coconut, one tablespoon at a time.
Step 4: Mix Until Fully Combined
Continue folding the coconut mixture until every flake is coated.
The texture should resemble a thick coconut dough rather than a liquid batter.
Step 5: Prepare the Baking Tray
Line a small baking tray or rectangular dish with parchment paper.
Leave some parchment hanging over the edges to make removing the coconut mixture easier.
Step 6: Spread the Coconut Mixture
Transfer the coconut filling onto the prepared tray.
Use a spatula to press it into an even rectangle approximately 3/4 inch thick.
Press firmly so the bars will hold their shape after chilling.
Step 7: Refrigerate the Coconut Filling
Place the tray in the refrigerator for approximately 30–45 minutes.
This helps the mixture firm up and makes it easier to cut into neat pieces.
Step 8: Cut Into Bars
Remove the chilled coconut slab from the tray.
Place it onto a cutting board and use a sharp knife to cut it into 16 rectangular bars.
For a classic candy-bar appearance, gently round the corners using your fingers.
Step 9: Freeze Before Coating
Arrange the coconut bars on a parchment-lined baking sheet.
Freeze for 20–30 minutes until firm.
This step is important because cold coconut bars are much easier to coat in melted chocolate.
Step 10: Prepare the Chocolate
Place the chocolate chips in a microwave-safe bowl.
Add the coconut oil if using.
Microwave in 20-second intervals, stirring between each interval, until the chocolate is completely melted and smooth.
Alternatively, melt the chocolate using a double boiler over gently simmering water.
Avoid overheating the chocolate, which can cause it to become thick or grainy.
Step 11: Dip the Coconut Bars
Remove the chilled coconut bars from the freezer.
Using two forks, carefully dip each bar into the melted chocolate.
Turn gently until the top, bottom, and sides are completely covered.
Step 12: Allow Excess Chocolate to Drip Off
Lift each chocolate-covered bar out of the bowl.
Let the excess chocolate drip back into the bowl before transferring the bar to a parchment-lined tray.
This creates a more even chocolate coating.
Step 13: Repeat With the Remaining Bars
Continue dipping the remaining coconut bars.
If the chocolate starts to thicken, gently warm it again for a few seconds.
Keep the coating smooth and glossy.
Step 14: Add Optional Decorations
Before the chocolate hardens, sprinkle a little toasted coconut or flaky sea salt over the top.
For a simple, classic appearance, leave the bars completely coated in chocolate without additional toppings.
Step 15: Chill Until the Chocolate Sets
Place the chocolate-covered coconut bars in the refrigerator for approximately 20–30 minutes.
The chocolate should become firm while the coconut filling remains soft and chewy.
Step 16: Serve and Enjoy
Remove the bars from the refrigerator.
Break or cut one in half to reveal the beautiful white coconut center surrounded by rich chocolate.
Serve slightly chilled or allow them to sit at room temperature for a few minutes for a softer texture.
Enjoy your delicious homemade chocolate coconut bars!
⭐ Why You’ll Love This Recipe
Only a Few Ingredients: You don’t need a long shopping list to prepare these delicious homemade candies.
No Oven Required: This easy no-bake dessert is perfect when you want something sweet without baking.
Perfect for Chocolate Lovers: The combination of sweet coconut and rich chocolate creates a delicious candy-bar flavor.
Great for Making Ahead: Prepare a batch in advance and keep it refrigerated for whenever a chocolate craving strikes.
Ideal for Gifting: Wrap the bars individually and arrange them in decorative boxes for thoughtful homemade gifts.
💡 Cooking Tips for Perfect Chocolate Coconut Bars
- Use Sweetened Shredded Coconut
Sweetened shredded coconut creates a moist, chewy filling similar to classic coconut candy bars.
Unsweetened coconut can be used, but the sweetness and texture will be different.
- Don’t Add Too Much Condensed Milk
The coconut mixture should hold together without becoming runny. Add the condensed milk gradually if your coconut is especially fine or moist.
- Chill Before Dipping
Cold coconut bars are easier to handle and less likely to fall apart in melted chocolate.
- Choose Good-Quality Chocolate
Milk chocolate creates a sweeter candy bar, while semi-sweet or dark chocolate provides a richer flavor and balances the sweetness of the filling.
- Avoid Overheating the Chocolate
Melt chocolate gently to maintain a smooth consistency.
- Use Parchment Paper
Parchment prevents the bars from sticking to the tray while the chocolate sets.
- Make the Bars Uniform
Cutting the filling into equal portions ensures attractive bars that are easy to serve and package.
🍫 Delicious Recipe Variations
Dark Chocolate Coconut Bars
Replace the milk chocolate with dark chocolate for a richer, less-sweet dessert.
Almond Coconut Bars
Press one whole almond onto each coconut bar before dipping it in chocolate for an Almond Joy-style treat.
White Chocolate Coconut Bars
Use melted white chocolate instead of milk chocolate for a sweeter, creamier variation.
Toasted Coconut Bars
Lightly toast part of the shredded coconut before mixing it with the condensed milk. Allow it to cool completely before combining.
Mini Coconut Bites
Cut the coconut mixture into small squares instead of full-size bars.
These bite-sized treats are perfect for dessert platters and parties.
🧊 How to Store Homemade Chocolate Coconut Bars
Refrigerator
Store the coconut bars in an airtight container in the refrigerator for up to 1 week.
Place parchment paper between layers to prevent the chocolate from sticking.
Freezer
These bars freeze beautifully.
Place them in a freezer-safe container or bag and freeze for up to 2 months for best quality.
Allow frozen bars to thaw in the refrigerator before serving.
Room Temperature
For the best texture and food quality, keep these homemade bars refrigerated until shortly before serving, especially in warm weather.
❓ Frequently Asked Questions
Can I make chocolate coconut bars without baking?
Absolutely! This recipe is completely no-bake. You only need to mix the coconut filling, chill it, and coat the bars in melted chocolate.
Can I use dark chocolate instead of milk chocolate?
Yes. Dark chocolate works wonderfully and creates a richer flavor that complements the sweet coconut center.
Why is my coconut filling too sticky?
The mixture may contain too much condensed milk. Add a small amount of shredded coconut and mix until it becomes easier to shape.
Why are my bars falling apart when dipped?
The coconut filling may not be cold enough. Freeze the shaped bars until firm before dipping them into the chocolate.
Can I make these coconut bars ahead of time?
Yes! They are an excellent make-ahead dessert and can be prepared several days before serving.
Are these similar to Mounds candy bars?
Yes! They feature the same delicious combination of sweet coconut filling and chocolate coating. Traditional Mounds bars use dark chocolate, so choose dark chocolate for a closer flavor.
📊 Nutritional Information
Estimated per serving (1 bar, based on 16 bars):
- Calories: Approximately 300 kcal
- Protein: 3 g
- Carbohydrates: 34 g
- Total Fat: 18 g
- Saturated Fat: 13 g
- Fiber: 2 g
- Sugar: 30 g
- Sodium: 70 mg
Nutrition values are estimates and will vary depending on the chocolate brand, coconut, and portion size.
❤️ Final Thoughts
These Homemade Chocolate Coconut Bars are proof that you don’t need complicated ingredients or hours in the kitchen to create a delicious dessert.
With their soft, sweet coconut centers and smooth chocolate coating, they taste like a special candy-shop treat made right in your own kitchen.
Whether you’re preparing them for Christmas, Valentine’s Day, birthday parties, holiday dessert trays, or simply an afternoon chocolate craving, these easy no-bake coconut bars are sure to be a hit.
Once you try making your own chocolate coconut candy, you may never want to buy the packaged version again!
📌 Save this Homemade Chocolate Coconut Bars recipe for later, share it with your friends, and enjoy every chocolatey, coconut-filled bite! 🍫🥥❤️