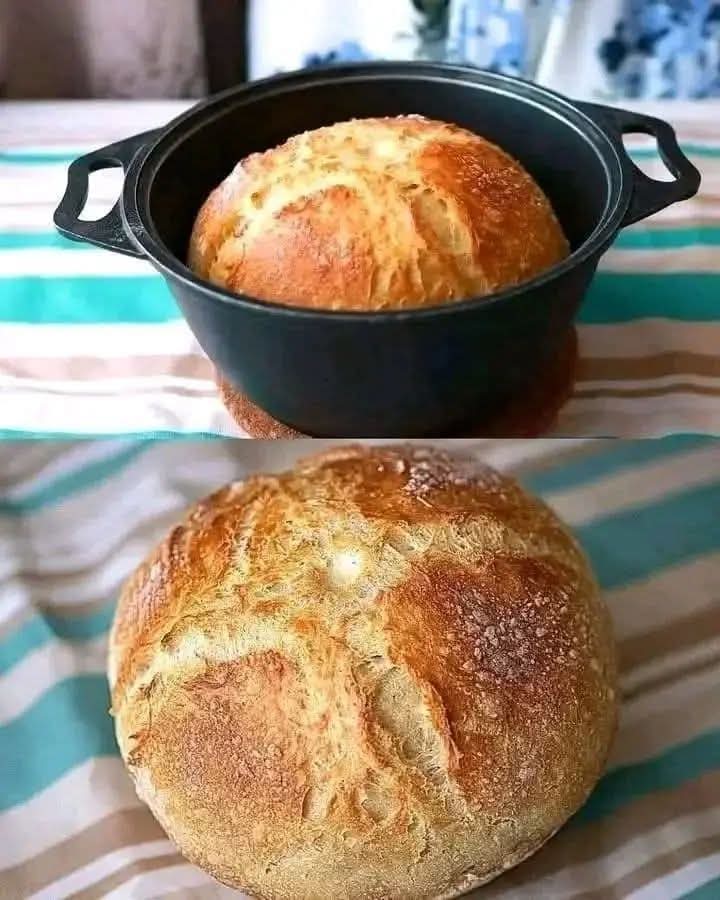
Easy No-Knead Dutch Oven Bread The Ultimate Guide to Bakery Quality Artisan Loaves
There is an undeniable magic in the aroma of freshly baked bread wafting through a home kitchen. For centuries, baking a perfect artisan loaf with a shatteringly crisp crust and a light, airy crumb was considered a craft reserved strictly for professional bakers with specialized steam-injection ovens. However, the culinary world underwent a massive revolution with the introduction of the no-knead method cooked inside a heavy cast-iron Dutch oven. This simple technique completely demystified bread baking, proving that anyone can produce a world-class, rustic loaf at home using only four basic pantry ingredients and absolutely zero kneading experience.
The secret to this incredible bread lies in the dual power of time and steam. Instead of physically working the dough for twenty minutes to develop the gluten network, you let a long, slow room-temperature fermentation do the labor for you. Then, by baking the dough inside a preheated Dutch oven with its lid tightly sealed, you trap the natural moisture evaporating from the wet dough. This creates an intense steam chamber that allows the bread to rise to its maximum potential before forming a thick, deeply caramelized, golden-brown crust. Whether you are a complete novice taking your first steps into bread making or an experienced cook looking for a reliable, hands-off recipe, mastering this Dutch oven artisan loaf will fundamentally change your home baking routine.
The Food Science Behind No-Knead Bread
To truly understand why this method works so flawlessly, it helps to explore the basic biology and chemistry of fermentation. In traditional bread recipes, kneading is essential because the mechanical action aligns the proteins gliadin and glutenin found in wheat flour, binding them together to form a stretchy, elastic web called gluten. This gluten web is what traps the carbon dioxide gas produced by the yeast, causing the dough to rise and develop structure.
In a no-knead recipe, you bypass the physical labor by significantly increasing the hydration level of the dough and extending the fermentation time. When flour is mixed with a relatively large amount of water, the protein molecules enjoy enhanced mobility. Over a period of twelve to eighteen hours, these molecules naturally find each other and link up to create a perfectly strong, complex gluten network entirely on their own. This slow process also gives the yeast ample time to break down complex starches into simple sugars, creating a remarkably deep, complex flavor profile with a subtle tang that closely mimics a high-quality sourdough loaf.
Essential Ingredients for the Perfect Loaf
One of the most beautiful aspects of an authentic artisan loaf is its purity. You do not need any dough conditioners, sugar, milk, or chemical additives. The entire recipe relies on just four ingredients that you likely already have in your kitchen.
- All-Purpose or Bread Flour: While you can successfully bake a great loaf using standard unbleached all-purpose flour, using premium bread flour will yield an even better result. Bread flour contains a higher protein content (typically around 12% to 14%), which translates to a stronger gluten structure, a higher rise in the oven, and a delightfully chewy interior crumb.
- Active Dry Yeast or Instant Yeast: Because this recipe relies on a long, slow fermentation, you only need a remarkably small fraction of a teaspoon of yeast. Using too much yeast will cause the dough to over-rise and collapse before it ever reaches the oven, resulting in a flat, dense loaf with an unpleasant alcoholic aroma.
- Fine Sea Salt or Kosher Salt: Salt is an absolutely critical component in bread baking. Beyond providing essential flavor, salt plays a structural role by tightening the gluten strands, which helps the dough retain its shape and gas bubbles. It also regulates the activity of the yeast, ensuring the fermentation proceeds at a steady, controlled pace.
- Lukewarm Water: The temperature of the water should be comfortable to the touch, roughly around 70°F to 80°F (21°C to 27°C). If the water is boiling hot, it will instantly kill the microscopic yeast cells; if it is ice-cold, it will severely delay the fermentation process.
Why the Dutch Oven is Non-Negotiable
The real game-changer in home bread baking is the use of a heavy-bottomed, lidded vessel, with a cast-iron Dutch oven being the absolute gold standard. Professional bakeries utilize specialized deck ovens that inject massive bursts of wet steam during the first ten minutes of the baking cycle. Steam is crucial because it keeps the outer skin of the dough soft and pliable, allowing the gases inside to expand rapidly and lift the loaf to its full height, a phenomenon known as “oven spring.” Steam also gelatinizes the starches on the surface of the loaf, which eventually dry out to form that signature glossy, blistered, crackly crust.
A standard home oven cannot maintain this level of humidity because the moisture constantly escapes through the oven vents. When you place your wet dough inside a blistering hot, covered Dutch oven, the small, sealed environment traps the steam radiating directly from the dough itself. In essence, the Dutch oven acts as a mini professional bakery oven right on your kitchen rack. For the final portion of the bake, removing the heavy lid allows the trapped steam to escape, exposing the loaf to dry heat so the crust can crisp up and develop a gorgeous deep amber hue.
Step-by-Step Instructions for Artisan Dutch Oven Bread
1. Mixing the Shaggy Dough
In a large glass or ceramic mixing bowl, whisk together your flour, salt, and a tiny pinch of yeast until thoroughly combined. Pour the lukewarm water directly into the dry ingredients. Using the handle of a wooden spoon, a silicone spatula, or a dedicated Danish dough whisk, stir the mixture gently just until all the dry flour is fully hydrated. The resulting dough will not look smooth or uniform; it will be an incredibly sticky, wet, and shaggy mess. This is completely normal and exactly how it should look at this stage. Do not be tempted to add extra flour or attempt to shape it yet.
2. The Long Overnight Fermentation
Scrape down the sides of the bowl to gather the dough into a loose ball in the center. Cover the top of the bowl tightly with a layer of plastic wrap, a beeswax wrap, or a damp kitchen towel to prevent the moisture from escaping and a hard crust from forming on top of the dough. Place the covered bowl on your kitchen counter at room temperature, safely out of direct sunlight and drafts. Let the dough sit undisturbed for at least 12 hours, though 18 hours is ideal for maximum flavor development. As the hours pass, the yeast will slowly consume the sugars, causing the dough to double in size, become highly loose, and fill with countless tiny, beautiful gas bubbles.
3. Shaping and the Second Rise
After the long rest, gently pull the plastic wrap off the bowl. You will notice a wonderful, complex fermented aroma. Generously dust a clean work surface with a layer of flour, and lightly flour your hands. Gently tip the sticky dough out of the bowl onto the floured surface. Do not punch the dough down or handle it aggressively, as you want to preserve as many of those precious internal air pockets as possible. Using a bench scraper or your floured fingers, gently fold the edges of the dough inward toward the center, working your way around the perimeter to create a loose, round ball. Flip the dough over so the smooth side faces upward. Cupping your hands around the base of the dough, gently drag it toward you across the counter to create light surface tension on the skin of the loaf. Place the shaped dough onto a large sheet of premium parchment paper, cover it loosely with a clean towel, and let it rest for another 45 to 60 minutes for its final proofing stage.
4. Preheating Your Baking Vessel
While your dough is undergoing its final proofing on the parchment paper, place your empty Dutch oven, along with its heavy lid, onto the middle rack of your cold oven. Turn the heat up to a scorching 450°F (230°C) and let the vessel preheat inside the oven for at least 30 to 45 minutes. It is vital that the cast iron becomes thoroughly and evenly saturated with heat before the cold dough ever touches it, as this intense thermal mass is what drives the explosive initial oven spring and prevents the bottom of the loaf from sticking.
5. Scoring and Baking
Once the preheating time is complete, carefully remove the blistering hot Dutch oven using heavy-duty oven mitts and set it down safely onto a heatproof trivet or your stovetop. Remove the hot lid. Uncover your proofed dough and use a sharp knife, a razor blade, or a professional baker’s lame to slice a clean, swift cut across the top of the loaf, roughly a quarter-inch deep. This cut, called scoring, acts as an intentional escape route for steam, directing where the loaf will expand so it does not burst haphazardly from the bottom or sides. Grabbing the corners of the parchment paper like a sling, carefully lift the dough and lower it, parchment paper and all, directly into the center of the piping hot Dutch oven. Immediately place the heavy lid back on top, transfer the vessel back into your oven, and bake covered for exactly 30 minutes.
6. Uncovering for the Golden Crust
After 30 minutes of covered baking, carefully reach into your oven and remove the heavy lid from the Dutch oven. You will be greeted by a beautifully risen, pale loaf that has expanded dramatically. Leave the lid off and continue baking the open loaf at 450°F (230°C) for an additional 15 to 20 minutes. Keep a close eye on it during this final stretch; you are looking for the crust to transform from a dull tan into a rich, deep chestnut brown, with the edges of the scored cut turning beautifully dark and crispy. Once the crust achieves your desired level of deep color, carefully lift the bread out of the pot using the edges of the parchment paper and transfer it onto a wire cooling rack.
Troubleshooting Common Bread Baking Mistakes
While this method is incredibly forgiving, you may occasionally run into a few structural issues. Understanding how to adjust your technique ensures a perfect loaf every single time.
Why Is My Bread Flat and Dense?
A flat, heavy loaf usually points to one of two common issues: old yeast or over-proofing. Yeast is a living organism that degrades over time; if your yeast has been sitting in a warm pantry for over a year, it may not have enough vitality to produce the necessary carbon dioxide gas. Always test your yeast in a small splash of warm water to see if it foams before committing to a full recipe. Alternatively, if you let your dough sit out at room temperature for too long, especially in a very warm or humid kitchen, the yeast will exhaust its food supply and the gluten structure will weaken, causing the loaf to deflate and flatten out the moment it encounters the heat of the oven.
Why Is the Bottom Crust Burnt or Too Hard?
Because a cast-iron Dutch oven sits relatively close to the lower heating elements of a home oven, the intense direct heat can sometimes cause the bottom crust of your bread to scorch before the top has finished browning. To prevent this, you can slide a heavy, rimmed baking sheet onto the oven rack directly beneath your Dutch oven during the final 15 minutes of baking. The baking sheet acts as a heat shield, deflecting the harsh, direct infrared radiation away from the bottom of the pot. You can also sprinkle a thin, even layer of coarse cornmeal onto the bottom of the parchment paper before placing the dough on it to provide an extra insulating barrier.
How to Properly Cool and Store Your Artisan Loaf
As intoxicating as a freshly baked, steaming hot loaf of bread is, the absolute hardest part of the entire process is also the most critical: you must let the bread cool completely on a wire rack for at least one full hour before slicing into it. When you remove the bread from the oven, the cooking process is not actually finished. The interior structure of the loaf is still filled with trapped, superheated steam and moisture. If you cut into a hot loaf immediately, that steam will violently escape, causing the delicate starch structures to collapse and leaving you with a gummy, wet, and condensed interior crumb. Allowing the bread to cool slowly allows the starches to set cleanly and stabilizes the moisture distribution throughout the loaf.
Storing for Lasting Freshness
Because homemade artisan bread contains absolutely no artificial preservatives, it will dry out much faster than commercial grocery store loaves. To preserve that magical contrast between the crunchy crust and the soft interior, store your leftover bread cut-side down on a heavy wooden cutting board or inside a breathable paper bag at room temperature for up to two days. Avoid wrapping fresh artisan bread in tight plastic bags, as the plastic traps the residual moisture escaping from the crumb, quickly turning your delightfully crispy crust soft, leathery, and prone to mold.
If you cannot finish the loaf within two days, your best option is to slice the remaining bread entirely, place the individual slices into a heavy-duty freezer-safe bag, and store them in your freezer for up to three months. When a bread craving strikes, you can drop a frozen slice directly into your toaster. The intense heat will instantly revive the soft interior and crisp up the outer crust, giving you a fresh-out-of-the-oven experience in a matter of minutes.
Delicious Ways to Enjoy Your Crusty Loaf
While a thick slice of this bread smeared with high-quality cultured butter and a sprinkle of flaky sea salt is pure perfection, its robust structure makes it incredibly versatile across a variety of sweet and savory dishes.
- The Ultimate Avocado Toast: Toast a thick slice of your Dutch oven bread until golden-brown, rub a raw clove of garlic across the rough surface of the crust, and top it with mashed ripe avocado, a squeeze of fresh lemon juice, red pepper flakes, and a soft-poached egg.
- Gourmet Grilled Cheese: The sturdy, irregular crumb of this artisan bread is the ultimate vessel for melted cheese. Sandwich thick slices of sharp cheddar, gruyère, or fontina between two heavily buttered slices of bread and pan-fry slowly over medium-low heat until the exterior is beautifully golden and the cheese is perfectly molten.
- Rustic Italian Ribollita or Panzanella: If your loaf happens to go completely stale after a few days, do not throw it away. Stale artisan bread is highly prized in Mediterranean cooking. Tear it into rustic chunks and toss it with ripe tomatoes, cucumbers, fresh basil, and extra virgin olive oil for a classic Tuscan Panzanella salad, or drop the cubes directly into a simmering pot of vegetable bean stew to thicken the broth and add a wonderful, hearty texture.
Conclusion
Baking an extraordinary, bakery-quality artisan loaf at home does not require expensive gear, complex techniques, or hours of exhausting physical labor. By embracing the simple chemistry of a high-hydration, no-knead dough and harnessing the magnificent heat-retention properties of a classic cast-iron Dutch oven, you can easily produce bread that boasts a jaw-droppingly beautiful crust and a light, airy, and deeply flavorful interior. It is a deeply satisfying, life-changing culinary skill that brings immense joy to the kitchen and comfort to the table. Gather your four simple ingredients, dust off your heavy pot, and enjoy the timeless, rewarding craft of home bread baking.