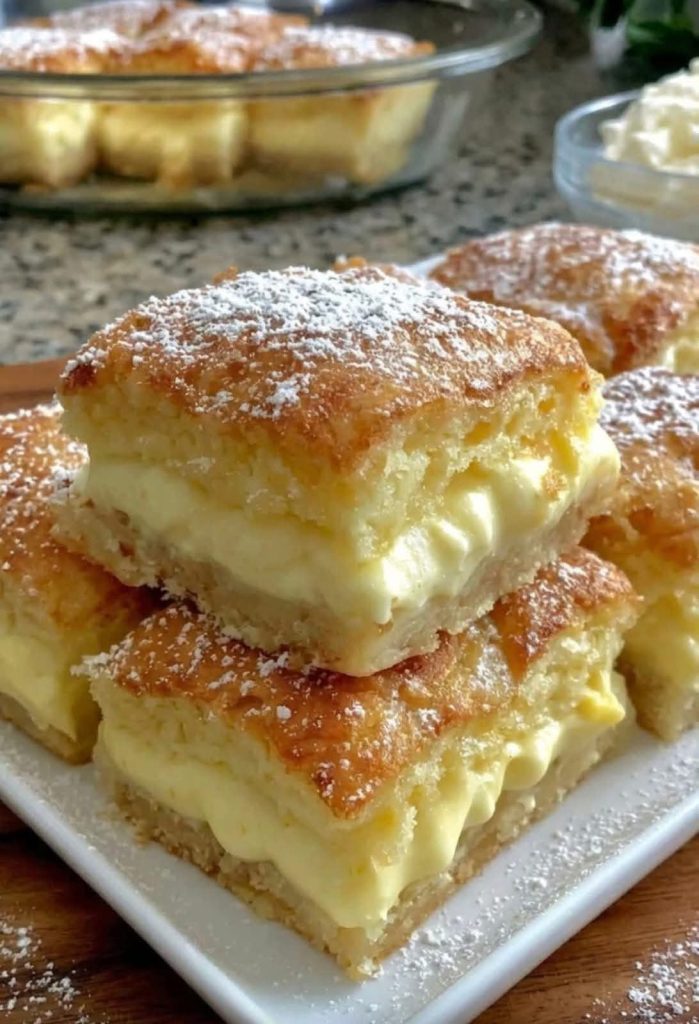
The Ultimate Custard Cream Cake Bars Recipe A Masterclass in Multi Layered Dessert Perfection
When it comes to creating a truly unforgettable dessert, balancing structural stability with a melt-in-your-mouth texture is the ultimate key to pastry success. A flawless sweet slice should offer a delicate, buttery cake base and a golden, slightly crisp top crust while enveloping a thick, velvety custard center. These custard cream cake bars achieve exactly that. By sandwiching a rich, rich vanilla custard filling between two layers of a tender, buttery cake batter and finishing it with a dusting of powdered sugar, you transform basic baking staples into an irresistible, bakery-level delicacy. Served chilled, this dessert easily rivals anything you would find at a high-end European patisserie.
For digital content publishers and avid home bakers alike, mastering the art of a custard-filled baked bar is a true game-changer. It relies heavily on precise structural baking—understanding how to bake a delicate liquid custard directly inside a cake batter layer without the two elements completely muddying together or turning soggy. In this comprehensive, long-form guide, we will look into the kitchen science of custard stability, provide a complete ingredient blueprint, walk through a step-by-step production protocol, and share the secrets to keeping your cake bars perfectly layered, structured, and visually stunning every single time.
The Science of the Perfect Layer: Thermal Separation and Set Dynamics
The primary technical challenge when baking cake bars with a rich liquid filling is preventing the layers from blending into a single, unappealing mush during baking. Custard and cake batter have vastly different densities, moisture levels, and thermal setting points.
Managing Starch and Egg Coagulation
To build a distinct, thick layer of cream right through the center of your bars, you must understand how egg proteins and starches respond to oven heat. Custard relies on the gentle coagulation of egg yolks combined with the gelatinization of starch (usually cornstarch or flour) to trap liquid milk fats into a solid, sliceable matrix.
If you introduce a piping-hot, freshly cooked custard directly to a raw, loose cake batter, the heat will melt the fats in the batter prematurely, causing the layers to collapse into one another. Conversely, if your custard is too thin when it enters the oven, the moisture inside will seep outward, steaming the bottom cake layer from the top down and turning it unpleasantly gummy. The solution lies in cooking the custard base first until it achieves a thick, pudding-like consistency, cooling it slightly to stabilize its structure, and carefully spreading it over a dense, stable lower batter layer that can support its weight through the early stages of baking.
Ingredients and Kitchen Tools Checklist
Using premium dairy fats, fine unrefined sugars, and fresh eggs ensures a smooth, luxurious custard mouthfeel and a golden, aromatic cake crumb.
For the Rich Vanilla Custard Filling:
- 2 cups Whole Milk: Provides the rich, full-fat liquid base necessary for a smooth custard.
- 1/2 cup Granulated Sugar: To sweeten the cream base.
- 4 large Egg Yolks: The primary thickening agent that lends a beautiful yellow hue and luxurious silkiness.
- 1/4 cup Cornstarch: Adds structural rigidity, ensuring the bars can be cleanly sliced once chilled.
- 2 teaspoons Pure Vanilla Extract or Vanilla Bean Paste: Infuses a deep, aromatic, and comforting pastry profile.
- 2 tablespoons Unsalted Butter: Stirred in at the very end for an extra glossy, smooth finish.
For the Tender Cake Layers:
- 1 1/2 cups All-Purpose Flour: Sifted thoroughly to form a light, tender crumb.
- 1 teaspoon Baking Powder: Provides just enough lift to keep the cake layers light without puffing up excessively.
- 1/4 teaspoon Fine Sea Salt: To balance the deep sweetness.
- 1/2 cup Unsalted Butter: Softened to room temperature for optimal creaming capacity.
- 3/4 cup Granulated Sugar: For structure and moisture retention within the sponge.
- 1 large Egg: To bind the batter matrix.
- 1/2 cup Whole Milk or Heavy Cream: Adds hydration and tenderness to the dough.
- Powdered Sugar (Confectioners’ Sugar): For a beautiful, classic snowy dusting over the cooled bars.
Step-by-Step Assembly and Baking Guide
Follow this precise chronological sequence to maintain an organized kitchen station and ensure distinct, beautifully defined layers.
Step 1: Crafting and Setting the Custard Base
In a medium-sized, heavy-bottomed saucepan, whisk together the egg yolks, granulated sugar, and cornstarch until they form a thick, pale yellow paste. Gradually pour in the whole milk in a slow, steady stream, whisking constantly to ensure no starch lumps form at the bottom of the pan. Place the saucepan over medium heat.
Cook the mixture continuously for 5 to 7 minutes, whisking vigorously without stopping. As the heat rises, the starch will activate and the egg proteins will thicken the liquid into a dense, glossy pastry cream that heavily coats the back of a spoon. The moment it begins to bubble gently, remove the pan from the heat. Stir in the vanilla extract and the two tablespoons of unsalted butter until fully melted and integrated. Pour the smooth custard into a glass bowl, press a sheet of plastic wrap directly onto the surface of the cream to prevent a tough skin from forming, and set it aside to cool to room temperature.
Step 2: Preparing the Dual-Layer Cake Batter
Preheat your oven to 180°C (350°F). Line a 9×9-inch square baking pan with premium parchment paper, leaving a slight overhang on the sides to serve as handles for easy removal later.
In a large mixing bowl, beat the softened unsalted butter and granulated sugar together using a hand mixer or stand mixer on medium-high speed for 3 to 4 minutes until the mixture is light, fluffy, and pale in color. Add the large egg and beat thoroughly until fully emulsified. In a separate bowl, whisk together the sifted all-purpose flour, baking powder, and sea salt. Alternating between the dry ingredients and the milk, add them to the creamed butter mixture in small batches, mixing on low speed just until a thick, uniform batter forms.
Step 3: Layering the Bars with Precision
Divide your completed cake batter into two equal portions. Take the first half of the batter and drop it in small dollops across the bottom of your prepared baking pan. Using a small offset spatula or the back of a spoon dipped in water, gently spread and smooth the batter into a thin, even layer covering the entire base of the pan.
Retrieve your cooled vanilla custard and stir it briefly with a spoon to ensure it is completely smooth. Pour the custard directly over the bottom batter layer, spreading it evenly from edge to edge to create a thick, stunning cream center. Finally, take the remaining half of the cake batter and carefully place spoonfuls of it on top of the custard layer. Gently smooth the top batter layer across the cream, working slowly to ensure you do not disrupt or mix the custard into the cake sponge.
Step 4: Baking to a Golden Crust
Place the pan into the center rack of your preheated oven. Bake at 180°C (350°F) for 35 to 40 minutes. As it bakes, the cake layers will set, and the top will puff slightly, turning a gorgeous, even golden-brown.
To check if the bars are cooked through, gently jiggle the pan—the center should feel relatively firm with only a very slight, structural wobble beneath the crust, indicating the custard has fully set without overcooking. Remove the pan from the oven and place it onto a wire cooling rack. Allow the dessert to cool completely to room temperature inside the pan.
The Critical Chilling and Slicing Protocol
While it can be incredibly tempting to slice into these bars while they are still warm, skipping the chilling phase will result in the custard layer pooling outward onto your cutting board.
Once the baking pan has cooled completely to room temperature, transfer it directly into your refrigerator. Let the dessert chill undisturbed for at least 3 to 4 hours, or ideally overnight. This extended cold rest allows the starches and fats within the custard filling to fully lock together, transforming the creamy center into a solid, sliceable, and intensely rich layer that holds its shape perfectly when cut.
When ready to serve, use the parchment paper handles to lift the entire block cleanly out of the baking pan and place it onto a sturdy wooden cutting board. Fill a fine-mesh sieve with powdered sugar and dust it generously across the entire golden surface until it resembles a pristine blanket of fresh snow. To achieve the immaculate, sharp edges seen in high-end pastry photography, run a large, sharp chef’s knife under hot tap water, wipe it completely dry with a towel, and slice the block into even squares. Clean and re-warm the blade between every single cut to ensure the yellow custard filling stays perfectly contained between the two light cake layers.
Storage and Preservation Practices
Short-Term Refrigeration
Because these cake bars feature a highly concentrated dairy and egg custard core, they must always be stored in a cold environment to maintain food safety and structural integrity. Place any leftover squares into an airtight glass storage container, separating any stacked layers with a sheet of parchment paper to prevent the powdered sugar from absorbing moisture and turning sticky. They can be safely refrigerated for up to 4 days, with the cake layers growing progressively moister and more flavorful as they absorb the vanilla aromatics from the custard core.
Freezing Guidelines
If you want to preserve these treats for a later date, they freeze surprisingly well. Wrap the individual, unsugared bars tightly in a double layer of plastic wrap, then place them into a heavy-duty freezer bag for up to 2 months. When a sudden dessert craving strikes, transfer the frozen bars into the refrigerator and let them thaw slowly overnight. Dust them with fresh powdered sugar right before serving to restore their beautiful, festive appearance.
Conclusion
Mastering these multi-layered custard cream cake bars is a wonderful testament to how structured baking techniques can elevate simple kitchen staples into a truly elegant dessert showpiece. By taking the time to fully cook and stabilize your vanilla pastry cream, setting up distinct layers within the pan, and practicing the discipline of a thorough overnight chill, you eliminate all risk of a soggy bake and unlock a spectacular textural balance.
Whether you choose to serve these beautiful squares at a cozy weekend afternoon tea or feature them as a premier, high-performing asset within a digital culinary collection, this recipe promises reliable success and immense satisfaction with every single bite. Gather your fresh dairy, whisk up a smooth batch of vanilla custard, and enjoy the incredibly rewarding and sweet process of crafting this ultimate bakery-style comfort food completely from scratch!