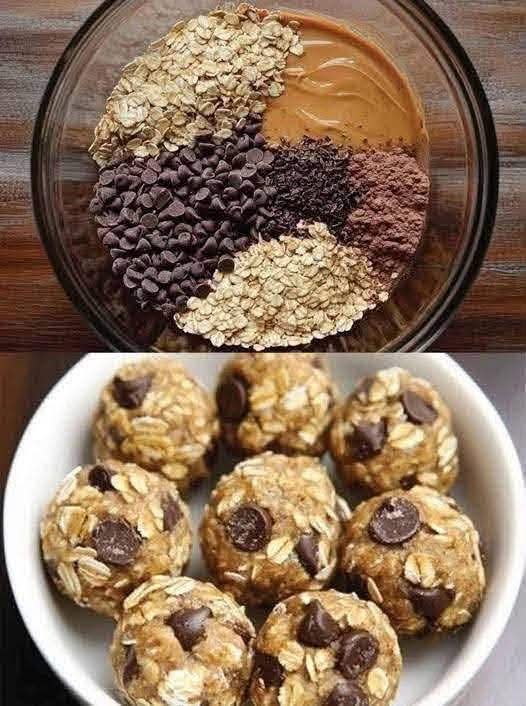
The Ultimate No Bake Chocolate Peanut Butter Energy Bites Recipe Your GoTo Healthy Snack
Finding a snack that perfectly satisfies sweet cravings while providing sustained, clean energy can feel like an impossible challenge. Many store-bought granola bars and protein snacks are packed with hidden refined sugars, artificial preservatives, and confusing chemical additives that leave you crashing an hour after eating. Fortunately, you do not need to rely on highly processed options to fuel your busy day. These homemade no-bake chocolate peanut butter energy bites are the absolute pinnacle of wholesome, whole-food indulgence. By combining complex carbohydrates from whole rolled oats with healthy fats from natural peanut butter and the antioxidant benefits of dark cacao, you create a dense, fudge-like treat that works as an excellent breakfast on the go, a post-workout recovery cell, or a guilt-free late-night dessert.
The true beauty of this recipe lies in its simplicity and its solid scientific foundation. You do not need to turn on your oven, drag out a heavy food processor, or possess advanced pastry skills to achieve bakery-level results. Instead, this recipe relies on simple binding mechanics—understanding how liquid plant lipids and sticky natural sweeteners interact with fibrous grains to build a perfectly pliable, cohesive dough that holds its shape cleanly. This comprehensive guide walks you through the nutritional science behind these energy rounds, provides a complete ingredient and substitution blueprint, details a step-by-step production protocol, and shares professional storage secrets to ensure your homemade bites stay perfectly moist, chewy, and travel-ready every single time.
The Science of Sustained Energy: Why Whole Foods Triumph
To understand why these energy bites are so incredibly effective at fighting midday fatigue, it helps to look at how our bodies process different types of macronutrients. Many popular commercial snacks rely heavily on isolated simple sugars, which are rapidly absorbed through the stomach lining into the bloodstream. This causes a sudden, dramatic spike in your blood glucose levels, prompting your pancreas to release a massive surge of insulin to clear the sugar. While you might feel a brief flash of alertness, it is almost always followed by a rapid blood sugar crash that leaves you feeling more exhausted and sluggish than before you ate.
These homemade energy bites prevent that cycle entirely through strategic ingredient pairing. By enveloping complex carbohydrates within a rich matrix of healthy monounsaturated fats and plant-based dietary fiber, you slow down the rate at which your stomach empties. The natural simple sugars present in the liquid honey or maple syrup provide an immediate but controlled spark of cognitive and physical energy. Meanwhile, the complex starches in the oats take hours to break down into glucose molecules, ensuring a steady, time-released delivery of fuel to your muscles and brain. This structural balance completely eliminates insulin volatility, giving you reliable, jitter-free stamina that keeps you focused and full for hours.
Sourcing Premium Ingredients: The Structural Flavor Matrix
Because a no-bake recipe does not undergo the thermal changes or flavor-enhancing effects of a hot oven, the quality and purity of your raw pantry goods dictate the final success of the dish. Selecting unrefined, high-grade whole foods ensures a rich, authentic flavor profile and a remarkably smooth mouthfeel without any chalky or dry textures.
Selecting the Ideal Oats for Maximum Texture
The foundation of your energy bites is the oats, and choosing the correct variety is paramount to achieving a satisfying, chewy texture. Old-fashioned rolled oats are the absolute gold standard for this recipe. During manufacturing, rolled oats are steamed and pressed flat, which preserves their large cellular structure and provides an excellent, visible bite. Avoid using raw steel-cut oats, which are far too hard and dense to chew without hours of boiling. On the other end of the spectrum, avoid using instant or quick-cooking oats if you can. Quick oats are pre-chopped into tiny fragments, causing them to absorb moisture far too rapidly; using them can turn your energy dough unpleasantly gummy, paste-like, and devoid of any structural definition.
The Critical Role of Creamy Natural Peanut Butter
The primary binding agent and lipid anchor of this recipe is the peanut butter. Peanut butter is a concentrated, natural emulsion of finely ground peanut solids suspended within their own rich, healthy monounsaturated oils. When mixed into the dry oats, these natural plant fats coat the individual grain flakes, softening their tough exterior cellulose walls while filling the microscopic voids between the pieces. This ensures that the bites remain incredibly soft and pliable without drying out or turning brittle. For the best structural results, look for a natural, creamy peanut butter with a smooth, pourable consistency. If your peanut butter is sitting at the very bottom of an old jar and has turned dry, chalky, or crumbly, it will lack the necessary free oils to hydrate the oats properly, causing your finished balls to fracture and fall apart when rolled.
Natural Sweeteners and Viscous Adhesion
While peanut butter provides the lipid base, your liquid sweetener introduces the vital element of structural adhesion. Pure unrefined honey or grade-A maple syrup function as a highly dense, sticky glue that holds the hydrated oats and chocolate chips together in a compact, unified sphere. Beyond their holding power, these natural syrups contribute subtle, complex flavor notes—such as the floral undertones of wild honey or the deep, woodsy profile of real maple—that far surpass the flat, aggressive sweetness of refined white sugar or corn syrup.
Complete Ingredients and Tools Checklist
Gather these essential kitchen staples before starting your mixing process. Keeping your workspace organized ensures a smooth, continuous workflow.
- 2 cups Old-Fashioned Rolled Oats: Fine or medium-rolled, yellow or white grain.
- 1 cup Creamy Natural Peanut Butter: Well-stirred, smooth, and pourable.
- 1/2 cup Pure Honey or Organic Maple Syrup: For natural sweetness and structural binding.
- 1/2 cup Mini Semi-Sweet or Dark Chocolate Chips: Mini chips are highly recommended because their smaller scale ensures even distribution throughout the dough matrix.
- 2 tablespoons Raw Cacao Powder or Unsweetened Cocoa Powder: For a deep, rustic dark chocolate baseline.
- 1 tablespoon Chia Seeds or Hemp Hearts (Optional): Adds a subtle, pleasant crunch alongside extra omega-3 fatty acids.
- 1/4 teaspoon Fine Sea Salt: Essential for cutting through the rich fats and elevating the natural chocolate tones.
- A Large Glass Mixing Bowl: To comfortably incorporate the sticky dough.
- A Sturdy Wooden Spoon or Silicone Spatula: For folding the dense ingredients.
- A 1-Tablespoon Cookie Scoop: To guarantee perfectly uniform, professional portions.
Step-by-Step Production and Rolling Protocol
The organization of your kitchen station is a vital factor when executing no-bake recipes. Maintaining a disciplined flow ensures that the dry powders dissolve perfectly into the wet binders without forming dry pockets or leaving a messy residue on your hands.
Step 1: Combining the Dry Elements
In your large glass mixing bowl, combine the old-fashioned rolled oats, mini chocolate chips, raw cacao powder, sea salt, and optional chia seeds. Use a dry whisk or fork to stir the dry components together for roughly thirty seconds. This pre-mixing phase is incredibly important because it ensures that the fine cocoa powder and salt are completely distributed through the coarse oat flakes before any wet binders are introduced. Skipping this step can lead to clumps of bitter, dry cocoa powder hiding inside your finished energy bites.
Step 2: Incorporating the Wet Binders
Pour your creamy natural peanut butter and liquid honey directly into the center of the dry oat mixture. Using a sturdy wooden spoon or a firm silicone spatula, begin folding the wet and dry elements together. Work from the bottom of the bowl upward, pressing the back of the spoon against the sides to force the peanut butter into the dry grain clusters. Because the dough will become incredibly thick, heavy, and dense as the oats drink up the liquid fats, continue mixing with firm, steady pressure until all traces of bare oats or dry cocoa powder completely disappear, leaving you with a uniform, sticky, and rich dark-brown dough matrix.
Step 3: The Mandatory 30-Minute Cold Rest
While it can be incredibly tempting to begin shaping your energy bites immediately, attempting to roll the fresh dough right out of the mixing bowl can be a messy, frustrating experience. The dough at this stage is highly viscous, warm from mixing, and will stick stubbornly to your fingers. To fix this, cover the bowl tightly with a sheet of plastic wrap and place it into your refrigerator for twenty to thirty minutes. This brief cold rest serves two crucial mechanical purposes: first, it gives the rolled oats time to absorb the ambient moisture from the honey, turning them wonderfully tender and chewy; second, it chills the natural oils inside the peanut butter, causing them to firm up slightly. This transforms a sticky, unmanageable batter into a firm, cohesive dough that shapes effortlessly.
Step 4: Measuring and Rolling with Precision
Retrieve your chilled dough from the refrigerator. Line a large baking sheet or wide storage container with a clean sheet of parchment paper to prevent any potential sticking. Using your 1-tablespoon cookie scoop, scoop up a level portion of the dough and drop it directly into the palm of your clean hand. Press your fingers together firmly two or three times to compress the oat layers, forcing out any internal air pockets that could cause the ball to split later. Gently roll the compressed dough between your palms in a steady, circular motion until it forms a perfectly smooth, solid, and pristine sphere. Arrange the completed energy bite on your prepared parchment paper, and repeat the process with the remaining dough until your batch is complete.
Creative Ingredient Substitutions and Variations
One of the greatest aspects of this recipe is its incredible versatility. You can easily adapt the foundational matrix to accommodate various dietary restrictions, allergies, or flavor preferences without sacrificing structural integrity.
Nut-Free Alternatives for School and Work Compatibility
If you need to prepare these snacks for a nut-free school environment, an office with strict allergy policies, or a household allergy, you can replace the peanut butter with equal success. High-quality sunflower seed butter (sunbutter) is an exceptional direct substitution that mirrors the fat content and binding viscosity of traditional peanut butter while introducing a delightful, earthy flavor profile. Soy-based butter alternatives or pumpkin seed butter also perform beautifully. When using seed butters, make sure to give the jar a thorough stir before measuring, as natural seed oils tend to separate quickly on the shelf.
Elevating the Nutritional Profile with Superfoods
If you want to maximize the functional wellness benefits of each bite, the dense oat matrix can easily support several powerful superfood additions. Beyond chia seeds and hemp hearts, you can incorporate two tablespoons of ground flaxseeds, which provide a rich source of lignans and dietary fiber. For an exotic twist, mix in dried goji berries, unsweetened shredded coconut flakes, or a scoop of your favorite plant-based chocolate protein powder. If you choose to add extra dry powders like protein powder, remember to add an extra tablespoon of peanut butter or a splash of almond milk to prevent the final dough from turning dry and chalky.
Long-Term Storage and Travel-Ready Maintenance
Because these homemade energy bites contain absolutely zero chemical preservatives, shelf-stabilizers, or synthetic shelf-life extenders, utilizing proper temperature control during storage keeps your snacks fresh, structural, and delicious for weeks.
Short-Term Refrigeration Protocol
Once your energy rounds are beautifully rolled and arranged on your parchment tray, place the entire container directly back into your refrigerator for at least one hour to allow them to complete their final setting phase. Transfer the firm spheres into an airtight glass storage container with a tight-fitting lid to prevent them from absorbing any unwanted food aromas from your fridge. If you need to stack the energy balls in multiple layers to save space, simply separate each layer with a small sheet of parchment paper to prevent them from fusing back into a single mass over time. Kept cold, they will stay perfectly fresh, structural, and spectacularly chewy for up to two full weeks.
Long-Term Freezer Preservation
For busy individuals who enjoy preparing large bulk batches weeks in advance to streamline their monthly wellness routine, these energy bites freeze exceptionally well with zero loss in quality. Place your parchment-lined tray of rolled balls directly into the deepest part of your freezer for two hours until they are frozen rock-solid. Once completely frozen, transfer the solid spheres into a heavy-duty, zip-top freezer bag, press out all excess air to prevent freezer burn, and seal it tightly. They can be safely frozen for up to three months. When a sudden snack craving strikes, simply pull a bite directly from the freezer; because of the high fat content within the peanut butter, they thaw to a perfect, soft, and chewy texture on your countertop in less than ten minutes.
Pack-and-Go Travel Safety
These energy bites are the ultimate clean fuel companion for long weekend hikes, intense gym sessions, road trips, or busy office workdays. When packing them for a day on the go, keep in mind that because they rely entirely on natural peanut butter oils to stay firm, they will naturally soften up if left in an intensely hot environment, such as a car dashboard or a backpack exposed to direct afternoon summer sun. For the absolute best on-the-go experience, pack your daily portion inside an insulated lunch bag with a small ice pack. This ensures they maintain that perfect, firm, and satisfyingly dense bite the exact second you need an energy boost.
Conclusion
Mastering the creation of perfect no-bake chocolate peanut butter energy bites is a magnificent validation of how a small handful of raw, unrefined pantry staples can be strategically organized to create an exceptional lifestyle asset. By respecting the natural emulsification boundaries of peanut butter lipids, utilizing natural syrups for viscous adhesion, and embracing the mandatory cold resting window, you eliminate all potential for a sticky or crumbly failure.
Whether you whip up a batch of these beautiful, dark-flecked rounds for a quick, family-friendly morning treat or use them as a reliable pre-workout fuel cell, this formula guarantees dependable success and immense satisfaction with every single bite. Gather your old-fashioned rolled oats, stir your natural peanut butter thoroughly, and enjoy the clean, incredibly rewarding process of crafting this ultimate whole-food comfort snack completely from scratch!