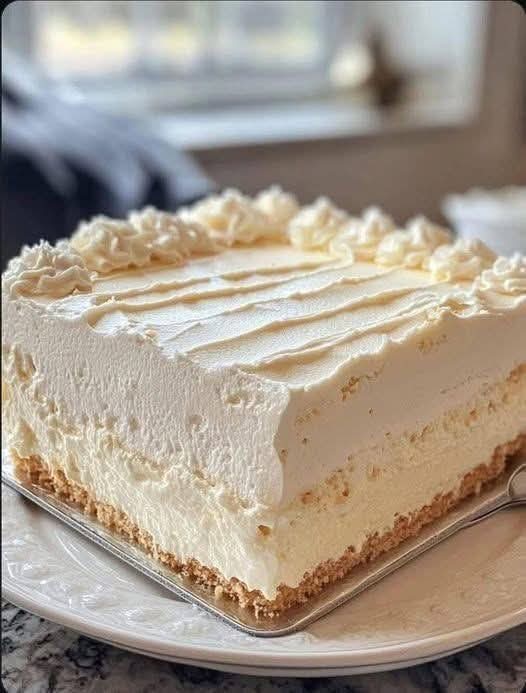
The Ultimate No Bake Vanilla Cream Cake A Masterclass in Effortless Dessert Elegance
When it comes to creating a show-stopping dessert, we often associate success with hours spent measuring flour, monitoring oven temperatures, and worrying about whether a sponge cake will rise or sink in the center. However, some of the most luxurious, crowd-pleasing confections require absolutely zero oven time. The classic no-bake vanilla cream cake stands as a triumphant testament to this fact. Boasting a beautifully structured, golden-brown biscuit crust, a thick, velvety layer of vanilla-infused cream filling, and a whimsical cloud of piped whipped cream on top, this dessert delivers a stunning multi-textured experience. It is rich yet remarkably light, making it the perfect centerpiece for elegant dinner parties, summer gatherings, or weekend family treats.
For digital publishers and home bakers alike, mastering this style of dessert is an absolute game-changer. It strips away the anxiety of traditional baking while leaning heavily into the architectural principles of pastry arts: balancing fats, textures, and temperatures to create a stable, sliceable masterpiece. In this ultimate long-form guide, we will break down the history and science behind no-bake cream cakes, provide a comprehensive ingredient blueprint, walk through a foolproof step-by-step assembly process, and share professional styling tips to ensure your cake looks like it emerged from a high-end boutique bakery.
The Architectural Appeal of No-Bake Desserts
The magic of a no-bake cream cake relies entirely on structural physics and temperature management rather than the chemical leavening and protein coagulation that occurs during oven baking. To appreciate this dessert, one must understand how three distinct layers work in tandem to create a harmonious bite.
Combining Comfort and Sophistication
No-bake desserts historically evolved from icebox cakes, which gained massive popularity in the early to mid-20th century as home refrigeration technology advanced. What started as a simple home-cook convenience trick—layering commercial cookies with whipped cream—has matured into a sophisticated culinary art form. Today’s vanilla cream cake takes those nostalgic flavor profiles and elevates them by using premium dairy, real vanilla bean infusions, and precise stabilization techniques. The result is a dessert that feels inherently comforting and nostalgic, yet presents itself with the clean lines and geometric perfection of a professional French entremet.
The Chemistry of the Chill
Without an oven to bake eggs or activate gluten, a no-bake cake relies on fat crystallization and protein stabilization to maintain its shape. When heavy cream is whipped, it traps tiny pockets of air, creating a stable foam. When this foam is folded into a base of softened cream cheese or mascarpone, the dense lipids of the cultured cheese provide a sturdy internal framework. As the assembled cake rests in the cold environment of a refrigerator, these fats solidify, cementing the structural integrity of the cream layer. This allows you to cut sharp, clean, geometric slices that hold their shape beautifully at room temperature, provided the balance of ingredients is precise.
Layer-by-Layer Structural Breakdown
To build a flawless no-bake vanilla cream cake, you must treat each layer as an individual component requiring specific attention to detail. Skipping steps or altering ratios within these layers can result in a crust that crumbles prematurely or a cream filling that slumps across the serving platter.
The Foundation: The Golden Biscuit Crust
Every great cake requires a reliable foundation. In this recipe, the crust provides a necessary textural contrast to the soft, ethereal cream layers above it. A perfect crust should be firm enough to support the weight of the cake and slice cleanly with a fork, yet tender enough to melt in your mouth without feeling unpleasantly hard or rocky. Achieving this balance depends entirely on the ratio of finely ground biscuit crumbs to melted unsalted butter. The butter acts as a liquid mortar; when chilled, it hardens completely, binding the dry crumbs together into a unified, moisture-resistant barrier that prevents the cream filling from making the base soggy.
The Core: The Velvety Vanilla Cream
The middle layer is the undeniable star of the show. It must be exceptionally smooth, free of graininess, and deeply fragrant. Rather than relying on standard artificial flavorings, a truly magnificent cream cake utilizes real vanilla bean paste or high-quality pure vanilla extract. This layer balances the dense, tangy richness of cream cheese or heavy cream with whipped air. To achieve the perfect sliceable consistency without relying heavily on gelatin, the dairy must be beaten to precise stages. The cream cheese must be thoroughly creamed to eliminate lumps before any liquids are introduced, ensuring a uniform, silk-like emulsion that feels incredibly luxurious on the palate.
The Crown: Piped Whipped Topping
The final touch is a decorative layer of stabilized whipped cream. As seen in professional presentations, simple dollops are replaced with elegant, structured piping that runs along the perimeter or covers the entire surface of the cake. This topping adds visual height and an extra element of lightness. Because standard whipped cream can weep, deflate, or separate over time, stabilizing this top layer with a touch of powdered sugar or a specialized whipping agent ensures that your decorative borders remain crisp, sharp, and pristine for days in the fridge.
Complete Ingredients and Substitution Guide
Before stepping into the kitchen, gathering premium ingredients is paramount. Because this recipe involves no cooking, the raw flavor of each component shines through clearly. Investing in high-quality dairy and vanilla will directly impact the final flavor profile of your dessert.
For the Crust Layer:
- 250 grams Graham Crackers or Digestive Biscuits: These provide a neutral, slightly nutty, and sweet base. You can substitute vanilla wafers or shortbread cookies for a richer flavor profile.
- 110 grams Unsalted Butter: Melted completely. Avoid salted butter unless you specifically desire a pronounced sweet-and-salty contrast.
For the Velvet Vanilla Cream Layer:
- 400 grams Full-Fat Cream Cheese: Must be brick-style cream cheese, completely softened to room temperature. Avoid low-fat or spreadable tub varieties, as their high water content will prevent the cake from setting firmly.
- 300 milliliters Heavy Whipping Cream: Cold, straight from the refrigerator, containing at least 36% to 40% milk fat to ensure a strong, stable whip.
- 120 grams Powdered Sugar: Sifted to prevent clumping. Powdered sugar is preferred over granulated sugar because it dissolves instantly into the cold dairy, leaving behind a flawless texture.
- 2 teaspoons Pure Vanilla Bean Paste: This provides a deep, authentic flavor and fills the white cream layer with beautiful, visible black vanilla bean specks. High-quality extract can be used as a secondary option.
For the Decorative Topping:
- 200 milliliters Heavy Whipping Cream: Kept ice-cold until the moment of preparation.
- 40 grams Powdered Sugar: To sweeten and subtly stabilize the foam.
- 1 teaspoon Pure Vanilla Extract: For a clean, aromatic finish.
Step-by-Step Assembly and Production Guide
Follow these precise chronological steps to build your no-bake masterpiece. For the best presentation, utilize an 8-inch or 9-inch square springform pan or a removable-bottom tart pan lined neatly with parchment paper along the base.
Step 1: Pulverizing and Compacting the Crust
Begin by transforming your chosen biscuits into a fine, uniform sand-like texture. Place the biscuits into a heavy-duty zip-top bag and crush them thoroughly using a rolling pin, or process them in a food processor for 1 minute. Transfer the fine crumbs into a large mixing bowl and pour the melted unsalted butter directly over them. Use a silicone spatula to stir the mixture until every single crumb is thoroughly hydrated and the texture resembles wet beach sand.
Dump the buttered crumbs into the bottom of your prepared pan. Use the flat bottom of a heavy glass cup or a metal measuring cup to press the crumbs down into an incredibly dense, flat, and even layer across the entire base of the pan. Pay close attention to the corners and edges, ensuring the crust is uniform in thickness. Once compacted, transfer the pan into the freezer for 15 minutes to allow the butter to lock the foundation into place.
Step 2: Emulsifying the Vanilla Cream Base
In a large mixing bowl, place your softened brick cream cheese and sifted powdered sugar. Using a hand mixer or a stand mixer fitted with the paddle attachment, beat the mixture on medium-high speed for 3 to 4 minutes. Stop the mixer occasionally to scrape down the sides of the bowl with a spatula. Continue mixing until the cream cheese is completely smooth, fluffy, and entirely free of tiny lumps. Stir in the vanilla bean paste until it is evenly distributed throughout the white base.
In a separate, chilled glass bowl, pour your cold heavy whipping cream. Use clean beaters to whip the cream on medium speed until it forms stiff, stable peaks. Be incredibly careful not to over-whip, or the cream will turn grainy and separate into butter. Once whipped, add one-third of the whipped cream to your cream cheese base, using a gentle folding motion with a spatula to lighten the mixture. Gradually fold in the remaining whipped cream in two separate batches, moving your spatula in a slow, circular, under-and-over motion until you are left with a uniform, voluminous, and velvety filling.
Step 3: Layering and the Stabilization Chill
Retrieve your chilled crust from the freezer. Spoon the fluffy vanilla cream filling directly over the hardened base, using a large offset spatula to spread the mixture into all four corners. Smooth the top surface of the cream until it is completely flat and level with the rim of your pan. Tap the pan firmly against your countertop two or three times to release any trapped air pockets within the filling.
Cover the pan loosely with plastic wrap, ensuring the wrap does not touch the smooth surface of the cream. Place the cake into the deepest part of your refrigerator and allow it to chill undisturbed for a minimum of 6 hours, though leaving it overnight is highly recommended. This extended chill time is non-negotiable; it gives the dairy fats ample time to undergo full crystallization, ensuring the cake stabilizes into a sturdy, sliceable consistency.
Step 4: Piping the Elegant Crown
Once the cake has fully set, prepare your decorative topping. In a chilled bowl, combine the remaining cold heavy cream, powdered sugar, and vanilla extract. Whip the mixture on medium speed until it achieves a sturdy, stiff peak consistency that holds its shape perfectly. Fit a pastry bag with a star tip (such as an open or closed star nozzle) and spoon the whipped topping into the bag.
Carefully remove the sides of your springform pan, using a warm knife slid along the perimeter to ensure a clean release if necessary. Gently pipe elegant rosettes, swirls, or textured ridges along the borders or completely covering the top surface of your cake, mimicking the structured design seen in luxury pastry shops. Keep the cake refrigerated until the exact moment of slicing and serving.
Professional Styling and Clean Slicing Secrets
To truly match user intent and deliver a flawless culinary presentation, your final product must look incredibly sharp and clean when sliced. Cutting through a dense cookie crust and a soft cream filling simultaneously can often cause the layers to smear if done incorrectly.
The Warm Knife Technique
To achieve the picture-perfect, geometric cross-sections shown in professional food photography, never use a dull or dry knife. Before making your first cut, fill a tall pitcher with hot water. Submerge a long, sharp chef’s knife into the water for 30 seconds to heat the metal blade. Wipe the blade completely dry with a clean kitchen towel, and slice straight down through the cake in one swift, confident motion.
Do not drag the knife back out through the top of the cake. Instead, pull the knife straight out horizontally through the bottom of the slice. Wipe the blade entirely clean of residual cream, submerge it back into the hot water, and repeat the process for every subsequent cut. This simple restaurant trick ensures that your white cream layers remain pristine and completely distinct from the biscuit base.
Conclusion
The classic no-bake vanilla cream cake is a spectacular validation of how simple, unrefined ingredients can be transformed through temperature and technique into a world-class dessert. By respecting the balance of fats within premium dairy, ensuring proper gluten-free compaction of your biscuit base, and allowing the cake the necessary time to crystallize and set within the cold environment of your refrigerator, you create an effortless masterpiece that easily rivals complex oven-baked pastries.
Whether you are preparing this elegant dessert to impress guests at a formal gathering or creating high-value content for an online culinary audience, this recipe delivers a perfect blend of simplicity, luxury, and reliable success. Gather your ingredients, prepare your pastry bags, and enjoy the smooth, rewarding process of crafting a flawless velvet cream cake entirely from scratch.