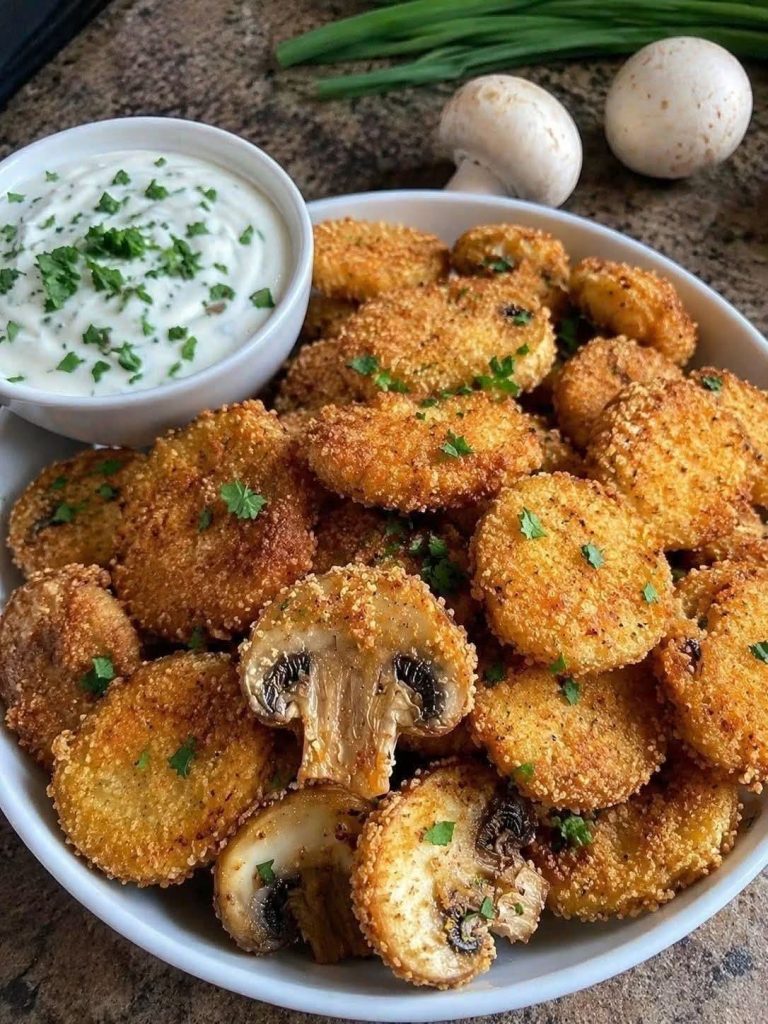
The Ultimate Guide to Crispy Garlic Herb Breaded Mushrooms A Culinary Masterclass in Crunchy Vegetarian Appetizers
There is an undeniable magic that happens when contrasting textures collide perfectly in a single bite. In the vast landscape of appetizers, few dishes achieve this sensory harmony as beautifully as a flawlessly executed crispy garlic herb breaded mushroom. The experience of biting through a shattered, golden-brown crust into a deeply savory, tender, and intensely juicy mushroom center is a universal crowd-pleaser. Whether you are seeking a standout vegetarian option for an elegant dinner party, an addictive game-day snack, or a high-performing recipe feature for a digital publishing platform, this dish represents the absolute pinnacle of comforting bistro-style finger foods.
While breading and frying vegetables might seem straightforward, achieving professional-grade results requires a firm grasp of culinary science and structural dynamics. Many home cooks struggle with soggy breading that detaches from the vegetable or mushrooms that absorb too much grease during the cooking process. This comprehensive, long-form guide provides an exhaustive look into the physics of moisture management, an unrefined whole-food ingredient blueprint, a meticulous step-by-step production protocol, and advanced cooking methodologies to ensure your breaded mushrooms turn out phenomenally crisp, structurally sound, and bursting with aromatic flavor every single time.
The Science of the Perfect Crunch: Overcoming Moisture Obstacles
To consistently produce a restaurant-quality crunch, one must first understand the unique cellular biology of the mushroom. Unlike starchy root vegetables or dense proteins, mushrooms possess a highly delicate cellular matrix that requires deliberate handling to prevent structural failure during thermal processing.
Managing the High Water Content of Fungi
Mushrooms are fundamentally biological sponges, composed of approximately 90% water within their structural walls. When exposed to heat, these cellular walls collapse rapidly, releasing internal moisture at an accelerated rate. If this moisture is not carefully managed or trapped, it will migrate outward into your breading layer. This creates a pocket of trapped steam between the mushroom surface and the crust, resulting in a soggy, rubbery jacket that slides off the moment you take a bite.
To overcome this natural obstacle, the exterior surface of the fungi must be completely dehydrated before any coatings are applied. This is why washing mushrooms by submerging them in water is a catastrophic mistake in pastry and frying disciplines; the porous tissue will eagerly drink up additional liquid, making a truly crispy crust structurally impossible to achieve.
The Structural Mechanics of the Standard Breading Procedure
The defense against internal steam migration relies entirely on the Standard Breading Procedure (SBP). This time-tested three-stage coating system establishes sequential chemical and physical barriers that preserve the integrity of the appetizer:
The Starchy Primer (Flour): The first step involves tossing the dry vegetable slices in a well-seasoned flour mixture. The fine starch particles absorb any immediate surface moisture and create a rough, microscopic primer coat. This layer provides the essential grip required for the subsequent liquid binder to adhere uniformly without pooling.
The Proteinaceous Glue (Egg Wash): The floured mushroom is then submerged in a thoroughly whisked egg wash. The proteins within the egg white and yolk—primarily albumin and lecithin—act as a highly effective, natural liquid adhesive. When heated, these proteins undergo rapid coagulation, transforming from a liquid into a firm, solid structural matrix that locks onto the starchy primer.
The Crispy Armor (Breadcrumbs): Finally, the wet, egg-coated mushroom is pressed firmly into a bed of fine or coarse breadcrumbs. The breadcrumbs form the outermost structural barrier. When introduced to hot cooking oil, the minimal moisture present within the outermost crumbs evaporates instantly, causing the starches to polymerize and harden into a rigid, shattered shield before the internal juices of the mushroom have a chance to migrate outward.
Selecting the Ideal Fungi: Variety and Prep Dynamics
Not all mushrooms are created equal when it comes to breading and frying. Selecting the appropriate variety and prepping it with geometric precision directly influences the final presentation and textural contrast.
White Button vs. Cremini Mushrooms
For the absolute best results, classic White Button mushrooms or Cremini (Baby Bella) mushrooms are the gold standards. White Button mushrooms offer a clean, subtle, and neutral earthy canvas that allows the bold profiles of garlic, onion, and herbs in the crust to shine brightly. Cremini mushrooms, on the other hand, are slightly more mature and possess a denser cellular structure with a deeper, woodsy, and distinctly savory umami profile. Both varieties hold up exceptionally well under high frying temperatures without breaking down into a mushy consistency.
Trimming and Geometric Slicing Strategies
The visual appeal of your final dish depends greatly on how the mushrooms are portioned. While some traditional recipes call for breading whole mushroom caps, slicing them into uniform rounds provides a vastly superior surface-area-to-volume ratio. This ensures that every single bite delivers an equal balance of crunchy crust and juicy interior.
Begin by wiping the mushroom caps clean using a slightly damp paper towel or a dedicated soft bristle vegetable brush to remove any lingering growing medium or debris. Avoid running them under a faucet. Use a sharp utility knife to trim away the very dried tip of the stem, but leave the rest of the stem intact, as it provides a beautiful, iconic silhouette when sliced. Slice the mushrooms vertically from cap to stem into thick, uniform rounds measuring precisely 1/4-inch in thickness. Slicing them too thin will cause them to shrivel up and vanish inside the crust during frying, while slicing them too thick will result in an undercooked, unpleasantly spongy center.
Complete Ingredients and Substitution Blueprint
To create a flawless culinary masterpiece, gathering premium, unrefined dry goods and fresh dairy elements is paramount. Balancing the seasonings across every layer ensures that the final appetizer tastes sophisticated and deeply seasoned throughout.
The Mushroom and Primer Elements
- 500 grams fresh White Button or Cremini mushrooms, wiped clean and sliced uniformly.
- 1/2 cup all-purpose white flour, sifted to ensure a completely smooth application.
- 1/2 teaspoon fine sea salt and 1/4 teaspoon freshly cracked black pepper, mixed directly into the flour primer.
The Coagulating Binder and Aromatic Crust
- 2 large farm-fresh eggs, beaten vigorously with 1 tablespoon of cold water to thin out stringy chalazae.
- 1 1/2 cups fine dry breadcrumbs or Panko crumbs. Fine breadcrumbs offer complete, velvet-like structural coverage, whereas Panko provides an exceptionally airy, jagged, and dramatic crunch. A 50/50 blend of both creates an incredible hybrid texture.
- 1 teaspoon high-quality garlic powder, providing a pungent, sweet savory backbone.
- 1 teaspoon onion powder, adding a subtle depth of background flavor.
- 1 teaspoon dried oregano or crushed Italian seasoning, introducing classic Mediterranean herbal aromatics.
- 1/2 teaspoon smoked paprika, offering a gorgeous golden color enhancement and a whisper of woodsmoke.
The Frying Medium
- 2 to 3 cups high-smoke-point vegetable oil. Avoid extra virgin olive oil or unrefined butter for deep or shallow frying, as their low smoke points will cause them to burn, turn bitter, and degrade well before the mushrooms are properly cooked. Opt instead for refined canola, sunflower, corn, or peanut oil.
Step-by-Step Production and Coating Protocol
The organization of your kitchen workspace is a vital factor when executing the Standard Breading Procedure. Maintaining a disciplined “dry hand, wet hand” technique prevents your fingers from becoming heavily coated in thick batter, keeping the process clean and efficient.
Step 1: Organizing the Coating Assembly Line
Line up three wide, shallow bowls or rimmed baking dishes in a strict left-to-right sequence on your clean countertop. In the first bowl, combine the all-purpose flour, sea salt, and black pepper, stirring with a fork to distribute the seasoning. In the second bowl, vigorously whisk the two large eggs and water until completely uniform and fluid. In the third bowl, thoroughly mix the breadcrumbs, garlic powder, onion powder, dried oregano, and smoked paprika until the dry herbs are beautifully speckled throughout the crumb matrix. Place a clean wire cooling rack over a baking sheet at the far right of your line to receive the finished pieces.
Step 2: Executing the Mechanical Coating
Using your designated left hand (the “dry hand”), take a thick mushroom slice and drop it into the first bowl. Toss it gently until every side is completely dusted in flour, then tap the slice against the edge of the bowl to shake away any loose, excess starch. Drop the floured slice into the second bowl containing the egg wash.
Switch to your right hand (the “wet hand”) to submerge the mushroom completely, ensuring the liquid coats every single nook and cranny. Lift the mushroom out, allowing any stream of excess egg to drip back into the bowl for a few seconds. Drop the wet mushroom into the third bowl containing the seasoned breadcrumbs. Switch back to your dry left hand to scoop a generous amount of breadcrumbs over the top of the mushroom. Press down firmly with the flats of your fingers to anchor the crumbs securely into the coagulating egg layer. Lift the perfectly jacketed mushroom slice and place it onto the wire cooling rack. Repeat this exact rhythm for the remaining slices.
Step 3: The Crucial Structural Rest Period
Once all of your mushroom slices are beautifully breaded, leave them undisturbed on the wire rack at room temperature for 5 to 10 minutes before introducing them to hot oil. This brief resting window is a vital secret of professional pastry chefs. It allows the dry starches in the breadcrumbs to absorb residual moisture from the egg wash, hydrating the proteins and creating a tighter, more cohesive bond. This structural setting period guarantees that the breading will remain locked securely onto the mushroom during the energetic bubbling of the frying process.
Advanced Cooking Methods: Frying, Baking, and Air-Fryer Mastery
Depending on your lifestyle preferences, equipment availability, or specific digital content strategy, this versatile appetizer can be prepared using three distinct thermal processing methods, each yielding an exceptional outcome.
Method 1: The Traditional Pan-Frying Technique (Bistro Style)
To achieve the luxurious, deeply golden finish characteristic of traditional European bistros, shallow pan-frying is unmatched. Pour your high-smoke-point vegetable oil into a heavy-bottomed cast-iron skillet or deep non-stick frying pan until it reaches a depth of roughly 1 inch. Place the pan over medium-high heat and monitor it carefully until the oil temperature reaches a steady 180°C (350°F). If you do not possess a digital culinary thermometer, simply drop a single pinch of dry breadcrumbs into the oil; if they sizzle immediately and float to the surface without turning black, the oil is ready.
Carefully lower the breaded mushroom slices into the hot oil in a single, organized layer. It is absolutely paramount that you do not overcrowd the pan; frying too many pieces simultaneously will cause the oil temperature to plummet, forcing the breading to absorb grease rather than crisping up. Fry the slices for 2 to 3 minutes on the first side until they are a deep, uniform golden-brown. Use a slotted spoon or metal tongs to gently flip each slice over, cooking for an additional 2 minutes on the second side. Transfer the sizzling mushrooms to a plate lined with heavy paper towels to drain any pooling surface oil, and immediately dust them with a tiny pinch of flaky sea salt while they are still piping hot.
Method 2: The Modern Air-Fryer Approach (Health-Conscious)
For an incredibly light, oil-free alternative that still delivers an exceptional crunch, the modern air fryer is an indispensable tool. Arrange your breaded mushroom slices in a single, flat layer inside the air fryer basket, ensuring they do not overlap or touch, which would trap steam and create soft spots.
Lightly mist the tops of the mushrooms with a high-quality olive oil or canola oil cooking spray to facilitate beautiful browning. Set the air fryer to 200°C (400°F) and cook for 8 to 10 minutes in total. At the 5-minute mark, pull the basket out, gently flip each mushroom slice over, apply another very light mist of cooking spray, and slide the basket back in to finish crisping. The intense, localized convection air currents will dry out the outer crumb layer with incredible speed, delivering a spectacular result with a fraction of the traditional fat content.
Method 3: Oven-Baked Precision (High Volume)
When preparing a massive batch of appetizers for a large holiday gathering, oven baking provides a seamless, stress-free production flow. Preheat your oven to 200°C (400°F) and line a massive baking sheet with a sheet of premium parchment paper. Lightly brush or spray the parchment with oil.
Arrange the breaded mushrooms across the tray, leaving at least half an inch of space between each piece to ensure optimal hot air circulation. Bake for 15 to 18 minutes, rotating the baking sheet halfway through the cooking time, until the crust is beautifully bronzed and completely rigid. This method keeps your stovetop completely clear and allows you to serve a large crowd all at once.
Crafting the Ultimate Creamy Garlic Herb Dipping Sauce
An exceptional fried appetizer is only as good as the sauce that accompanies it. Because breaded mushrooms are naturally rich, earthy, and warm, pairing them with an icy-cold, highly acidic, and creamy dipping sauce creates an incredible culinary counterweight that refreshes the palate between bites.
The Tangy Emulsion Formula
In a medium-sized ceramic serving bowl, combine 1/2 cup of full-fat sour cream (or thick, strained unsweetened Greek yogurt for a protein boost) with 1/4 cup of premium mayonnaise. The mayonnaise provides a silky, luxurious mouthfeel, while the sour cream delivers a sharp, clean lactic acidity. Grate one large clove of fresh garlic directly into the dairy base using a microplane, ensuring the garlic is pulverized into a smooth paste to avoid unpleasant raw chunks.
Incorporating Fresh Botanicals
To elevate the sauce into something truly memorable, finely mince 1 tablespoon of fresh flat-leaf parsley and fresh chives, folding them gently into the white cream base along with 1 teaspoon of freshly squeezed lemon juice and a pinch of fine salt. The bright, grassy notes of the fresh herbs and the clean citric punch of the lemon slice effortlessly cut through the rich oils of the crunchy mushroom crust. Cover the bowl with plastic wrap and place it into the deepest part of your refrigerator for at least 30 minutes before serving. Serving this sauce ice-cold next to piping-hot mushrooms creates a sensational temperature contrast that guests will absolutely rave about.
Comprehensive Troubleshooting and Maintenance Guide
Even seasoned culinary enthusiasts encounter unexpected variables in the kitchen. Having a clear understanding of how to read and correct your cooking environment ensures absolute consistency.
Diagnosing Breading Separation
If you find that your beautiful breaded jacket is bubbling up and peeling away from the mushroom during frying, it is generally caused by one of two specific errors. First, the mushroom may have been too wet before entering the flour bowl, creating a slimy water barrier underneath the starch. Ensure you wipe your fungi thoroughly with dry towels. Second, you may have skipped the vital 5-to-10-minute structural rest period on the wire rack, denying the egg proteins the time they need to cross-link and lock onto the starches.
Managing Oil Temperature Fluctuations
If your mushrooms are turning out excessively greasy, dark, or soggy, your stove heat requires calibration. When oil is too cold (below 170°C), the breadcrumbs cannot instantly seal, causing the cooking fat to seep deeply into the mushroom tissue and creating a heavy, oily mess. Conversely, if your oil is too hot (above 195°C), the outer breadcrumbs will burn to a bitter charcoal color before the interior mushroom has a chance to heat through and soften. Always work in controlled batches and allow the oil 1 minute to return to its optimal heat level between frying rounds.
Storing, Freezing, and Reheating Instructions
While fried appetizers are undeniably at their absolute zenith the exact second they emerge from the cooking medium, you can safely preserve and refresh leftovers with zero loss in quality if you avoid common mistakes.
Short-Term Refrigeration
Allow any leftover cooked mushrooms to cool down completely to room temperature on a clean wire rack to prevent steam condensation from pooling underneath them. Line an airtight glass storage container with a dry paper towel, arrange the mushrooms in a single layer, and seal the lid tightly. They can be safely refrigerated for up to 2 days.
When it is time to reheat, never use a microwave, as it will instantly superheat the internal moisture of the fungi, turning your beautifully engineered crust into a soft, rubbery, and unappealing mess. Instead, arrange the pieces on a baking tray and place them into a 180°C (350°F) oven or air fryer for 4 to 6 minutes until you see the surface oils beginning to sizzle and crisp up once again.
Long-Term Freezer Meal Prep
If you want to prepare this appetizer weeks in advance, you can successfully freeze them before the frying stage. Arrange your freshly breaded, uncooked mushroom slices in a single layer on a parchment-lined baking sheet and place the entire tray flat into your freezer for 2 hours. This flash-freezing technique locks the structural moisture in place individually, preventing the pieces from fusing together into a solid block.
Once frozen solid, transfer the rigid mushroom slices into a heavy-duty freezer bag, remove any excess air, and store them for up to 2 months. When a sudden craving strikes, there is no need to thaw them; simply drop the frozen mushroom slices directly into your preheated 180°C oil or air fryer, adding an extra 60 to 90 seconds to the total cooking time to account for the frozen core.
Conclusion
The creation of perfect crispy garlic herb breaded mushrooms is a magnificent validation of how mastering basic structural techniques can completely elevate everyday garden ingredients into a world-class culinary experience. By understanding the sponge-like nature of fungi, respecting the three-step mechanics of the Standard Breading Procedure, and maintaining precise control over your cooking temperatures, you remove all guesswork from the kitchen.
Whether you choose to shallow-fry them for a classic bistro flair, air-fry them for a modern health-conscious twist, or bake them to feed a large gathering of loved ones, this recipe promises an unyielding, spectacular crunch that contrasts beautifully with a succulent, savory core. Gather your fresh button mushrooms, set up your coating assembly line with care, and enjoy the immensely rewarding and delicious process of crafting this ultimate crispy vegetarian appetizer entirely from scratch.